Defining Parameters in the Bounce Window
After routing channel strips to an output (see Routing Channel Strips to an Output) and defining a bounce range (see Defining the Bounce Range), you should define the bounce parameters in the Bounce window.
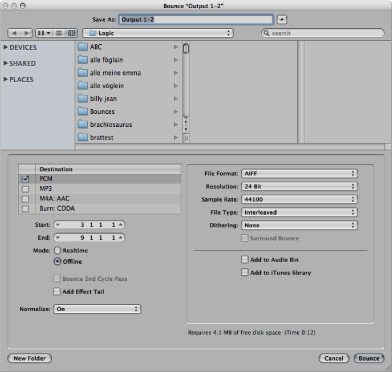
Choose File > Bounce from the main menu bar to bounce output channel strips 1 and 2.
Click the Bounce button on the relevant output channel strip.
Setting Global Parameters in the Bounce Window
Several global options are available in the Bounce window, regardless of the file types being bounced.

- Destination pane: You activate an option in the Destination pane by clicking its name and selecting its checkbox. You can select multiple checkboxes, if you like. If you do so, multiple files are created, with the appropriate file extension: filename.aif, filename.mp3, filename.m4a. You can choose from several destination file formats for your audio bounce:
PCM file (SDII, AIFF, (Broadcast) Wave, or CAF format)
MP3 file
M4A: AAC file
Burn: CDDA file
If you click the Destination file format name, rather than select the file format checkbox, you can set a number of preferences in the area to the right (preferences change based on your chosen Destination file format). For example:
- PCM, MP3, and M4A: AAC files can be individually bounced and added to the iTunes library if the “Add to iTunes library” checkbox is selected (for each format).
- PCM files in SDII, AIFF, Wave, or CAF format: Can be added to the Audio Bin if the “Add to Audio Bin” checkbox is selected.
- Start and End fields: These fields define the boundaries of the project segment that you want to write to the bounce file. The defaults for these fields are set in the following way:
If the Cycle function is engaged, the boundaries are set to the locator positions.
If a selection is made in the Arrange window, the boundaries are set to the selected area.
If neither of the above is valid, the boundaries encompass the entire Logic Pro project.
In any case, you can adjust the start and end positions manually—for example, if you want to take into account a MIDI sound module (mixed via an aux channel strip) that falls outside the bounce start and end positions.
Tip: It’s often a good idea to set the end position of the bounce a little bit past the end of the last region. This ensures that reverb tails and echoes from delay plug-ins are not chopped off. The amount of extra time needed depends on the effect settings used.
As you adjust the Start and End position parameters, you are shown the hard disk space requirements for the bounced file above the Cancel and Bounce (Bounce & Burn) buttons.
- (Bounce) Mode buttons: You can create the bounce file in real time or offline:
- Offline: Accelerates the bounce process, depending on the complexity of your arrangement and available system processing power. This setting also allows you to bounce arrangements that would normally exceed the processing power of your system, if trying to play them in real time. Offline bouncing is limited to internal sources (audio or instrument tracks). External MIDI tracks and audio channel inputs are deactivated during offline bounces. The Offline Bounce mode is only available to the output channels of devices that use native audio driver systems (Core Audio). DSP-based audio hardware cannot make use of offline bouncing due to the nature of its stream-oriented technology. (In other words, these devices only work in real time.) Other software applications that are fed into your Logic Pro Mixer via ReWire can be bounced offline.
- Normalize pop-up menu: You can choose between the following three states:
- Off: Normalization is turned off.
- Overload Protection Only: Downward normalization takes place in case of overloads (levels above 0 dB, which would lead to clipping), but no normalization takes place for lower levels.
- On: The incoming audio is scanned for the highest amplitude peak. The level of this peak is increased to the maximum possible level (without clipping), and all other incoming audio is increased by this amount.
Setting PCM Options in the Bounce Window
Click the PCM name and select its checkbox in the Destination pane to access the following options:
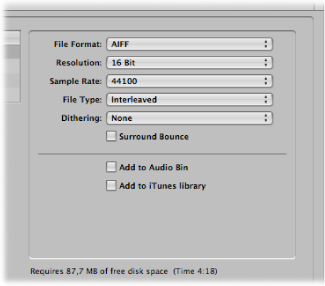
- Surround Bounce checkbox: Select this checkbox to bounce all outputs in the project surround format (File > Project Settings > Audio > Surround Format).
Each surround channel is bounced to a separate file.
All surround outputs are bounced simultaneously, regardless of which output channel’s Bounce button is clicked (or if the Bounce window was opened via File > Bounce).
The Logic Pro > Preferences > Audio > I/O Assignments pane gives you access to the surround settings.
You can determine the stereo and surround output formats in the Output pane.
The Bounce Extensions pane displays the extensions that are added to the filenames resulting from a stereo or surround bounce. Click the various fields to edit the extensions.
You can determine the stereo and surround input formats in the Input pane.
Note: Selecting the Surround Bounce option deselects the MP3, M4A: AAC, and Burn checkboxes in the Destination pane (following a warning message).
Setting MP3 Options in the Bounce Window
Logic Pro allows the bouncing of MP3 (MPEG-2, Audio Layer 3) format files. This well-known data reduction format for digital audio signals was developed by the Fraunhofer Institute, and allows high compression rates while maintaining reasonable audio quality (depending on the compression rate). MP3 is a widely used standard for audio file exchange via the Internet.
Because encoding an MP3 file equates to a loss of audio quality, you should not use MP3 files during production if you have access to the same audio data in linear formats such as AIFF, WAV, or SDII.
Bounced PCM files are also used for encoding to MP3/M4A: AAC. Note that this occurs before dithering takes place.
Note: If the selected sample rate is higher than 48 kHz, a temporary copy of the bounced PCM file is created (with an automatic sample rate conversion to 48 kHz) before encoding. This conversion takes place because the MP3 format does not support sampling rates higher than 48 kHz.
If the PCM option is unselected in the Destination pane, a temporary PCM file is bounced as a source for encoding to MP3/M4A: AAC or burning to a CD, according to the options selected in the PCM pane.
Selecting the MP3 option in the Destination pane automatically disables the PCM > Surround option (following a warning message). This is because the MP3 format does not support surround. Split Stereo format is, however, possible, even if the encoded MP3 file is set to Joint Stereo mode.
Select the MP3 name (and select its checkbox) in the Destination pane to access the following options:
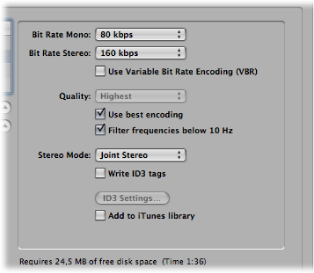
- Bit Rate (Mono/Stereo) pop-up menus: MP3 bit rates are available between 32 kbps and 320 kbps, but default to 80 kbps mono, and 160 kbps stereo. These rates offer acceptable quality and good file compression.
To enhance audio quality, provided you can afford the extra file size, choose:
96 kbps for mono streams
192 kbps for stereo streams
You can choose higher rates, but the quality improvement afforded by bit rates above 96/192 kbps is nominal.
- Use Variable Bit Rate Encoding (VBR) checkbox: Variable Bit Rate encoding compresses simpler passages more heavily than passages that are (more) harmonically rich, generally resulting in better-quality MP3 files.
Unfortunately, not all MP3 players can accurately decode VBR-encoded MP3s, which is why this option is turned off by default. If you know that your target listeners can decode VBR-encoded MP3s, you can turn this option on.
- “Filter frequencies below 10 Hz” checkbox: When this option is selected (the default), frequencies below 10 Hz (which are usually not reproduced by speakers, and are not audible to human ears at any rate) are removed. This leaves slightly more data bandwidth for the frequencies that are audible, resulting in an improvement of the perceived quality. Only deselect this option if you’re experimenting with subsonic test tones.
- ID3 Settings button: Click this button to open a dialog where you can edit and configure ID3 tags.
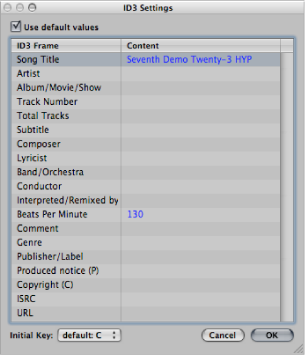
All entries are made by double-clicking the Content column fields to the right of the corresponding ID3 Frame column entry, and typing in your text.
Select the “Use default values” checkbox to display default settings for certain Content column entries. For example, the Project Title and Tempo (Beats Per Minute) are automatically filled in.
Selecting the “Use default values” checkbox also sets the Initial Key pop-up menu to the first entry shown in the global Signature track. This is “default: C” if no key has been set for the project. You can choose another key from the menu.
Setting M4A: AAC Format Options in the Bounce Window
Click the M4A: AAC name and select its checkbox in the Destination pane to access the following options:
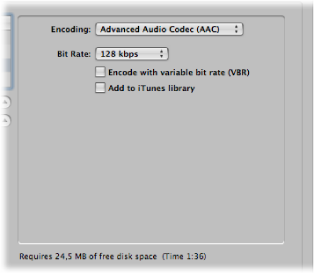
- “Encode with variable bit rate (VBR)” checkbox: Variable Bit Rate encoding compresses simpler passages more heavily than passages that are (more) harmonically rich, generally resulting in better-quality files.
Unfortunately, not all media players can accurately decode VBR-encoded files, which is why this option is turned off by default. If you know that your target listeners can decode VBR-encoded files, you can turn this option on.
Note: This parameter is only available when the AAC codec is chosen.
- “Add to iTunes library” checkbox: Adds the encoded file to the iTunes library.
Choosing the M4A: AAC option in the Destination pane disables PCM > Surround (following a warning message). Split Stereo is, however, possible.
If the selected sample rate is higher than 48 kHz, a copy of the bounced PCM file is created (with an automatic sample rate conversion to 48 kHz) before encoding. This conversion takes place because the M4A: AAC format does not support sampling rates higher than 48 kHz.
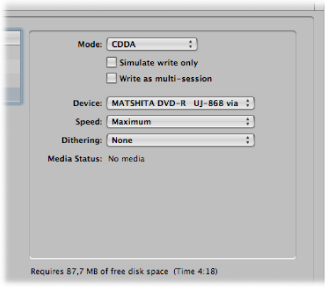
Setting Burn Options in the Bounce Window
Choose the Burn: (CDDA or DVDA) name (and select its checkbox) in the Destination pane to access the following options:
Logic Pro can directly burn Red Book audio to blank CDs or DVD-Audio to blank DVDs.
- When CDDA is chosen: If the selected sample rate (chosen in the PCM pane) is higher than 44.1 kHz, a copy of the bounced PCM file is created (with an automatic sample rate conversion to 44.1 kHz) before encoding. This conversion takes place because the CD Audio format (Red Book) does not support sampling rates higher than 44.1 kHz.
- When DVDA is chosen: Any sample rate up to 192 kHz can be used for stereo files, and up to 48 kHz for surround files.
Note: Enabling the Burn option automatically disables the PCM > Surround and Split Stereo options (following a warning message). This is because CD or DVD-Audio only makes use of interleaved stereo files.
The “Simulate write only” option, as the name suggests, simulates a CD/DVD burn, but does not write data to the blank media. This can be used either alone or in conjunction with the “Write as multi session” option (if burning a CD).
The “Write as multi session” option is only available when CDDA is chosen in the Mode pop-up menu. This option allows you to add a data session to the same CD at a later date—to add the project folder, for example.
This pop-up menu allows you to choose between any recognized CD/DVD burners connected to your system.
Note: If your system contains multiple burners, the first one detected is chosen as the default.
The first time you use the Speed pop-up menu, a request is made to the burning mechanism, which may take a while. Once the scan is complete, you can choose from the available speeds.
The Dithering pop-up menu is only available when CDDA is chosen in the Mode pop-up menu. Use of the Dithering parameter is recommended when bouncing 24-bit recordings into 16-bit files.
Note: If you attempt to switch the PCM Resolution to 16 Bit when in DVDA Burn Mode, DVD burning is automatically disabled (following a warning).
Clicking the Bounce & Burn button initiates the bounce, and burns the audio to a CD or DVD.
Note: Following confirmation of the file location(s), you may see further dialogs that ask if you want to overwrite existing files. Use these as necessary.
The Media Status field indicates the type of media chosen in the Device pop-up menu.
The field below indicates the current PCM pane settings (if applicable).
A further field, above the Cancel and Bounce & Burn buttons, indicates the amount of disk space required, and the time (length, shown in hours, minutes, and seconds) of the bounce area.
Note: You cannot directly alter any information shown in these areas.