Customizing the Mixer
You can customize the Mixer in a number of ways to suit your own mixing needs.
You can switch the Mixer between three different views, and refine these views even further using Filter buttons. You can also view each of the following: Mixer channel strips associated with folder tracks, track notes associated with Mixer channel strips, and control surface bars.
Switching Between Mixer Views
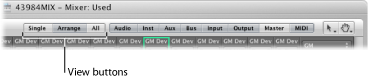
You can choose between three different Mixer views: Single, Arrange, and All. These views allow you to restrict the Mixer to display only those channel strips that you actually need for the current mixing task. This accelerates and simplifies your workflow.
Click the Single, Arrange, or All button in the Mixer’s menu bar (or use the Cycle Through Mixer Modes key command).
Using Single View
Single view limits the Mixer display to a single channel strip—the track selected in the Arrange area—and its signal flow.
The signal flow may contain some or all of the following, laid out from left to right:
The original channel strip assigned to the selected Arrange area track
Aux channel strips—used for individual output signals of multi-output instruments—shown to the right of the instrument channel strip, and in ascending order
Aux channel strips—used as send destinations for the original channel strip—shown in ascending order
Output channel strips—used as a routing destination for the original channel strip (or for other displayed channel strips)—shown in ascending order
The master channel strip
Using Arrange View
In Arrange view, the Mixer displays all channel strips that correspond to tracks—audio, instrument, or external MIDI—used in the Arrange window, and their signal flow.
Note: The signal flow is visible only if the Add Signal Flow Channel Strips command is chosen from the Mixer’s View menu.
The entire signal flow is laid out from left to right, as follows:
All channel strips that are assigned to Arrange area tracks, shown in ascending order
Aux channel strips—used for individual output signals of multi-output instruments—shown to the right of the instrument channel strip, and in ascending order
Aux channel strips—used as send destinations for all channel strips (or for other displayed aux channel strips)—shown in ascending order
Output channel strips—used as a routing destination for all channel strips in the Mixer—shown in ascending order
The master channel strip
You can choose the following two items from the Mixer’s View menu to further refine the Arrange view:
- Other Tracks: Enable to show (or disable to filter) track channel strips that do not offer any mixing parameters, such as volume or pan control. These other tracks include the No Output and Metronome tracks. This is useful for setting the level and routing assignment for the Metronome. (The latter option is handy if you need to provide a click track to a specific output—for a musician or for purposes of synchronization.)
- Same Instrument Tracks: Enable to show (or disable to filter) Arrange window tracks that address the same instrument channel strip. These tracks have redundant settings for volume, pan, and so on—because they address the same channel strip—so it’s usually unnecessary to display more than one channel strip for each track.
Using All View
In All view, the Mixer displays all channel strips available in the project, including those that don’t have a corresponding track in the Arrange area.
Aux and output channel strips are examples of channel strips that don’t have a corresponding track in the Arrange area. You can, however, create tracks for such channel strips.
In the Mixer, choose Options > “Create Arrange Tracks for Selected Channel Strips.”
Note: This function cannot be used to duplicate Arrange tracks. If the selected channel strip is already available as an Arrange track, the Arrange track will be selected and shown in the visible window area.
Using Filter Buttons in the Mixer
You can use the channel strip filter buttons in conjunction with the Arrange and All views to refine the Mixer display even further. These filter buttons enable you to limit the Mixer’s display to particular channel strip types.
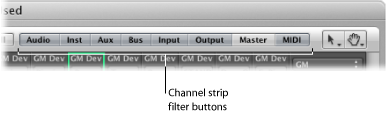
You can use different filter button settings for both views:
Click a button to enable or disable the view of this channel strip type.
Option-click a button to enable it, and to disable all other buttons (all other channel strip types).
Viewing Mixer Channel Strips Associated with Folder Tracks
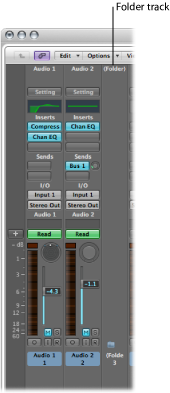
If the Arrange area contains a folder track, this folder track is displayed in the Mixer.
Note: To view channel strips associated with folder tracks, make sure Folder Tracks is chosen in the Mixer’s View menu.
Double-click the folder track in the Mixer.
Double-click the folder region in the Arrange area.
Select the folder, then use the “Go Into Folder or Region” key command.
The Mixer now displays only those channel strips that are in the folder track.
Click the Hierarchy button at the left side of the Mixer.
Click the Hierarchy button at the left side of the Arrange area.
Double-click the Arrange area background (or use the “Go Out of Folder or Region” key command).
The Mixer now displays all the channel strips in the Arrange area, including the folder track.
Viewing Track Notes in the Mixer
Track-specific notes can be viewed, created, and edited in the Mixer area, as well as in the Notes area (see Working in the Notes Area).
Unlike track notes in the Notes area, however, track notes in the Mixer area cannot be changed in regard to formatting. And only the first line of text from a track note in the Notes area is displayed in the Mixer area. You cannot view or edit any text after the first line break.
Choose View > Notes.
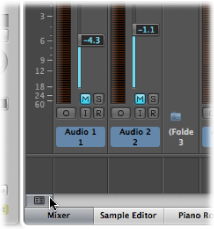
Click the Notes button at the bottom left of the Mixer area.
Control-click (or right-click) the Mixer area, and choose Notes from the shortcut menu.
The Notes area is displayed at the bottom of the Mixer and can be enlarged by dragging the dividing line between the Notes area and the channel strips.
Double-click the Notes area at the bottom of the Mixer, and edit, delete, or create text.
The track notes in the Notes area are also updated accordingly.
Viewing Control Surface Bars in the Mixer
You can view which tracks are accessed by control surfaces connected to your system.
Choose View > Control Surface Bars.
Each control surface can be assigned a different color in the Device Parameter box. For more information, see the Logic Pro Control Surfaces Support manual.
Using Link Modes in the Mixer
The Link mode options—No Link, Same Level Link, and Content Link—allow you to define how information is displayed in the Mixer when working with folder tracks in the Arrange area.
Control-click (or right-click) the Link button in the Mixer, then choose the mode you want from the shortcut menu:
- No Link: The Mixer does not follow display level changes when selecting, entering, or exiting folder tracks in the Arrange area.
- Same Level Link: The Mixer follows display level changes when selecting, entering, or exiting folder tracks in the Arrange area.
- Content Link: The Mixer displays the track list inside a folder when selecting a folder track in the Arrange area.