Setting Up the Metronome for Recording
If you would like to hear the metronome—which makes a regular click—while recording, you can set this up in the Metronome project settings window.
Choose File > Project Settings > Metronome (or use the Open Metronome Project Settings key command).
Click the Settings button in the Arrange toolbar, and choose Metronome from the pop-up menu.
Control-click (or right-click) the Metronome button in the Transport bar, and choose Metronome Settings from the pop-up menu.
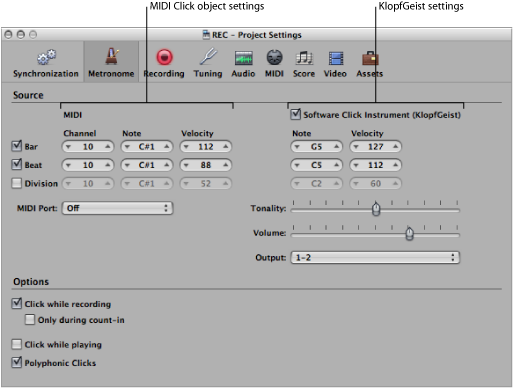
The Metronome Project Settings window combines all settings for:
- KlopfGeist: This is a software instrument metronome sound source found in the plug-in menu of Instrument slots. Logic Pro automatically creates instrument channel strip 256 (with KlopfGeist inserted) when the Software Click Instrument (KlopfGeist) checkbox is selected. Deselect the checkbox to turn off the option. Theoretically, any other Logic Pro or third-party instrument could be deployed as a metronome sound source—using instrument channel strip 256. For more information about the KlopfGeist instrument, see the Logic Pro Instruments manual.
- MIDI Click object: The Environment’s MIDI Click object (see MIDI Click Objects) is used to create note events at bar, beat, and division intervals. These can be sent to either a MIDI port or the internal speaker. To turn off the MIDI metronome output, choose “Off” in the MIDI Port pop-up menu.
You can use these click sources in isolation or in combination with one another.
Define when you want to hear the metronome click—on every bar, beat, or division—by selecting the corresponding Bar, Beat, and Division checkboxes.
Turn on the “Click while recording” option. Also set the “Only during count-in” and “Click while playing” options to meet your needs. It is suggested that you leave the “Polyphonic Clicks” option enabled, as this allows for overlapping clicks.
Click the Recording button at the top of the Project Settings window, to open the Recording pane.
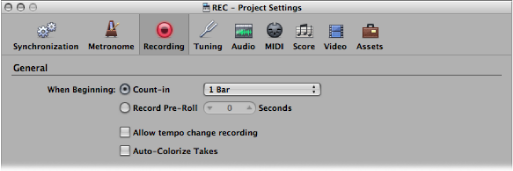
Select the Count-in radio button.
Open the pop-up menu and choose the desired count-in period that will precede recording:
- None: The recording begins with no count-in.
- n Bars: The recording begins after n bars of count-in.
- n/4: The count-in time signature may be set here. These settings are useful when the count-in—and, presumably, the recording—falls across a bar line.
For details about the Metronome project settings, see Metronome Settings.