Using Common Plug-in Window Functions
The header area at the top of the plug-in window is common to all plug-ins. It offers a number of important functions for plug-in use.

Click the icon at the top-right corner of the plug-in window.
Linking Plug-ins
The button to the extreme left of the plug-in window header (with a chain on it) is called the Link button.
A single plug-in window is used to display all open plug-ins. Each time you open a new plug-in, the window updates to reflect the newly chosen plug-in.
Choosing a different arrange track updates an open plug-in window to display the corresponding slot number of the newly selected track or channel strip. For example:
Track 1, assigned to instrument channel strip 1, has an ES1 instance loaded (in the Instrument slot).
Track 11, assigned to instrument channel strip 2, has an EXS24 mkII instance loaded.
Switching between tracks 1 and 11 automatically updates the plug-in window to show the ES 1 or EXS24 mkII, respectively.
You can open several plug-in windows simultaneously, and these do not update to reflect any track or plug-in choices you may make. Each open plug-in window does, of course, continue to show all parameter updates and changes.
Turning Link off is handy when you want to compare the settings of two plug-ins, or adjust the parameters of several open plug-in windows at the same time.
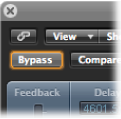
Bypassing Plug-ins
If you want to deactivate a plug-in, but don’t want to delete it or remove it from a channel strip, you can bypass it. Bypassed plug-ins do not drain system resources.
Click the Bypass button at the left side of the plug-in window header.
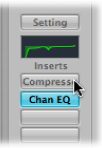
Option-click the appropriate Insert or Instrument slot on the channel strip.
The Insert slot of the bypassed plug-in turns from blue to gray, indicating that the plug-in is currently bypassed.
Getting to Know the Settings Area
All current plug-in parameter settings are stored with the project file, and are automatically recalled the next time it is loaded. You can also save and recall any changes you make to plug-in parameters. These are stored and recalled as individual settings (or presets, if you prefer) via the Settings area.
The Settings area appears to the right of the Bypass button.

- Next and Previous Setting buttons: Click to load the previous or next plug-in setting.
- Settings field: Displays the name of the current plug-in setting. Click to access the Settings menu.
- Compare button: Click to compare a changed plug-in setting with the setting saved with the project.
- Copy and Paste buttons: Click to copy or paste a plug-in setting.
Using the Settings Functions
In this section, you’ll use the various functions available in the Settings area.
Open the Settings menu (of the plug-in window, not the channel strip Settings menu) by clicking the Settings field.
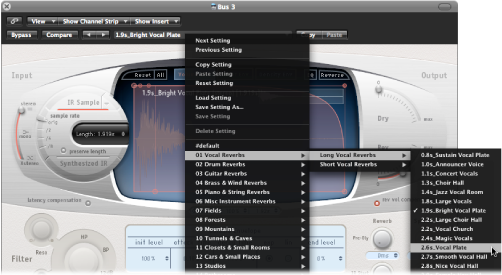
Do one of the following:
Browse to, and choose the setting you want to use from the menu or category submenus.
Choose the Load Setting command. A dialog opens. Only settings for compatible plug-in types are shown. Each plug-in has its own set of parameters, and therefore its own file format.
Note: You can also choose plug-in settings from the Library tab of the Media area in the Arrange window. See Using the Library to Choose Plug-in Settings.
In the plug-in window header, click the left arrow to choose the previous setting, or the right arrow to choose the following setting.
Make use of the following key commands:
Next Plug-in Setting
Previous Plug-in Setting
Next Plug-in Setting or EXS Instrument
Previous Plug-in Setting or EXS Instrument
Next Channel Strip or Plug-in Setting or EXS Instrument
Previous Channel Strip or Plug-in Setting or EXS Instrument
Browse to, and choose the setting you want to use from the plug-in Settings menu.
Choose the Load Setting command, then choose the setting from the dialog.
Make adjustments to the plug-in parameters.
The Compare button turns blue (with white text), indicating that you have made changes to the plug-in parameters, but have not saved the edited plug-in setting in the project.
Click the Compare button to listen to the setting that was originally saved with the project.
The Compare button turns black (with white text).
Click the Compare button again to switch back to the edited plug-in setting.
The Compare button again turns blue (with white text).
This feature allows you to audition your audio or instrument track playback through two variations of a plug-in. The tweaked version can be saved as a new plug-in setting via the Settings menu, if you decide to keep it. If you save it, the Compare button turns black and is disabled.
The Compare button compares the tweaked setting with the reference setting that was stored when you last saved your project—even if you have saved the setting since opening the project.
This approach means that you can quickly change the reference setting by saving the project.
Choose Reset Setting from the Settings menu.
Click the Copy button in the plug-in window header (or choose Copy Setting from the Settings menu).
This copies all parameter settings into a plug-in settings Clipboard, which is independent of the global Logic Pro Clipboard.
Click the Paste button in the plug-in window header (or choose Paste Setting from the Settings menu).
Note: This option only works between plug-ins of the same type (two Compressor instances, for example). Some plug-ins, such as the ES2 and some ES2-based GarageBand instruments, have a number of shared parameters, allowing you to freely copy and paste parameter settings between them. (See Switching the Contents of the Plug-in Window.)
Choose Save Setting to save the current plug-in parameter values as the setting. This action overwrites the existing setting.
Choose Save Setting As to name and save a setting, inclusive of a folder location. You can also create a new folder in the Save As dialog, if you wish.
Note: The folder location (existing or newly created) must be in the associated plug-in folder. For example, you could save a setting called Euro Lead in the Lead Synths sub-folder of the ES2 folder.
Save a setting called #default in the Settings folder of any plug-in type.
It will always be loaded when that plug-in type is opened. The #default setting is also useful as a starting point when creating new plug-in settings, or as a fallback position when you’ve been experimenting.
Choose Delete Setting from the Settings menu.
Replacing Setting-Compatible Plug-ins
When you replace a plug-in with another plug-in that is setting-compatible, the new plug-in automatically uses the setting of the replaced plug-in.
For example, when you replace an ES2-based GarageBand instrument with the ES2, the inserted ES2 uses the same setting as the replaced ES2-based GarageBand instrument. It also works for most EXS-based GarageBand instruments, with two exceptions: Hybrid Morph and Hybrid Basic.
Switching the Contents of the Plug-in Window
You can reassign any open plug-in window in two different ways: via the Show Channel Strip menu and the Show Insert menu:
Click the Show Channel Strip menu to switch the plug-in window between all channel strips that use the same plug-in. If you have inserted the ES2 on tracks 1 and 6, for example, you can switch between these channel strips and adjust the parameters of each ES2 instance, respectively.
Click the Show Insert menu to switch between the plug-in slots of the selected channel strip. For example, if a particular channel strip uses an equalizer and an ES2 plug-in, you can switch between these plug-ins.
Switching the Plug-in Window View Mode
Plug-in parameters can be viewed in two forms: Controls view and Editor view. The Editor view shows the plug-in’s graphical interface, if it offers one.
The Controls view displays all plug-in functions as a set of horizontal sliders, with numerical fields to the left of each parameter. These fields are used for both the display and entry of data values.
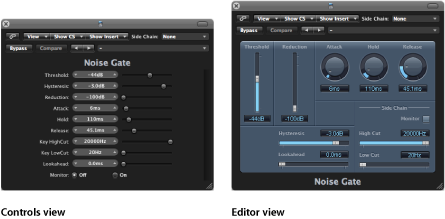
Choose the Controls or Editor item in the plug-in window header’s View menu.
Side Chaining Plug-ins
All plug-ins that support side chain inputs feature an additional Side Chain menu at the right of the plug-in window header. This allows you to route any audio, input, or aux channel strip into the plug-in, via a side chain.

Click the instrument channel strip’s Send slot, and choose an unused Bus from the pop-up menu.
This creates an aux channel strip.
Click the Output slot of the aux channel strip, and choose No Output from the pop-up menu.
This turns off the output signal of the aux channel strip, which you don’t want to hear.
Open the required plug-in from the instrument channel strip, and choose the newly-created aux channel strip from the plug-in’s Side Chain menu.
The plug-in processes the audio of the aux channel strip selected in the Side Chain menu, and not the audio of the instrument channel strip that the plug-in is inserted into.
The signal peaks of the side chain input (the sent instrument signal), combined with the Threshold parameter of the plug-in, determine when the plug-in is triggered.
The following are some side chaining examples:
A sustained pad sound is sent through a noise gate, which is triggered by a drum track being used as the side chain input signal. This results in a rhythmic pad sound which follows the signal peaks of the drum track.
A noise gate inserted into a bass guitar channel is triggered by the kick drum track via the side chain. This can tighten the timing of the bass guitar, as it follows the kick drum signal.
Side chains can also be used to blend a music mix with a voiceover. To achieve this, the mix needs to be routed through a compressor which, in turn, is side chained, using the voice-over track. In this type of setup, the music becomes softer when the narrator is speaking, and louder when not. The effect is also known as ducking. Note that in order for this to function, the Automatic Gain Make-up or Auto Gain control (if applicable to the Compressor plug-in) must be disabled.
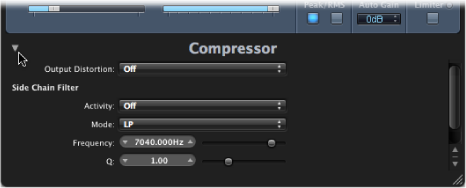
Hiding and Showing Extended Parameters
Some Logic Pro plug-ins may have additional parameters that don’t appear in the Editor view (the graphical interface of the plug-in).
This is indicated by a disclosure triangle that appears at the bottom-left corner of the plug-in window.

If no disclosure triangle is visible, the plug-in has no additional parameters.
Click the disclosure triangle at the bottom of the plug-in window.