Working with Plug-ins
Plug-ins are, broadly speaking, broken down into two categories:
Software instruments, which respond to MIDI note messages
Audio effects, which do not respond to MIDI note messages
The Audio Units format also offers two further plug-in types:
Generators
MIDI-controlled effects
As the name suggests, Generator Audio Units plug-ins generate audio signals. In contrast to software instruments, however, they do not require a MIDI note message to be triggered.
Audio Units MIDI-controlled effects can be controlled via MIDI, unlike standard audio effect plug-ins. As such, they are used differently.
Inserting, Removing, and Replacing Plug-ins
You can insert, remove, and replace plug-ins.
Click a channel strip’s Insert slot.
A menu appears, showing all available effect plug-ins, sorted into different categories.
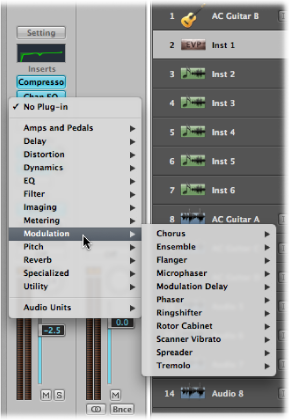
Browse through the categories and choose a plug-in name by clicking it. A plug-in version that matches the chosen channel strip input format is loaded.
You also have the option of choosing a mono or mono-to-stereo version of the plug-in, for example, by clicking the appropriate entry.
Logic Pro effect plug-ins are displayed in various categories such as Delay and Reverb. Further submenus, such as Audio Units, are also available if plug-ins in these formats are installed on your system.
Click the Instrument slot of an instrument channel strip, then choose the software instrument plug-in, Audio Units Generator, or MIDI-controlled effect (name and type) from the Plug-in menu.
Tip: You can simply choose an instrument name to insert the instrument in stereo on a stereo format channel.
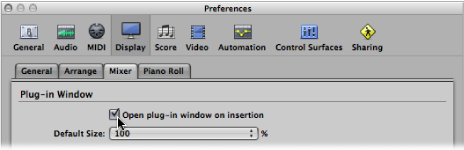
The plug-in window of the chosen instrument, effect, or generator opens automatically. If you don’t want the plug-in window to open automatically after insertion, deselect the “Open plug-in window on insertion” preference in the Logic Pro > Preferences > Display > Mixer pane.
You can adjust all plug-in parameters in the plug-in window. For more information, see Adjusting Plug-in Parameters.
Click the Insert or Instrument slot, then choose No Plug-in from the menu.
Click the Insert slot, then browse to the appropriate plug-in type.
Moving Plug-ins
You can use the Hand tool to move instruments and effects between channel strips.

To use the Hand tool in the Arrange channel strips, hold down the Command key when the pointer is placed over an Insert or Instrument slot. To use the Hand tool in the Mixer, hold down the Command key.
With the Hand tool selected, drag the plug-in name (blue label) in any used Insert or Instrument slot to an unused target slot.

During the operation, the potential destination is highlighted using a colored rectangle (empty slot) or a colored line (when placing an effect between two Insert slots).
With the Hand tool selected, Option-drag the plug-in name from any used slot to an unused target slot.
With the Hand tool selected, drag the effect plug-in name from any used Insert slot to an unused target slot.
This action swaps the plug-in slot positions. For example, on a channel strip with a reverb, chorus, and delay inserted into slots 1 through 3, respectively, dragging the slot 1 plug-in to slot 3 places the reverb in slot 3, and the delay is moved to slot 1. Of course, altering effects positions changes the sound of the signal on the channel strip.
Note: When the Hand tool is used to drag plug-ins between channel strips, the existing plug-in on the destination channel strip is replaced, not swapped.
With the Hand tool selected, drag the effect plug-in name of any used Insert slot between two used Insert slots, and release the mouse button.
The effect is inserted into a newly created slot between the two used slots. The effects below the drop position (new slot) are shifted down by one.
Note: If all 15 Insert slots are used, you cannot insert any more plug-ins into the channel strip, unless you replace an existing plug-in.
Knowing Where Different Plug-in Types Can Be Used
Keep the following in mind when inserting plug-ins into channel strips:
Effect plug-ins can be placed in the Insert slots of all audio channel strip types (audio, instrument, auxiliary, output).
Software instruments can only be inserted into instrument channel strips. These channel strips feature an Instrument slot, directly above the Output slot, which is used for software instrument insertion.
Audio Units Generators can only be inserted into instrument channel strips.
Audio Units MIDI-controlled effects are inserted into the Instrument slot of instrument channel strips. The audio signal that you want to process is then selected via the plug-in’s Side Chain menu.
Using the Channel EQ
The Channel EQ is an insert effect, like any other. In most mixing situations, it is used as the first effect on a channel strip, allowing you to sculpt the sound of the channel strip signal before applying other effect types.
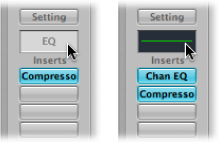
On channel strips where Insert slot 1 is not used: Double-click the EQ area on the upper portion of the channel strip to place the Channel EQ in the first Insert slot.
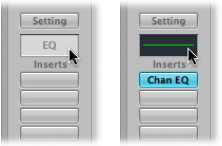
The EQ area changes to a thumbnail view of the Channel EQ display. The thumbnails provide an overview of the EQ settings used in each individual channel strip.
On channel strips where Insert slot 1 is used: Option-double-click the EQ area to insert the Channel EQ as the first plug-in, and move all existing plug-ins of the channel strip one slot down (and redirect their automation data accordingly, if necessary).
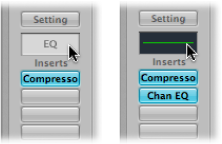
Double-clicking the EQ area on channel strips with an occupied Insert slot 1 inserts the Channel EQ into the next available (unused) slot.
You can freely insert the Channel EQ into any Insert slot as you can other plug-ins. You’ll find it in the EQ section of the Plug-in menu. Note that only the first (topmost) Channel EQ is displayed as a thumbnail graphic in the EQ area.
More information about the parameters of the Channel EQ can be found in the Logic Pro Instruments and Logic Pro Effects manuals.