
The object list is useful for managing the placement of objects (text boxes, lines, shapes, images, charts, and tables) in a presentation, and for selecting objects on a slide that might otherwise be difficult to select (because they’re placed behind or grouped with other objects).
In the object list, objects are shown in the layering order they appear on the slides (known as the stack). You can select objects in the object list then group, lock, or move them in the stack or to another slide. You can search for objects in the list by name. To make it easier to differentiate objects in the list, you can also edit their names.
Keynote must be in Slide Only view or Navigator view in order to show the object list.
Click ![]() , then choose Show Object List.
, then choose Show Object List.
Choose Hide Object List when you want to close the list.
Select a slide in the slide navigator, or Command-click multiple slides.
All of the objects on the selected slides—except objects from the master slide that aren’t placeholders—appear in the object list.
If the object list doesn’t include all of the objects you expected to see, you may need to change how it’s filtered.
Drag the object above or below another object in the list.
For more information about layering objects, see Layer, group, and lock objects.
Note: Even with the object list open, you can still move objects directly on a slide. This is true even for objects that don’t appear in the object list but do appear on a slide.
In the slide navigator, select the slides you want to edit.
In the object list, drag the object from one slide to the other, placing it in the order you want it to appear on the new slide.
You can also copy and paste an object from another open presentation or drag an image or other object from a web browser or from your computer.
If you don’t see the objects you expected, you may need to change the filtering on the object list.
Do any of the following:
Create a group: Command-click the objects to select them, Control-click one of the selected objects, then choose Group from the shortcut menu.
Lock or unlock a group: Click the lock icon on the right side of the group name.
Show or hide the objects in a group: Click the disclosure triangle next to the group name.
Add an object to a group: Drag the object between two objects in the group.
You can also copy and paste an object from another open presentation or drag an image or other object from a web browser or from your computer.
Remove an object from a group: Drag the object above the group name or below and to the left of the group.
Ungroup objects: Control-click the group, then choose Ungroup from the shortcut menu.
For more information about grouping or locking objects, see Layer, group, and lock objects.
You can filter the object list to show only certain types of objects, such as shapes, text boxes, or tables. Filtering applies only to the object list and doesn’t affect what appears on the slides.
Filter the list: Click the Filter button at the bottom of the object list, then select the object types you want to show.
If you select a type of object that is in a group of objects on any slide, that group appears in the object list.
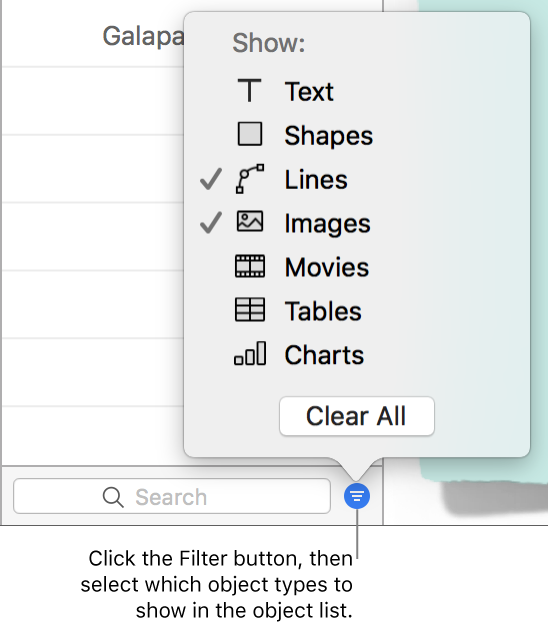
Change the filtering: Click the Filter button and choose other object types.
Remove an object type: Deselect it in the menu.
Remove all filters and return to the full object list: Click the Clear All button.
By default, text boxes in the object list are named with the first words they contain, and other objects are labeled as what they are—shape, table, chart, and so on. You can rename any object to make it easier to identify it in the list.
Double-click the object name and type a new name.
If the object is locked, first click the lock icon next to the object name to unlock it.
You can use the search field at the bottom of the object list to filter the object list by object name.
Select the slides you want to search.
Type part or all of a name in the search field at the bottom of the object list.
Objects with matching names on the selected slides are shown in the object list.
If you don’t see the objects you expected, you may need to change the filtering on the object list.
Choose Keynote > Preferences > General, then select or deselect the checkbox next to “Show smaller thumbnails in object list.”
Double-click to the left of an object icon (not the object name) to enter navigation mode, then do any of the following:
Move up or down in the object list: Press the up or down arrow keys.
Objects are highlighted in the object list as you move up or down.
Edit an object name: Highlight an object, then press Return.
Expand or collapse a group: Highlight the group, then press the right or left arrow key.
Select the highlighted object on the slide: Press Tab.
The object list shows placeholder objects from the master slide layouts you’re using for your slides, but not other (nonplaceholder) master objects. On a slide, you can still move your own objects in front of or behind any master object—even if it doesn’t appear in the object list—as long as you selected the “Allow layering” checkbox for that master. For information about working with master objects, see Add and edit master slides.