
You can export a Keynote presentation to save a copy of it in another format–PDF, Microsoft PowerPoint, QuickTime, HTML, Images, or Keynote '09. Exporting a presentation is useful when you’re sharing it with others who may use different software from you. Any changes made to the exported version don’t affect the original.
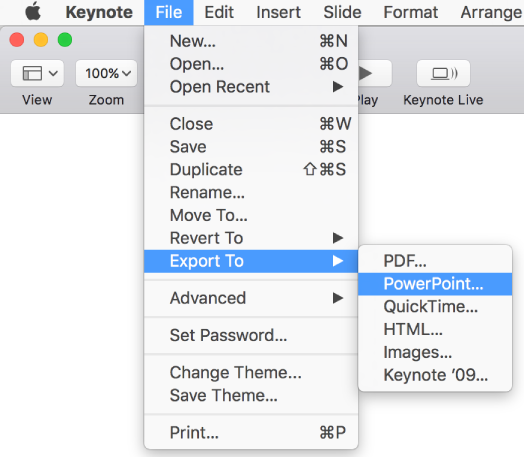
Open the presentation, then choose File > Export To > [file format] (from the File menu at the top of your screen).
Specify export settings, which differ depending on the file type:
PDF: Choose an image quality—the higher the image quality, the larger the file size of the exported copy. To restrict access to the copy, select the “Require password to open” checkbox, then enter the requested information.
Each slide appears on its own page of the PDF. To have each build print on its own page, in the order they appear in the presentation, select “Print each stage of builds.”
PowerPoint: To restrict access to the copy, select the “Require password to open” checkbox, then enter the requested information. If the file needs to be compatible with an older version of PowerPoint (1997-2003), click Advanced Options, then choose .ppt from the pop-up menu.
QuickTime: If your presentation includes a recorded narration, click the Playback pop-up menu, then choose Slideshow Recording. All other presentations are set to be self-playing and advance through the slides or builds based on the time intervals you enter. Builds and transitions that are already set to advance following another build or transition aren’t affected by these time intervals.
To choose a format that’s best for the device you’ll use to play the presentation, click the Format pop-up menu, then choose an option.
HTML: Generates an index.html file that opens your presentation in a web browser when you click it. Animations and builds are also exported with your presentation.
Images: Choose the slides you want to export as images, and select an image format for your slides. The higher quality the image, the larger the file size.
Keynote '09: To restrict access to the copy, select the “Require password to open” checkbox, then enter the requested information.
Click Next, then type a name for the presentation.
The filename extension (.pdf or .ppt, for example) is automatically appended to the presentation name.
Enter one or more tags (optional).
To choose where to save the presentation, click the Where pop-up menu, choose a location, then click Export.
To see more locations, click the arrow button next to Save As.
Note: If you set a password, it protects only your exported copy, not the original file. To set a password for the original presentation, see Password-protect a presentation. If the original file already has a password, it applies to the exported file as well.
If you’re sending the presentation to someone else, you can also select a different format when you send it. See Send a copy of a presentation for more information.