You can change an object’s appearance by modifying its borders, fill color, shadow, and more. Keynote provides many predesigned object styles—coordinated sets of colors, borders, and shadows—that match a presentation’s theme. You can quickly change how an object looks by applying one of these styles, and you can also select from a range of additional options to customize the object’s appearance.
Select an object, then select a style at the top of the Style pane of the Format inspector.
Click the left or right arrows to see more styles.
Select an object.
In the Style pane of the Format inspector, drag the Opacity slider.
Select an object.
In the Style pane of the Format inspector, click the disclosure triangle next to Border, then choose a type of border from the pop-up menu.
Use the controls to adjust the border’s appearance (options vary depending on the type of border you choose).
You can fill shapes, text boxes, and other objects with a solid color or a gradient (two or more colors that blend into one another). You can choose colors and gradients designed to go with the theme, or choose from the full range of colors.

Select an object.
In the Style pane of the Format inspector, do any of the following:
Use a color or gradient that goes with the theme: Click the color well next to Fill, then choose a color or gradient.
Use a two-color gradient fill: Click the Fill disclosure triangle, choose Gradient Fill from the pop-up menu, then choose colors. The left side of the color well shows colors that match the theme; the color wheel opens the Colors window, where you can choose any color.
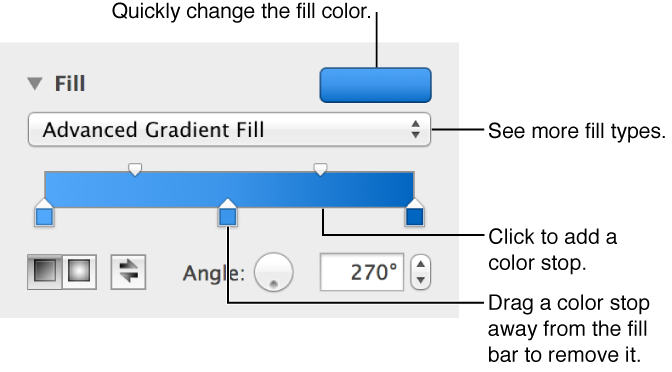
Use a custom gradient: Click the Fill disclosure triangle, choose Advanced Gradient Fill from the pop-up menu, then click the color stops below the slider to choose colors. You can slide the color stops and use the other controls to change the blend, angle, and direction of the gradient.
You can save a custom fill to use it again.
Select an object with the fill you want to save.
In the Style pane of the Format inspector, click the color well next to Fill.
A window showing fill choices appears.
Drag the fill in the Current Fill well to any other well in the window to replace it.
Some fills can’t be replaced. To change which fills you can replace, click the Fill Type pop-up menu and select a different option. For example, if you want to save a gradient fill, select Gradient Fill from the pop-up menu, then drag the fill in the Current Fill well to a well in the the Gradient Fills section.
You can fill shapes, text boxes, and other objects with an image.
Select an object.
In the Style pane of the Format inspector, click the disclosure triangle next to Fill.
Choose Image Fill, or Advanced Image Fill if you want to add a tint to the image, from the pop-up menu.
Click Choose, navigate to your photos, then double-click an image to add it.
If you chose Advanced Image fill to add a tinted image, click the color well (to the right of the Choose button) to select a tint color.
Drag the Opacity slider in the Colors window to make the tint more or less transparent.
To change how the image fills the object, choose an option from the pop-up menu above the Choose button:
Original Size: Places the image inside the object without altering the image’s original dimensions.
Stretch: Sizes the image to fit the object’s dimensions.
Tile: Repeats the image inside the object.
Scale to Fill: Makes the image larger or smaller to leave no space in the object.
Scale to Fit: Resizes the image to fit the object’s dimensions.
Shapes, text boxes, and images can have a shadow or reflection.
Select a shape, text box, or image.
In the Style pane of the Format inspector, click the disclosure triangle next to Shadow, then choose a type of shadow from the pop-up menu.
Drop Shadow: Makes the object look like it’s hovering above the slide.
Contact Shadow: Makes the object look like it’s standing on the slide.
Curved Shadow: Makes an object look like its edges are curled.
Adjust any of the following to change the shadow’s appearance:
Blur: The softness of a shadow’s edge.
Offset: The distance between the shadow and the object or text.
Angle: The angle of the shadow.
Perspective: The angle of the light source in a contact shadow.
To add a shadow to a chart series, see Change the look of a chart.
Select a shape, text box, or image.
In the Style pane of the Format inspector, select the Reflection checkbox.
Drag the slider to make the reflection more or less visible.