Getting to Know Sculpture’s Morph Section
Sculpture features a number of “morphable” parameters—indicated in the Sculpture interface by an orange value bar, rather than a blue or turquoise one. This makes it easy to identify, and edit, the values of these parameters.
All morphable parameters can be independently adjusted and stored in a morph point. In essence, the values of all morphable parameters are captured at a particular moment in time, much like a photograph.
You can smoothly change the sound—in a subtle or radical way—by transitioning between up to five morph points.
The Morph Pad and Morph Envelope allow you to create, and precisely control, the movements and blending between morph points.
The current morph point position is indicated by the ball in the Morph Pad. This can be moved with MIDI controllers, such as a vector stick, or with the mouse. Such movements can be recorded and played back independently—with each voice being morphed in a different way.
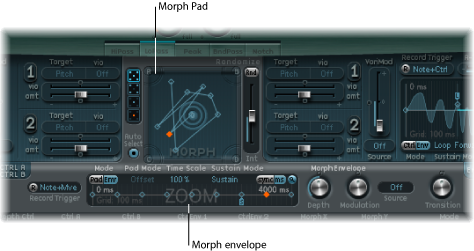
The morph section consists of two parts:
- Morph Pad: Used to display and edit, or draw, morph point paths. It provides five morph points—center and four corners—plus menu options for randomizing, and copying and pasting, morph points or Morph Pad states.
- Morph Envelope: Used to display and edit morph points—either by segment (with the mouse), or recorded MIDI controller movements. For example, you could use a vector stick (Morph X/Y controllers) or drag the morph ball (on the Morph Pad).
Sculpture Morph Position Display
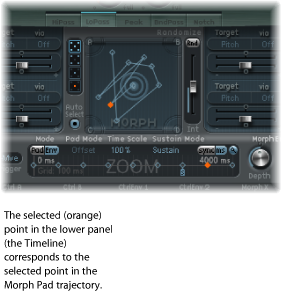
The red line in the Morph Envelope’s timeline shows the current time position, during a morph. Sculpture’s Morph Pad displays a moving dot that indicates the current morph position.
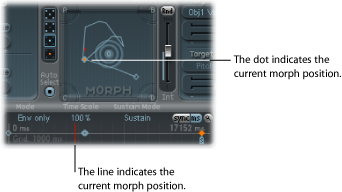
Note: The current morph position is only shown if one note is being played.
Selecting Morph Points in Sculpture’s Morph Pad
One of the five Morph Pad points (A, B, C, D, and Center) is always selected for editing. This selected point is indicated by two concentric circles that surround it.
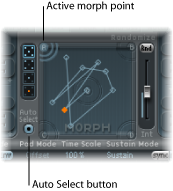
When you activate Auto Select mode, the nearest morph point will be automatically selected when you move the ball in the Morph Pad.
You can also click in the circles around A, B, C, D, or Center to manually select a Morph Pad point.
Sculpture Morph Pad Menu Commands
You can open the shortcut menu by Control-clicking the Morph Pad. The menu contains the copy, paste, and exchange commands.
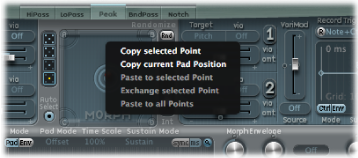
- Copy selected Point: Copies the current morph point into Sculpture’s Clipboard.
- Copy current Pad Position: Copies the current morph state into Sculpture’s Clipboard.
- Paste to selected Point: Pastes the Clipboard content to the selected point.
- Exchange selected Point: Swaps previously copied data with the selected point.
- Paste to all Points: Pastes the Clipboard content to all selected points.
Randomizing Morph Points in Sculpture’s Morph Pad
The randomize feature allows you to create random variations of selected morph points. When combined with the copy/paste function, randomizing lends itself to using the Morph Pad as an automatic sound generator.
Use of the Morph Pad can yield interesting composite sounds—hybrids of the original and morphed sound. You can copy this hybrid sound to a corner of the Morph Pad, or to several corners, and randomize it by a definable amount.
The morphed sound then becomes a new timbral element that can, in turn, be moved to the corners, randomized, and so on.
In effect, you are “breeding” a sound, while maintaining some control by selecting parent and child sounds.
This approach can result in new, complex sounds without your needing to be a sound programming guru.
The following parameters allow you to define your random variations.
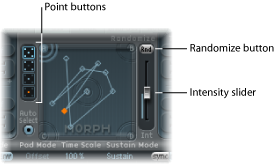
- Point buttons: Set the number of morph points that are to be used for randomization, and they also indicate which points will be randomized.
The bottom button, when selected, limits randomization to the currently selected morph point.
- Randomize button: Creates randomized values for all parameters of the chosen Morph points.
- Int(ensity) slider: Determines the amount of randomization from 1% (slight deviation) to 100% (completely random values).
Select the desired Point button (the top, five-point button, for example).
Ensure that Auto Select is active.
Set the Int(ensity) slider to a value of around 25%.
Click the Rnd button. Keep an eye on the parameters in the core synthesis engine. You will see a number of them move.
Drag the morph ball to each of the corners in the Morph Pad. Do this along the edges, as well as through the center of the Morph Pad, and note how this affects the morph.
Don’t forget to strike a few notes on your MIDI keyboard while doing this.
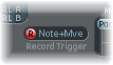
Note: The morph ball is visible only when the Record Trigger button is active.
As you’re moving the morph ball around, you’ll see “ghost” controls in the Pickup display and the ball in the Material Pad move. If you look closely, you’ll also notice a number of red dots moving about in the various string and object parameters.
Each of these indicates the current morph position. This is a handy tool for seeing what parameters have changed, and how they have changed.
You’ll also note that positions on the Morph Pad—which fall in-between the various morph points—cause the randomized parameters to interpolate between values.
You can use the Copy and Paste commands to make use of these in-between values.
Sculpture Randomize Menu Commands
You can open the shortcut menu by Control-clicking the Rnd button. The menu commands determine which parameters are randomized with the Rnd button and Int slider.
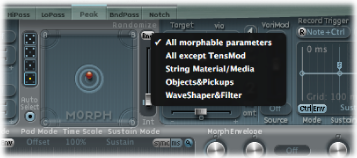
- All morphable parameters: This is your ticket to weird sounds, as all parameters in the following groups are randomized. This menu item can lead to some interesting results, but it can be uncontrolled. This is less useful for the “sound breeding” idea discussed in the Randomizing Morph Points in Sculpture’s Morph Pad section.
- All except TensMod: Basically the same as All morphable parameters, but excludes the TensionMod parameter from randomization.
- String Material/Media: Includes the Material Pad position, Stiffness, Inner Loss, Media Loss, Resolution, and Tension Modulation parameters for randomization.
- Objects&Pickups: Alters the positions of objects and pickups, plus the various object parameters, when randomization is used.
- Waveshaper&Filter: Alters the positions of all Waveshaper and filter parameters when randomization is used.
Getting to Know Sculpture’s Morph Envelope Display
The morph envelope offers nine points/eight segments, and recording functionality that is much like that of the controller envelopes.
The overall time/length of the morph envelope is indicated by the numerical entry at the top right of the display.
The maximum time/length of the morph envelope is 48 bars/40 seconds.
The lines on the background grid are placed 100 milliseconds apart.
If you click the handles (nodes) or lines between the nodes, the current envelope segment becomes highlighted. A small help tag also indicates the millisecond value of the current segment.
As you move your cursor along the line, or hover over the nodes, the current envelope segment is highlighted.
You can create your own envelopes manually by manipulating the nodes and lines, or you can record an envelope (see Recording Morph Envelopes in Sculpture).
Drag the desired handle to the left or right. As you do so, the overall length of the morph envelope will change, with all following nodes being moved.
You cannot move a node beyond the position of the preceding node. You can, however, move nodes beyond the position of the following node—even beyond the right side of the envelope display—effectively lengthening both the envelope segment and the overall envelope.
Note: Sculpture’s Morph Pad displays a moving dot that indicates the current morph position, during a morph on a monophonically played sound. The red line in the Timeline below the Morph Pad shows the current time position.
Using the Sculpture Morph Envelope Parameters
The following section outlines the morph envelope’s parameters.
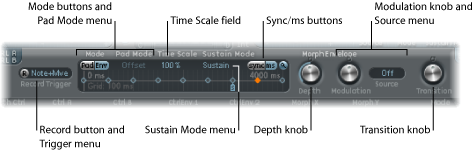
- Mode buttons and Pad Mode menu: Activate the morph envelope, and allow you to choose a mode. See Choosing Sculpture’s Morph Envelope Mode.
- Time Scale field: Scales the duration of the entire envelope between 10% and 1000%.
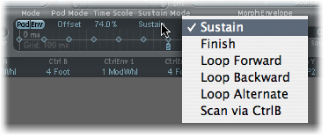
- Sustain Mode menu: Defines the behavior of the morph envelope while a note is held. The menu items are Sustain mode, Finish mode, one of three loop modes (Loop Forward, Loop Backward, Loop Alternate), or Scan via CtrlB mode. See Choosing Morph Envelope Sustain or Loop Mode in Sculpture.
- Record button and Trigger Mode menu: Used to arm the envelope for recording, and to set the event type that triggers recording. See Recording Morph Envelopes in Sculpture.
- Sync and ms buttons: Set either a free-running envelope (with segment times displayed in milliseconds) or a tempo-synced envelope with note value options, such as 1/8 or 1/4.
Note: Switching between values forces a recalculation of times to the nearest note value or ms time, respectively, based on the current project tempo.
- Depth knob: Scales the amount of morph movement caused by the morph envelope. The effect of the Depth parameter is visually displayed in the Morph Pad. As you increase or decrease the value, the morph trajectory will also be scaled.
- Modulation knob and Source menu: Allow you to select a modulation source and amount, which are used to scale the movement of the morph envelope.
- Transition knob: Provides control over the transitions between morph points. This can be the original (possibly recorded) movement to linear, or stepped, transitions. The latter remains at one morph state and then abruptly switches to another morph state at the following envelope point. This parameter (and the morph envelope itself) can lead to interesting, evolving sounds, or even rhythmic patches.
Choosing Sculpture’s Morph Envelope Mode
The Mode buttons activate the morph envelope and allow you to choose from the following modes:
- Both buttons off: Morph functionality is disabled.
- Pad only: Envelope is deactivated, and morph functionality is controlled by the morph ball or X/Y MIDI controllers only.
- Env only: Envelope is running, but the morph ball and X/Y MIDI controllers are deactivated.
- Env + Pad: Envelope is running, and the position of the morph ball or X/Y MIDI controllers is used as an offset for any envelope movements.
- Offset button: When in Env + Pad mode, click the offset button (beside the mode buttons) to choose from the following menu items:
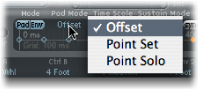
- Offset: The default mode, behavior is the same as Env+Pad mode: Envelope is running, and the position of the morph ball or X/Y MIDI controllers is used as an offset for any envelope movements.
- Point Set: Envelope is running. The selected envelope point can be edited by moving the Morph ball or with a MIDI controller (MorphX and MorphY Controller Assignments).
- Point Solo: Envelope is in a kind of “snapshot” mode. The selected envelope point can be edited by moving the morph ball.
Choosing Morph Envelope Sustain or Loop Mode in Sculpture
You can choose between Sustain mode, Finish mode, three loop modes (Loop Forward, Loop Backward, Loop Alternate), or Scan via CtrlB mode.
When you are in any of the loop modes, the loop always cycles between the loop and sustain envelope handles—the nodes indicated by the small L and S icons. The morph envelope can, like any envelope, run in one-shot mode—it runs normally, for as long as the note is sustained. It can also run several times, or in an infinite cycle, much like an LFO. You can achieve the latter through the use of loops.
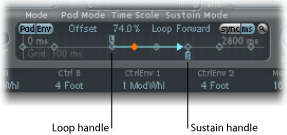
The Loop and Sustain point handles can be grabbed and repositioned. Note that doing so can potentially alter the loop (and the overall morph envelope) length. The loop modes behave as described below:
- Finish: The envelope runs in one-shot mode from its beginning to its end—even if the note is released before the envelope has completed. The other loop parameters are disabled.
- Forward: The envelope runs to the Sustain point and begins to repeat the section between the Loop point and Sustain point periodically—always in a forward direction.
- Backward: The envelope runs to the Sustain point and begins to repeat the section between the Sustain point and Loop point periodically—always in a backward direction.
- Alternate: The envelope runs to the Sustain point and returns to the Loop point and back to the Sustain point periodically, alternating in both a backward and forward direction.
- Scan via CtrlB: The time line position within the envelope is disconnected from normal, real-time operation, allowing you to manually scan the overall time range with the MIDI controller assigned to Ctrl B (in the MIDI Controller Assign section).
Tip: It is also possible to drag the red time position marker.
Note: If one of the three loop modes is selected, and the Loop point is positioned before the Sustain point, the loop remains active until the key is released. Following the key release, the envelope then continues beyond the Sustain point, as usual. If the Loop point is positioned after the Sustain point, the loop will begin as soon as the key is released, and will cycle continuously until the complete voice has finished the amplitude envelope release phase.
Recording Morph Envelopes in Sculpture
The following section outlines the steps required to record a morph envelope.
Choose a trigger mode (see below), if you don’t want to use the Morph Pad.
Press the R(ecord) Enable button to “arm” the morph envelope record function.
Play a note on your MIDI keyboard, and do one of the following:
Drag the silver ball in the Morph Pad.
Move an external controller (see Assigning MIDI Controllers in Sculpture).
Following the recording of a controller movement, R(ecord) Enable is automatically set to off and Mode is set to Env only. This ensures that only the recorded movement is active, regardless of the controller’s position or further movements after you finish recording.
Note: The mode defaults to (Morph) Pad as soon as the R button is clicked (for more information on modes, see Using the Sculpture Morph Envelope Parameters).
Click the menu to the right of the R button, and choose from one of the following trigger modes, which will start recording when R(ecord) Enable is active:
- NoteOn: Recording starts when a note is played.
- Note + Move Morph Point: Recording starts when MIDI control change messages (as assigned in the Morph X and Y parameters of the MIDI Controller Assign section) arrive while a note is held.
- Note + Sustain Pedal: Recording starts when the sustain pedal is depressed while a note is held.
Click the R(ecord) Enable button (or trigger) a second time.
Release all keys, and allow all voices to complete their decay phase. This will automatically end the recording.
Note: You can stop recording early, before the decay phase completes, by releasing all keys and then pressing a single key.