Using the Transform Window Parameters
This section discusses the use of the individual Transform window elements, providing an overview of what each option does. Examples toward the end of the chapter (see Usage Examples) give you an idea of how each can be used, but these are only the tip of the iceberg. Ultimately, your imagination and creativity are the only restrictions on how MIDI events can be manipulated in the Transform window.
Defining Global Parameters
These parameters globally affect the Transform window appearance and operating mode.
- Mode menu: Choose one of the following menu options to determine how events are transformed.
- Apply operations to selected events: Choose this mode to apply the operations to all selected events. The selected events are determined by the selection conditions.
- Apply operations and delete unselected events: Choose this mode to transform the selected events, and delete all unselected events. Only events that match the selection conditions remain after the transform operation. This mode allows you to use the Transform window as a programmable filter, where only events that match the conditions survive.
- Delete selected events: Choose this mode to delete selected events. This mode allows you to use the Transform window as a programmable erase function. All events that match the conditions are deleted, and all other events remain unchanged. The operation settings are irrelevant in this mode.
- Copy selected events, then apply operations: Choose this mode to retain the selected events in their original form, copy them, and apply the operations.
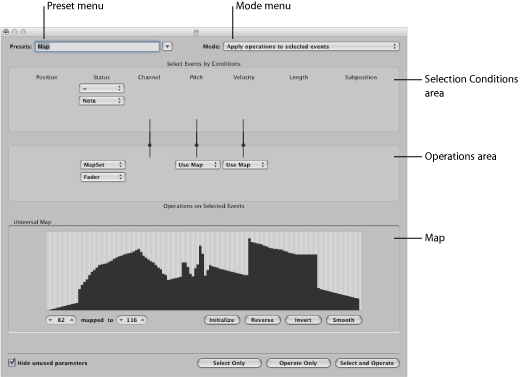
Defining Selection Conditions
You can define conditions that determine which events are selected for transform operations. This is done in the Selection Conditions area of the Transform window.
Each column represents a different MIDI event parameter.
- Position: Determines the time position of the event, referenced to the start point of the MIDI region (not the start point of the project).
- Status: Determines the event type.
- Channel: Recorded MIDI channel of the event
- Data Byte 1/Pitch: First data byte (controller number) or note pitch
- Data Byte 2/Velocity: Second data byte (controller value) or note velocity
Note: The parameters displayed in the Data Byte fields are dependent on the chosen Status menu setting. Certain Status menu settings will not show the Data Byte fields at all.
- Length: Length of the note or event
- Subposition: Time position of the event, within a bar
The condition is considered to be fulfilled when an event matches the defined effective range, and values, of all event parameters. These ranges and values are determined in the pop-up menus and fields found under each of the event parameter columns.
Click the Status pop-up menu to determine which events will be selected. You have a choice of two settings:
- All: All event types fulfill the condition.
- =: A further pop-up menu is displayed below the Status pop-up menu, in which you can define the desired event type. These include note, poly pressure, control change, program change, channel pressure, pitch bend, meta, and fader.
Click the pop-up menus (in each column that is needed) to define the selection criteria for events.
One or two value fields appear below the pop-up menu, unless Map is chosen. You can assign one of the following value conditions for each of the parameter columns:
- “=”: The event must be equal to the value in the field, for the condition to be fulfilled. For example, only note C#3 events will meet the condition.
- Unequal: The event must not be equal to the value in the field, for the condition to be fulfilled. All events that are not C#3 will meet the condition, for example.
- Smaller/Equal (<=): The event value must be less than, or equal to, the value in the field (a note velocity less than, or equal to 98, for example) for the condition to be fulfilled.
- Larger/Equal (>=): The event value must be larger than, or equal to, the value in the field (a note pitch higher than, or equal to C#3, for example), for the condition to be fulfilled.
- Inside: The event must fall within the value range (of event positions or note pitches, for example) of both fields, for the condition to be fulfilled.
- Outside: The event must be outside the value range (of event positions or note pitches, for example) of both fields, for the condition to be fulfilled.
- Map: Most conditions are numerical relationships, and the condition is met if the incoming MIDI event value satisfies the condition. The last condition, Map, works a little differently. Two numerical parameters are specified, and the incoming value is first converted by the map, to create a mapped value. The mapped value is then compared with the two parameters to see if it falls inside them. Incoming events with a mapped value that falls within the range will fulfill the condition—all other events will not fulfill the condition (see Using the Map).
Use the mouse as a slider, or type a value directly into the field.
Defining Operations
The Operations area is used to define the changes you want to make to events that meet the selection conditions. As with the selection condition pop-up menus, you choose an operation in the appropriate event parameter columns. One or two value fields may appear, depending on the chosen operation.
Click the pop-up menu, and choose one of the following operations for the Status condition:
- Thru: The event type passes through unaltered.
- Fix: The event type is altered. Choose a new event type in the pop-up menu that appears below the Status Operations menu. Choices include fader, meta, note, poly pressure, control change, program change, channel pressure, or pitch bend. This effectively converts one type of event to another.
Note: When you convert note events, two events are created: one for the note on event, and one for the note off event.
- MapSet: Choosing this setting means that events that match the Status condition (note events, for example) are used to control the map of a subsequent operation—in the Channel, Data Byte 1, Data Byte 2, and Length columns.
The Data Byte 1 value selects the position in the map.
The Data Byte 2 value determines the value at this map position.
Internally, Logic Pro sends a meta event pair: #123 for the position, and #122 for the value at this position. These types of meta events can also be created in other ways.
Choose one of the following operations for the Channel, First or Second Data Byte, and Length columns (as required). One or more value fields will appear below the respective operations pop-up menus.
- Thru: The event passes through unaltered.
- Fix: Fixes the event parameter to the set value. You could use this to set the pitch of all note events to a specific note value, making it easy to convert a bass groove into a hi-hat pattern, for example.
- Add: Adds the value to events. For example, a value of 8 could be added to all incoming note velocity events, thus making the notes louder.
- Sub: Subtracts the value from events. You could use this to reduce all controller 10 (Pan) events, thereby narrowing the stereo spread of an electric piano part, for example.
- Min: Parameter values lower than the defined value are replaced (by this value). Larger parameter values are not altered. You could use this to replace all note velocity messages below 45, thereby reducing the dynamic range of a MIDI region—or put another way, making the soft notes louder.
- Max: Parameter values that exceed the set value are replaced by it. Smaller event parameter values remain unaltered. This could be used to restrict filter resonance modulation events above a value of 100, for example, resulting in a softer filter sound.
- Flip: All parameter values that match the conditions are reversed around a pivot point (the value defined here). Events above this value are moved by the same distance below it and vice versa. For example, you could move a note from E3 to G#2, if the pivot point value was set to C3. Effectively, the E3 event, which is 4 (pitch) values above the C3 pivot point is flipped to 4 values below (G#2). This can also be used to reverse selected note positions around a particular bar or beat, as another example.
- Mul: The parameter value is multiplied by the set value (accurate to four decimal places). The effect, and use, of this operation is best illustrated by the Half Speed preset.
- Div: The parameter value is divided by the set value (accurate to four decimal places). The effect, and use, of this operation is best illustrated by the Double Speed preset.
- Scale: The parameter value is multiplied by the top value, and the bottom value is then added. This is a combination of Mul and Add. If you enter a negative number here, values can be subtracted from—rather than added to—the value resulting from the multiplication.
- Range: Parameter values outside the set value range are replaced by the values of the (range) limits (combination of Min and Max).
- Random: Random values are generated within the set limits.
- +-Rand.: A random value between zero and the set value (positive or negative) is added.
- Reverse: The parameter value is reversed within its value range (no value can be set here).
- Quantize: The parameter value is quantized to a multiple of the set value.
- Qua & Min: Like Quantize, but the quantization does not fall below the set value (a combination of the Quantize and Min functions, with the same set value).
- Expon.: The parameter value is scaled exponentially. The extreme values (0 and 127) remain unaltered. The set value determines the shape of the curve. Positive values result in the exponential scaling of data (increasing input values remain lower for longer, and then rise quickly), and negative values result in the logarithmic scaling of data (decreasing input values remain higher for longer, and then drop off more quickly).
- Crescendo: This only works if the Inside Position selection condition is selected (crescendos need start and end points). Crescendo creates a smooth alteration of the current parameters, between the set value boundaries.
- Rel.Cres: This only works if the Inside Position selection condition is selected. The effect is similar to that achieved by Crescendo, but the previous values of the parameters being altered are taken into account when the crescendo is created, preserving the relative feel of the original.
- Use Map: The set map will be used when this operation is selected (see Using the Map).
Use the mouse as a slider, or type a value directly into the field.
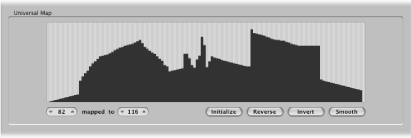
Using the Map
128 vertical bars reflect the full MIDI value range (from 0 to 127), and provide a visual overview of the transformation.
Essentially, each bar represents a particular MIDI value, which can be mapped to a different value. The type of event, and operations, are determined in the Selection Conditions and Operations areas.
For example:
Each of the bars could represent a MIDI note number (from 0 to 127) value.
By default, there is a 1:1 relationship for each bar, where value 1 = value 1, value 15 = value 15, and so on, throughout the 128 bars. Applying this to MIDI note numbers, bar 60 = C3 (middle C), bar 61 would represent C#3, bar 62 = D3, and so on.
The default and mapped values are shown in the two fields to the lower left of the map area.
You can alter these values directly in the fields, or by dragging any of the bars vertically. As you do so (using either method), the corresponding field or bar is updated.
If you alter the bar 60 (middle C) value to show 72 in the “mapped to” field, this value is remapped accordingly when the transform operation is applied.
This results in all MIDI note number 60 messages being transformed into MIDI note number 72 messages (effectively transposing all C3 notes to C4).
Exchanging Parameter Values
You can reroute the value of each of the three event parameters—Channel, Data Byte 1, and Data Byte 2—to the value of a different parameter from this group.
Click the dots on the lines between the Selection Conditions and Operations areas.
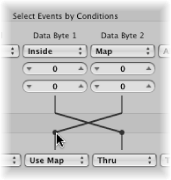
Repeated clicks cycle between different targets.
Note: The value is exchanged before the operation is performed.