
Use the Project navigator to open, add, delete, and organize files in your project. To switch to the Project navigator, click the Project Navigator button (![]() ) in the navigator bar of the navigator area. Your project files are displayed in the content area below.
) in the navigator bar of the navigator area. Your project files are displayed in the content area below.
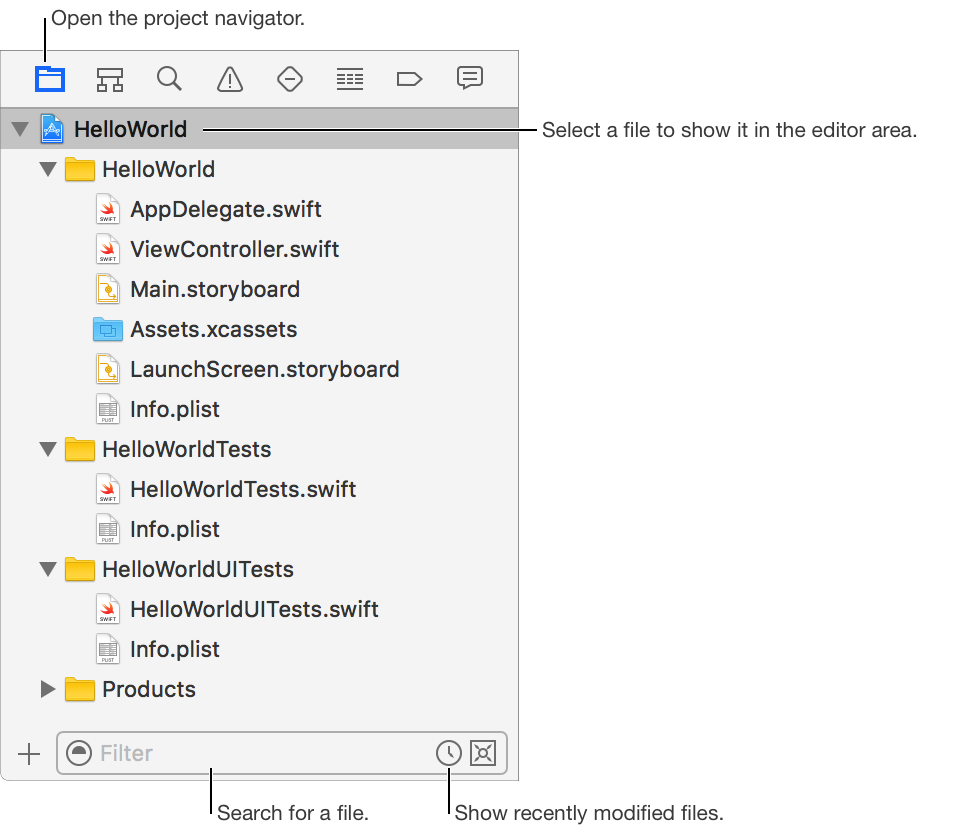
Open a file: Click the file to open it in the editor area.
Search for a file: Enter text in the filter field.
Show recently modified files: Click the Recent Files icon (![]() ) in the filter field.
) in the filter field.
Show files with source control status: Click the Source Control icon (![]() ) in the filter field.
) in the filter field.
Unlock a file: Select the file, then choose File > Unlock. (If the file is unlocked or you don’t have permissions to unlock it, the menu item is disabled.)
View properties of a file: Select the file, then choose View > Inspectors > Show File Inspector. The properties appear in the File inspector.
Add a new file: Click the Add button (+) at the bottom, choose File, then select a template.
Add an existing file: Click the Add button (+) at the bottom, choose Add Files to “[ProjectName]”, then choose a file on your computer.
Add a new group: Click where you want to add the group, then choose File > New > Group. A group is associated with an underlying folder with the same name by default. To create a group without an associated folder, choose File > New > Group without Folder.
Add files to a new group: Select the files, then choose File > New > “Group from Selection”. The files are moved to the associated folder in the file system.
Add files to an existing group: Select the files and drag them to the group. If the group is associated with a folder (the default), the files are moved to the associated folder.
Rename a file or group: Double-click the file or group, then enter the new name.
Change a group’s associated folder: Select the group, then choose View > Inspectors > Show File Inspector. To change the associated folder, drag the new folder from the Finder to the old folder name under Location in the File inspector. To remove an associated folder, click the delete icon under Location. To add an associated folder, click the folder icon.
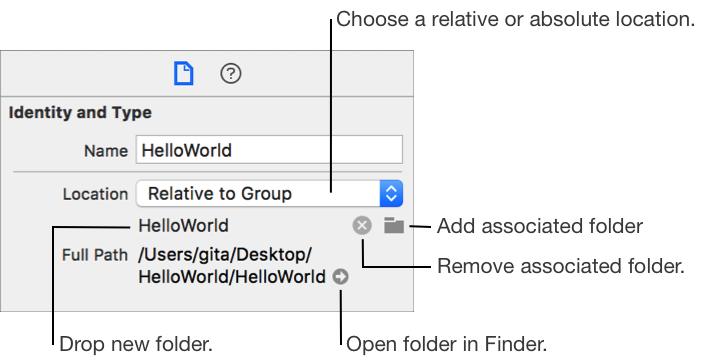
Choose a relative or absolute location: In the File Inspector, choose a relative or absolute location from the Location pop-up menu. For example, choose Relative to Group (recommended) to preserve references when you move your project folder.
Modify the default move and copy behavior: To force a move operation, press and hold Command (⌘) while dragging files. To force a copy operation, press and hold Option (⌥). To force a reference operation, press and hold Command-Option (⌘-⌥).
Important: If a group is associated with a folder, all rename, delete, move, and copy operations are performed in the underlying file system. If you use source control, all operations are performed using the respective source control system and work across source control systems. If you move files between groups that are in the same Git repository, the files are moved between the associated folders in the file system. If the files are in different repositories, the files are copied from one associated folder to the other associated folder.