
After you pair a device with Xcode, you can launch your app on the device over WiFi or other network connection. If your Mac and the device are on the same network, you can connect to the device using Bonjour. In the Devices and Simulators window, a network connection icon indicates whether the device was discovered. Otherwise, you can connect to a network device using its IP address.
Tip: If a network device you previously paired is disconnected, it may be asleep. To keep your iOS device from sleeping during testing, open Settings, tap Display & Brightness, tap Auto-Lock, then tap Never.
If you use automatic signing (recommended), Xcode creates the necessary signing assets for you in your developer account. Although, you’ll need to explicitly register the wireless device before running the app.
Before you begin, add your Apple ID account and assign the target to a team.
Connect your Mac and the device to the same network.
In the toolbar, choose the target and device from the Scheme menu.
In the Signing section (located in the General pane of the project editor), click Register Device(s).
If you previously registered the device, the Register Device button doesn’t appear.

In the toolbar, click the Run button.
Connect your Mac and device to a network.
Choose Window > Devices and Simulators, then in the window that appears, click Devices.
In the left column, Control-click the device, then choose Connect via IP Address from the pop-up menu.
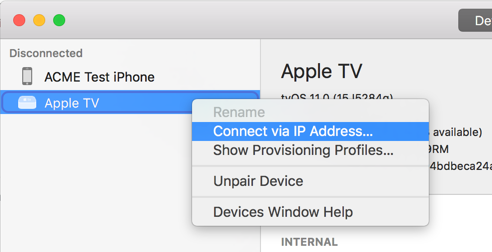
In the dialog that appears, enter the IP address of the device and click Connect.
In the left column of the Devices and Simulators window, the device should appear under Connected with a network icon next to the device name.
In the toolbar, choose the target and device from the Scheme menu.
In the Signing section (located in the General pane of the project editor), click Register Device(s).
If you previously registered the device, the Register Device button doesn’t appear.
In the toolbar, click the Run button.