When you create a book, Photos automatically assigns a layout to each page and places photos on the pages of the book. You can change the layout of a page at any time.
Click Projects in the toolbar, then double-click the book.
Double-click the page you want to change.
The page opens in a two-page spread, with the page you double-clicked selected.
Click the Options button
in the toolbar.
Scroll through the available page layouts, then click the page layout you want.

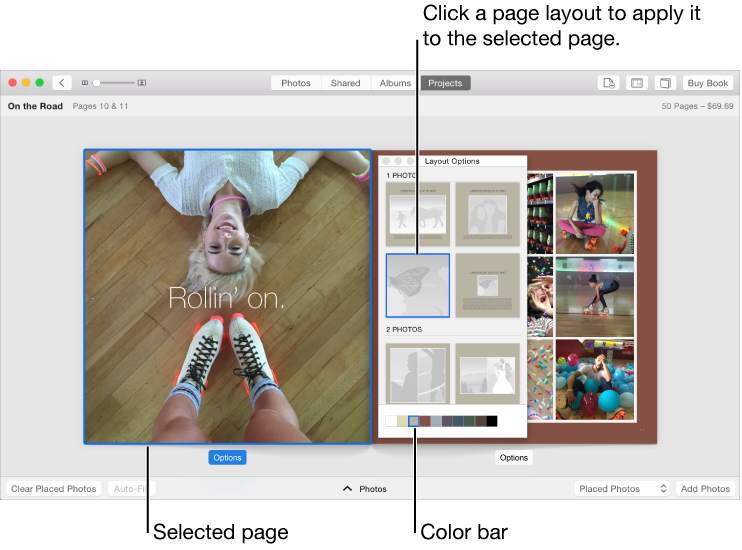
The book theme you use determines the available page layouts.
To change the background color, click a color in the color bar.
You can increase or decrease the size of a photo in a photo frame.
Click Projects in the toolbar, then double-click the book.
Double-click the page that contains the photo.
Do one of the following:
Resize a photo: Double-click the photo you want to change. Drag the Zoom & Crop slider to increase or decrease the photo’s size, and drag the photo to reposition it in the frame.

Fit an entire photo within a frame: Control-click the photo and choose Fit Photo to Frame. (This command isn’t available for all themes.)
If you fit a photo in its frame, blank edges may appear on the long sides of the photo so that the widest portion of the photo can fit within the frame.
Flip a photo within a frame: Control-click the photo and choose Flip Photo.
When you flip photos, be aware that text or logos that appear in the photo may appear as a reversed mirror image.
You can apply a filter to a photo in a book. These filters are applied only to the photo in the book, and nowhere else the photo appears in your photo library. In some page layouts, you can also add border and caption areas to photos.
Click Projects in the toolbar, then double-click the book.
Double-click the page that contains the photo.
Double-click the photo you want to change.
Click a filter or a border to apply it to the photo.

Tip: To rotate, enhance, retouch, or otherwise edit a photo used in a book, click Edit Photo to open the editing tools. Any edits you make are applied everywhere the photo appears, including in your Photos library and any other projects that use the photo.
Some page layouts use overlapping photo frames. You can arrange overlapping photos by moving them forward and backward.
Click Projects in the toolbar, then double-click the book.
Double-click the page you want to change.
Control-click a photo and choose Move to Front or Send to Back.