
A word-processing document can have multiple sections, each of which can have different page numbering, headers, footers, or background objects (such as a watermark). Some templates have predetermined sections that you can add to or delete.
To see a document's sections, click ![]() in the toolbar, then choose Show Page Thumbnails. When you click a thumbnail, a background color appears behind all of the page thumbnails that belong to the section.
in the toolbar, then choose Show Page Thumbnails. When you click a thumbnail, a background color appears behind all of the page thumbnails that belong to the section.

Click to place the insertion point where you want the new section to start.
Click ![]() in the toolbar and choose Section Break.
in the toolbar and choose Section Break.
The new section starts at the top of a new page.
Click anywhere on the page you want to start the new section with, or click anywhere in a section to add a section after it.
Click ![]() in the toolbar, then click the Section tab at the top of the sidebar.
in the toolbar, then click the Section tab at the top of the sidebar.
Click the “Create a new section” pop-up menu and choose where to start the section.
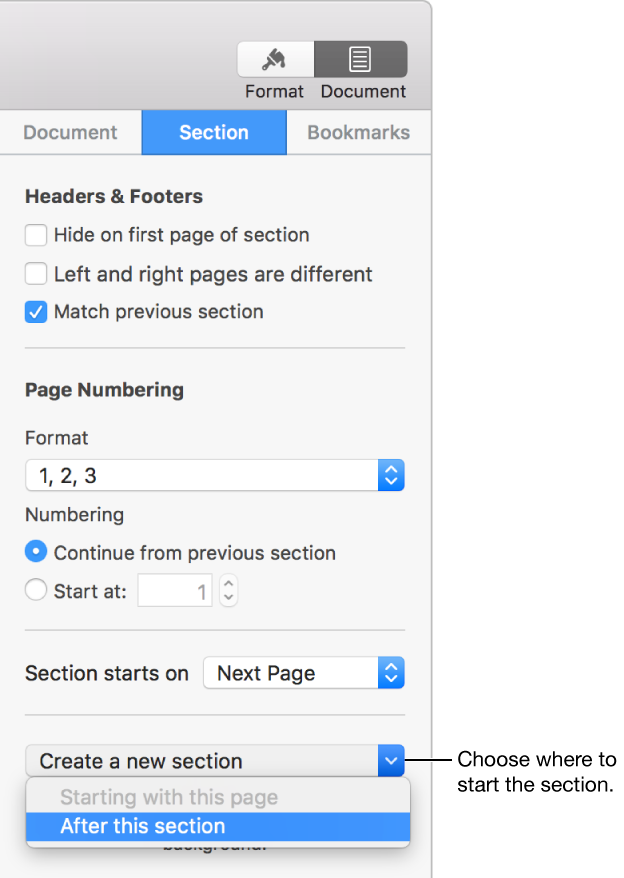
If the document uses facing pages, click the “Section starts on” pop-up menu and choose the page where the new section starts:
Next Page: Starts the section on either a left or right page, whichever comes next in the document.
Right Page: Starts the section on the first right page. If the next page in your document would be a left-side page, a blank page is inserted before the start of the section on the right.
Left Page: Starts the section on the first left page. If the next page in your document would be a right-side page, a blank page is inserted before the start of the section on the left.
Select any of the checkboxes to specify headers and footers:
Hide on first page of section: Show headers and footers on all but the first page of the section.
Left and right pages are different: For documents that have facing pages, use different headers and footers for left and right pages.
Match previous section: Deselect to use different page numbers, headers, or footers for this section.
Choose how page numbers appear:
Continue from previous section: Page numbers continue without a break from the previous section.
Start at: Enter the page number you want this section to start with.
Format: Click the pop-up menu and choose a number format.
See Add headers and footers to learn how to add these to your document.
If you want to keep the content that’s in the section, copy and paste it someplace else in the document before you delete the section.
Click ![]() in the toolbar, then choose Show Page Thumbnails.
in the toolbar, then choose Show Page Thumbnails.
Select the section in the thumbnail sidebar, then press Delete on your keyboard.
Click ![]() in the toolbar, then choose Show Page Thumbnails.
in the toolbar, then choose Show Page Thumbnails.
Select the section in the thumbnail sidebar, then choose Edit > Duplicate Selection (from the Edit menu at the top of your screen).
The new section is added below the original. You can drag it in the thumbnail sidebar to where you want it.
Click Delete in the dialog.