Add and edit lines and arrows

You can create a straight or curved line then customize it by changing its width (thickness) or color, or by adding different endpoints—for example, an arrow, circle, or square.

Add and edit a line

  1. Do one of the following:

    • Click Shape button in the toolbar, then click a line.

      Options include a straight line with or without endpoints, or a line with editing points to create a curved line.

    • Select an existing line on a page.

  2. To move the line, click near its middle, then drag it to where you want it.

  3. To change the line length or rotation, drag the handles on the ends of the line.

    For curved lines, drag the green dot to change the arc.

  4. To see controls for changing the look of the line, click the Style tab at the top of the sidebar on the right.

    If you don’t see a sidebar, or the sidebar doesn’t have a Style tab, click Format button in the toolbar.

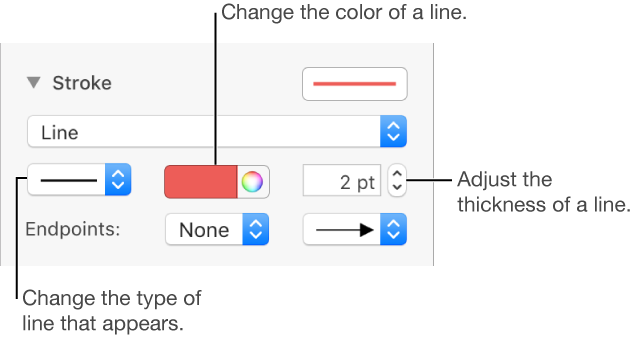
  5. Click a line style at the top of the sidebar, or use the controls in the Stroke section to adjust any of the following:

    • Line type: Click the pop-up menu above Endpoints and choose an option.

    • Color: Click the left color well to choose a color designed to go with the template, or click the color wheel to open the Colors window and choose any color.

    • Thickness: In the field to the right of the color controls, click the arrows.

    • Endpoints: Click the Endpoints pop-up menus, then choose options to change the left endpoint and right endpoint.

    The stroke controls for setting endpoints, line thickness, and color

If you can’t delete a line on a page, it may have been added as a rule between lines of text. To learn how to remove it, see Add borders and rules (lines).

You can save a line as a custom object style so you can apply the formatting to other lines.

Edit line curves and corners

You can edit a curved line to add right-angle corners or curves. As you edit, you can quickly change corners to curves and vice versa.

  1. Select the line, then click the Arrange tab at the top of the sidebar on the right.

    If you don’t see a sidebar, or the sidebar doesn’t have an Arrange tab, click Format button in the toolbar.

  2. Click the Curve or Corner button in the Connection section of the sidebar.

    If you don’t see the buttons, make sure you selected a line with an editing point between the endpoints.

  3. Drag the green dot to change the position of the angles or the curve.

Connect two objects with a line

You can join two objects with a curved, straight, or right-angle connecting line. If you move one or more connected objects, they remain joined by the line. This is especially useful if you’re creating a flowchart.

  1. Click Shape button in the toolbar.

  2. Click the curved line to add it to the page.

  3. Drag one endpoint of the line until it snaps to an object, then drag the other endpoint until the line snaps to another object.

    If the line doesn’t attach to the object, set the object to Stay on Page (in the Arrange tab of the sidebar on the right).

  4. To change the curved line to a straight or right-angle line, select the line, click the Arrange tab in the sidebar, then click Straight or Corner.

  5. To change the amount of space between the endpoints of the line and the objects, select the line, then adjust the Offset Start and End values in the Connection section of the sidebar.

  6. To change the position of the angles or the curve, drag the green dot.

You can change the look of the connection line, just as you would any other line, by changing its thickness, color, line style, and endpoints, and by adding effects like a shadow and reflection.

If you make changes to the appearance of a line, you can save it as a custom object style.

See also
Place objects with text
Use object styles
Resize, rotate, and flip objects
Position and align objects