You can change the appearance of a table by changing the table outline, showing or hiding grid lines, and using alternate row colors.
Change the table outline and grid lines
Click the table.
Click the Table tab at the top of the sidebar on the right.
If you don’t see a sidebar, or it doesn’t have a Table tab, click in the toolbar.
Do any of the following:
Change the outline: Change the line type, thickness, and color, using the Table Outline controls.
Change the grid lines: Click the Grid Lines buttons to add or remove grid lines from the table body, from the header rows and columns, and from footer rows.
Change the border and background of cells
You can change the border and background of any selection of table cells.
To change all the cells in a table, select the table.
Click the Cell tab at the top of the sidebar on the right.
If you don’t see a sidebar, or it doesn’t have a Cell tab, click in the toolbar.
Do any of the following:
Change cell borders: In the Border section, click one of the buttons below Border to choose the cell borders you want to format, then click the Border Styles pop-up menu and choose a border style.
To create a custom cell border, click a border layout option in the Border section, then use the controls to specify a custom style, color, and thickness.
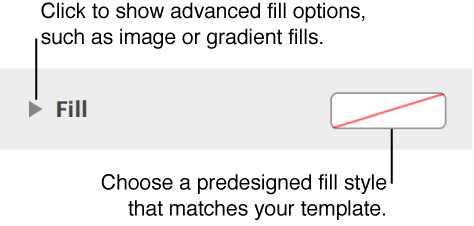
Change the background: In the Fill section, click the color well, then select a color option. To customize the background, click the disclosure triangle next to Fill, then use the controls to make further changes.
You can also create rules to automatically change a cell’s appearance when the value in the cell meets certain conditions. For more information, see Add conditional highlighting to cells.
 in the toolbar.