You can add photos and graphics to a document from your iPhoto or Aperture library, or drag them from a website or from the Finder. You can crop an image by masking out parts you don’t want, and make adjustments to its background and exposure.
Do any of the following:
Drag an image from your computer or a webpage onto the page or onto a placeholder image.
Click
in the bottom-right corner of an image placeholder, then select the image you want to add.
Click
in the toolbar, then drag an image from your iPhoto or Aperture library.
You can click the magnifying glass to search for an image in your iPhoto or Aperture library.
Choose Insert > Choose (from the Insert menu at the top of your screen), then select an image.
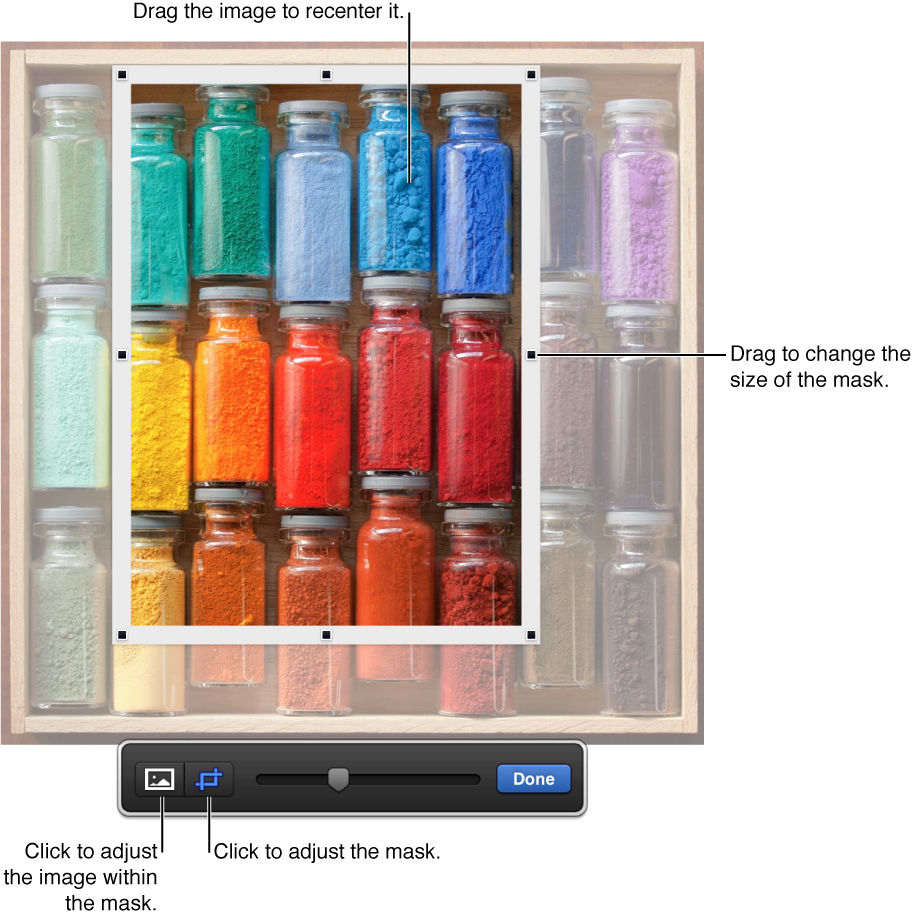
When you replace an image placeholder with your own image, the new image is no longer a placeholder. If you try to add a different image over the one you added, the images overlap. If you want to use a different image than the one you added, press Command-Z to remove the image and restore the placeholder, then add the new image.
You can add image placeholders to documents you frequently update.
Add an image to the document, then format it how you’d like images to appear in the document.
You can add a mask or border, rotate the image, change its size, and more.
Select the image, then choose Format > Advanced > Define as Media Placeholder (from the Format menu at the top of your screen).
If you can’t replace an object on a template, the object may be locked or it may be a master object. To make it editable, do one of the following:
Select the object, click the Arrange tab at the top of the sidebar, then click Unlock.
If you don’t see a sidebar, or it doesn’t have an Arrange tab, click
in the toolbar.
Select the object, then choose Arrange > Section Masters > Make Master Objects Selectable (from the Arrange menu at the top of your screen).
Masking is a way to hide unwanted portions of an image without modifying the image itself.
Double-click the image.
The mask controls appear. The default mask is the same size as your image.
Use the controls to frame just the parts of the image you want to be visible.

Click Done.
You can reset the mask at any time by double-clicking the image to reveal the cropping controls.
Use the Instant Alpha tool to make parts of an image transparent. This feature is useful for removing an unwanted background or color from an image.
Select the image.
Click the Image tab in the sidebar on the right.
If you don’t see the sidebar, or it doesn’t have an Image tab, click
in the toolbar.
Click Instant Alpha.
On the image, click the color you want to remove, then drag slowly over it (as you drag, the selection grows to include areas that use similar colors).
Remove all of the color (even in other parts of the image): Press the Option key as you drag.
Add a color back to the image: Press the Shift key as you drag.
Click Done, or click Reset to restore the image to its original state (and undo all your changes).
Select the image.
Click the Image tab in the sidebar on the right.
If you don’t see the sidebar, or it doesn’t have an Image tab, click
in the toolbar.
Use the controls to make adjustments:
Exposure: Changes the overall lightness or darkness of the entire image.
Saturation: Changes the richness of color in the image. Dragging to the right makes the colors richer or more vibrant.
Enhance: Automatically adjusts the image by spreading the red, green, and blue tones evenly across the histogram.
To see the image histogram and adjust more advanced features like levels, gamma, temperature, and tint, click
.

To restore the original settings, click Reset Image.
Tip: You can add these buttons to the toolbar: Adjust Image, Instant Alpha, and Mask. You can also open the Adjust Image controls in a separate window that you can move anywhere. Choose View > Show Adjust Image (from the View menu at the top of your screen).