You can filter the data in a table to show only the data you’re interested in seeing. You filter data by creating rules that determine which rows in a table are visible.
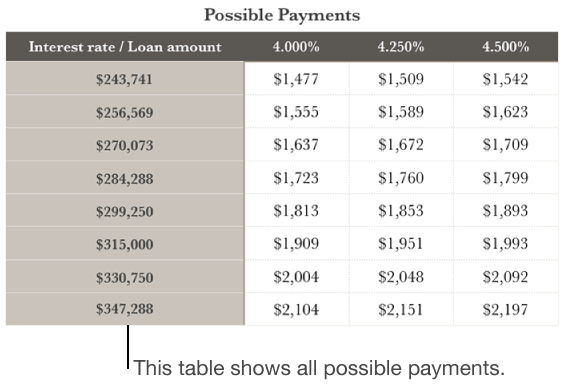
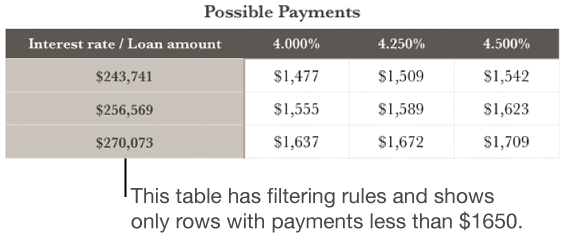
For example, if you’re looking at a table of possible monthly mortgage payments for a loan with various interest rates, you can filter the table to show only the loans you can afford.
Important: If the filter options aren’t available, your table might have cells merged across adjacent rows. You need to unmerge the cells to filter data. Click the merged cells, then choose Table > Unmerge Cells (from the Table menu at the top of your screen). If you’re not sure where the merged cells are, select the table, then choose Table > Unmerge All Cells.
You can quickly filter a table based on one of the values in a column.
Select a column, then click the down arrow on its border.
Choose Filter Table, then choose the value you want to filter by, such as “Female.”
All rows without the “Female” value in the selected column aren’t shown.
To remove the filter, choose the value again.
You can view filtering rules at any time by clicking the Filter tab in the sidebar on the right. If you don’t see a sidebar, or the sidebar doesn’t have a Filter tab, click ![]() in the toolbar.
in the toolbar.
You create filtering rules based on the values in a column. Only rows with the specified values in that column appear.
Click the table.
Click the Filter tab at the top of the sidebar on the right.
If you don’t see a sidebar, or the sidebar doesn’t have a Filter tab, click ![]() in the toolbar.
in the toolbar.
Click Add a Filter, then choose which column to filter by.
Click the type of filter you want (Text, for example), then click a rule (for example, “starts with”).
The filtering rule appears in the Filter tab.
Enter values for your rule; for example, if you select “is not,” type text such as “due by.”
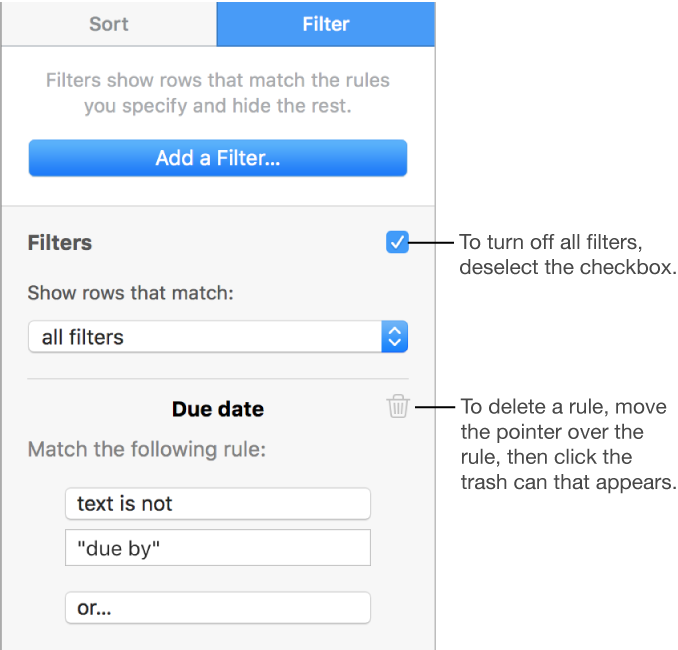
The Filters checkbox is selected and the rule is applied to the table.
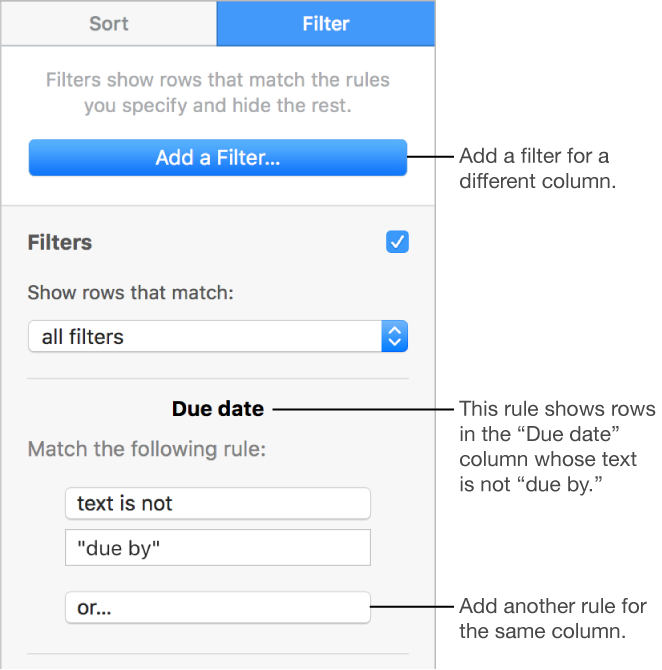
To add another filter for the same column, click Or, then choose a new filter and rule.
You can have multiple filters for a column, such as “Show rows that have ‘yes’ or ‘maybe’ in Column C.”
To add a filter to a different column, click Add a Filter and enter another filtering rule.
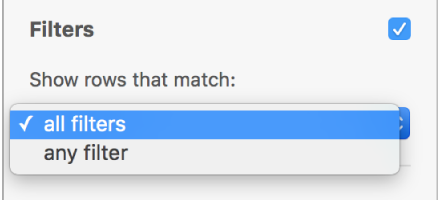
If a table has multiple filtering rules, you can choose whether to show rows that match all filters or any filter in the pop-up menu at the top.
Note: You can’t add new rows to the table until you turn off filtering. To turn off filtering, deselect the Filters checkbox in the Filter tab.
You can turn off all filters for a table without deleting them. You can turn them back on later if necessary. If you don’t need a filter, you can delete it.
Click the table, then click the Filter tab in the sidebar on the right. If you don’t see a sidebar, or the sidebar doesn’t have a Filter tab, click ![]() in the toolbar.
in the toolbar.
Use the controls as follows: