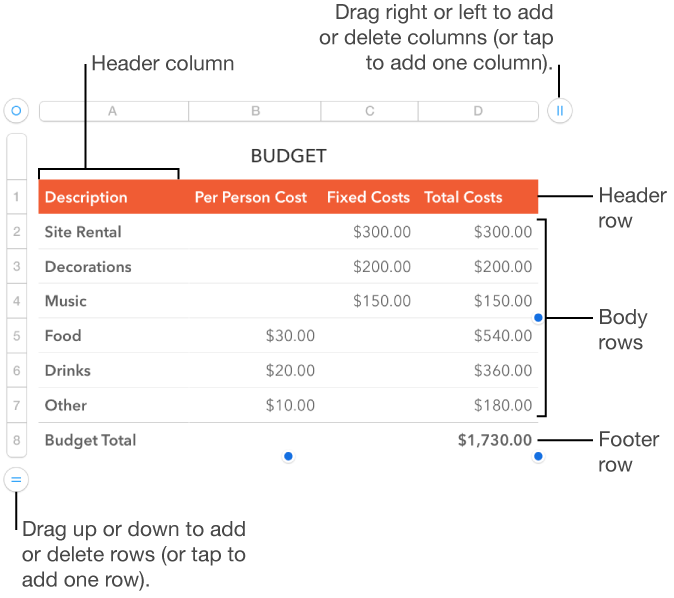

There are three types of rows and columns in a table:
Header rows and columns are optional and can contain text identifying what the row or column contains. Data in header cells isn’t used in calculations, but the text in a header cell can be used in formulas to refer to all the cells in the row or column. A table can have up to five header rows and five header columns.
You can freeze (or lock) header rows and columns so that they’re always visible when you scroll the spreadsheet.
Body rows and columns contain table data. A table must contain at least one body row and one column.
Footer rows appear at the bottom of a table. Footers are optional; you can have up to five footer rows.
Tap the table.
Do any of the following:
Add or delete a row or column at the edge of the table: Tap ![]() at the bottom or
at the bottom or ![]() at the top of the table. (Drag the control to add or delete more than one row or column.) You can delete a row or column only if all of its cells are empty.
at the top of the table. (Drag the control to add or delete more than one row or column.) You can delete a row or column only if all of its cells are empty.
Insert or delete a row or column within the table: Tap the row number or column letter, then tap Insert or Delete.
Adding header rows, header columns, or footer rows converts existing rows or columns into headers or footers. For example, if you have data in the first row of a table and you add a header row, the first row is converted to a header row that contains the same data.
You can freeze header rows or columns so they’re always visible as you scroll the spreadsheet.
Tap the table, tap ![]() , then tap Headers.
, then tap Headers.
Do any of the following:
Add or delete headers and footers: Tap ![]() or
or ![]() next to a header or footer category.
next to a header or footer category.
Freeze header rows or columns: Turn Freeze Rows or Freeze Columns on or off.
Select one or more rows or columns.
Do any of the following:
Move rows: After selecting the rows, touch and hold the row numbers until the rows appear to rise off the table, then drag them above or below another row.
Move columns: After selecting the columns, touch and hold the column letters until the columns appear to rise off the table, then drag them to the right or left of another column.
Tip: If you drag rows or columns outside of an existing table, you create a new table with them.
You can transpose the rows and columns in a table to switch them—Row 1 becomes Column A (the contents of row 1 move into column A) and vice versa, Row 2 becomes Column B, and so on.
Tap the table.
Tap ![]() in the top-left corner of the table, then tap Transpose.
in the top-left corner of the table, then tap Transpose.
These are the results of transposing:
Rows and columns resize to the default width and height for the table.
Header rows become header columns and footer rows become the rightmost columns.
The table style and custom style changes you made are preserved, including alternating row colors, gridline settings, table and cell outlines, cell and text style, conditional highlights, hidden rows and columns, and so on.
Chart data references update so charts reference the same data, even after it’s transposed.
Merged cells transpose normally, unless they’re in the header row. In a few cases, transposing unmerges merged header row cells.
Sort and filter rules are discarded, and a linked form is unlinked, if transposing results in a table that’s not a valid form.
Many formulas and functions update automatically when they’re transposed. Warnings indicate any formulas that can’t be updated.
Note: To undo the transposing and revert all the changes, select the table and transpose it again.
Hiding rows or columns is useful if, for example, you need to use their data for formulas, but you don’t want the data to be visible.
When you sort columns, the hidden cells are also sorted.
Tap the table.
Tap the number or letter for the row or column you want to hide, then tap Hide.
To show hidden rows or columns, tap a row number or column letter adjacent to the hidden ones, then tap Unhide Rows or Unhide Columns.
If you import a Numbers or Microsoft Excel spreadsheet with filtering turned on, some rows in your table may be hidden (or filtered). To display rows that are filtered out, you must turn off filtering.
Tap the table, then tap ![]() in the top-left corner.
in the top-left corner.
Tap Turn Filters Off.
To reapply the filtering criteria, tap Turn Filters On. You can’t add or edit filtering criteria on your iOS device.