
You can add different kinds of audio files to a Motion project. Motion lets you preview files before adding them to your project. Motion supports audio in a variety of common file formats, sample rates, and bit depths. For a complete list, see Supported media formats.
Audio files added to a project are converted to a Motion-specific internal format, allowing you to mix audio files with differing formats, sample rates, and bit depths in the same project.
Note: When you add an audio file, its start point in the Timeline is determined by the Create Layers At preference in the Project pane of Motion Preferences. To adjust this preference, see If it’s your first import.
Do one of the following:
In the toolbar, click Import, locate and select an audio file, then click Import.
Choose File > Import (or press Command-I), locate and select an audio file, then click Import.
Drag an audio file from the Finder into the Layers list, Timeline, canvas, Audio Timeline, or Audio list.
Control-click in the Audio list, choose Import Audio, locate and select an audio file, then click Import.
The audio file is added to the project and appears in the Audio Timeline, Audio list, mini-Timeline, and Media list (but does not appear in the Layers list).
Important: Audio tracks from files with more than two tracks of audio (such as 5.1 surround audio) are imported as individual audio objects.
In the Library, select iTunes, then select Music (or a playlist) in the sidebar to the right.
Select a song in the file stack.
Do one of the following:
In the preview area, click Apply.
Drag the file from the stack to the Layers list, canvas, Timeline, Audio Timeline, or Audio list.
Note: Rights-protected AAC files cannot be imported into Motion and do not appear in the file stack.
The audio file is added to the project and appears in the Audio Timeline, Audio list, mini-Timeline, and Media list (but does not appear in the Layers list).
You can also add an audio file to your project without having it appear in the composition. For example, you might want to archive an audio file for later use. You do this by dragging the file into the Media list.
Click Media in the Project pane to open the Media list.
Drag an audio file from the Finder or Import dialog into the Media list.
The audio file is added to the Media list, but not to the Audio Timeline or Audio list. If you later decide to add the file to the active composition, drag its row from the Media list to the canvas, Timeline, or Audio Timeline.
When you add a QuickTime movie to your project, the movie’s video and audio tracks are both imported. If you don’t need the video, you can add only the audio track to your project.
Drag a QuickTime movie file from the Finder into the Audio list.
The audio track from the movie is added to your project, without the video footage. The video footage is added to the Media list (but isn’t used in your composition).
You can import multi-channel audio from QuickTime files as a single stereo track or as individual tracks.
Choose File > Import (or press Command-I).
In the dialog, select a QuickTime movie file that contains stereo or multi-channel audio tracks.
Click the Audio pop-up menu at the bottom of the Import Files dialog, then choose an import option:
Mix to Stereo: Imports the movie file as a single stereo track.
Import All Tracks: Imports the movie file with a separate audio track for each channel.
Click Import.
If you chose Mix To Stereo, the Audio list displays a single audio track
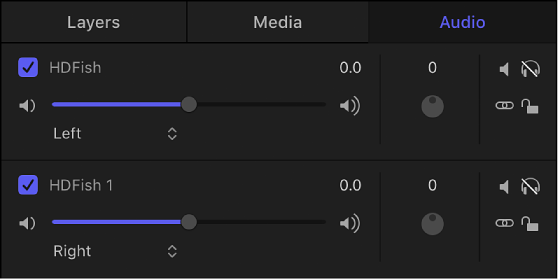
If you chose Import all Tracks, the Audio list displays an individual audio track for each channel in the file. The following image shows the Audio list after importing a stereo QuickTime movie file using the Import All Tracks option, with the resulting left and right tracks.
When you export a multichannel audio file from Motion, you can export all channels or mix them down into a single track. See Select output channels.