Each project has a Master audio track. The controls for the Master track are located at the bottom of the Audio list, below the individual audio tracks. Using the Master track’s controls, you can make changes that affect the final mixed output of all audio tracks. For example, you can lower the volume of all tracks at once, or pan all tracks to the left or right. In addition, you can turn the Master track on or off, or mute it.
You select the Master track by clicking its area at the bottom of the Audio list. When selected, the Master track area is highlighted.
The Master track is turned on by default. When its activation checkbox is deselected, no sound is audible when you play the project, and no audio is included when you export your project. When the checkbox is selected, all audio tracks that are active are included in your export.
Click the checkbox on the left side of the Master track; click the checkbox again to return the Master track to its previous state.
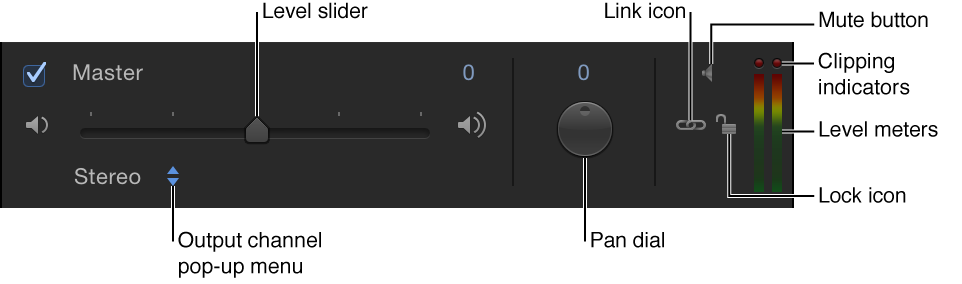
You can use the master Level slider to set the overall volume of audio in your project.
Drag the master Level slider left or right.
The master Level slider multiplies the level setting for each track. For example, if you set a track’s level to 0.5 and you set the master level to 0.5, the combined level is 0.25 (one-fourth) of the original.
Note: If you raise an individual track’s level and the master level so the combined increase is greater than 2, you may cause audio distortion, or clipping.
At the right of the Master track controls is a pair of stereo level meters that display the combined level of all audible tracks. If either of the two red dots above the level meters (called clipping indicators) lights up during playback, your master levels are too high, causing audio distortion, or clipping.
Typically, when working with digital audio, audio engineers set the overall volume level as high as possible without causing clipping. If the clipping indicators light up above the master level meters, you need to find where clipping is occurring and lower the level to eliminate the cause of the clipping.
Play the project and observe where the clipping indicators light up. You can solo each audio track to determine which track is causing the clipping. After you determine which track is causing the clipping, you can lower that track’s overall level, or use keyframes to lower the track’s level at the specific point where clipping occurs. The clipping indicators are “sticky,” meaning that when they light up, they stay lit until you reset them or close the project. This helps remind you to find and eliminate the cause of the clipping before you export your project. As you work to eliminate clipping, reset the clipping indicators and play the project again to make sure clipping no longer occurs.
To reset a clipping indicator, click a lit clipping indicator.
Adjust the Pan dial to place the sound where you want it in the stereo field.
The Pan dial in the Master track works with the pan setting for each track. For example, if you pan a track to –100 (hard left) and you pan the master to 100 (hard right), the track is inaudible.