Using Gestures

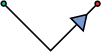
The following illustration shows the basic gesture anatomy. The green dot represents the start of the gesture; the blue arrow is the direction of your gesture; and the red dot the end of the gesture. Draw the gesture on the tablet, with your pointer in the Motion Canvas or Timeline.

Figure. Diagram showing basic gesture anatomy including start position, direction of movement, and end position icons.

Modifier Keys

Many gestures have additional functionality when used with a key on the keyboard. In the following tables, if a gesture has an entry in the Modifier keys column, it has additional functionality accessible via a keyboard shortcut. For example, if you have the Control key set as the gesture trigger, and you draw the play forward gesture, the project plays forward from the current time. If you press Control-Shift and draw the play forward gesture, the project plays from the start of the project.

The Motion Gestures

The following tables describe the available Motion gestures and their modifier keys, where applicable.

Note: There is no defined minimum or maximum scale for the gestural input. The tolerance is defined by the Inkwell technology. However, the size at which gestures are drawn may affect the result of the gesture. For example, when using the fit-to-fill zoom gesture and you draw a large circle, the zoom amount is small. If you draw a small circle, the zoom is large.

Playback Control Gestures

Use the gestures described in the following table for controlling playback.

Gesture
Description
Modifier keys
Figure. Diagram showing a left-to-right gesture.
Advance one frame.
To advance in increments of 10 frames, press Shift.
Figure. Diagram showing a right-to-left gesture.
Go back one frame.
To go back in increments of 10 frames, press Shift.
Figure. Diagram showing a gesture moving left-down, then right-down creating the right side of a diamond shape.
Play forward at normal speed.
  • To play from start, press Shift.

  • To turn looping on or off, press Option.

Figure. Diagram showing an up-to-down gesture.
Stop or pause playback.

General Navigation

Use the gestures in the following table for general navigation, such as zooming the Canvas and displaying the panes in the Motion user interface.

Gesture
Description
Modifier keys
Figure. Diagram showing a curved gesture moving from 2 o'clock to 10 o'clock in a clockwise direction.
Zoom in to the Canvas.
  • To zoom to the area within the gesture, press Shift. For example, if you draw a small gesture around an area, you get a large zoom. If you draw a large gesture, you get a small zoom.

  • To position the zoom at the center of the gesture, press Option.

Figure. Diagram showing a curved gesture moving from 10 o'clock to 2 o'clock in a counterclockwise direction.
Zoom out of the Canvas.
To position the zoom out at the center of the gesture, press Option.
Figure. Diagram showing a curved gesture moving from 10 o'clock to 12 o'clock in a counterclockwise direction, then moving straight downward to 6 o'clock.
Select the Zoom tool. To zoom in and out of the Canvas, move the pen left or right. The zoom is centered on the area where the pointer is placed in the Canvas.
Figure. Diagram showing a curved gesture moving from 9 o'clock to 3 o'clock in a clockwise direction then moving directly left back toward 9 o'clock in a straight line.
Select the Pan tool.
Figure. Diagram showing a triangular gesture moving from lower left corner to top, to lower right corner, and back to the first point to complete the triangle.
Set the Canvas to Home (100 percent).
Figure. Diagram showing a square-shaped gesture beginning at the upper left corner in a clockwise direction.
Fit the Canvas in the window.
To switch the Canvas display to full-screen mode, press Shift.
Figure. Diagram showing a backwards N-shaped gesture (vertical zig-zag) moving from upper left to lower right.
Show or hide the Timing pane.
Figure. Diagram showing a Z-shaped gesture (horizontal zig-zag) moving from upper left to lower right.
Show or hide the Project pane.
Figure. Diagram showing a circular gesture beginning at 12 o'clock, moving straight down to six o'clock, then completing a full counterclockwise circle.
Show or hide the Inspector.
Figure. Diagram showing a P-shaped gesture starting at the bottom of the stem.
Show or hide the File Browser.
Figure. Diagram showing an L-shaped gesture beginning at the top of the stem, and making a small clockwise loop before proceeding along the horizontal line.
Show or hide the Library.

General Commands

The following table describes the gestures for general commands, such as undo, select, and copy and paste.

Gesture
Description
Modifier keys
Figure. Diagram showing a curved gesture moving counterclockwise from 3 o'clock to 12 o'clock.
Undo.
Figure. Diagram showing a curved gesture moving clockwise from 9 o'clock to 12 o'clock.
Redo.
Figure. Diagram showing a bowtie-shaped gesture moving from upper-left corner and ending at the lower-left corner.
Delete the selected object.
Figure. Diagram showing a checkmark-shaped gesture beginning at the top of the short (left) side and ending at the top of the tall (right) side.
Choose the Select/Transform tool.
Figure. Diagram showing a down-to-up gesture.
Show and hide the HUD.
Figure. Diagram showing an up-to-down gesture with a C-shaped curve on the way down.
Copy.
Figure. Diagram showing a P-shaped gesture, beginning at the upper left, moving downwards, then back up to make the clockwise loop.
Paste.
Note: The Paste command may be a bit tricky to master.

Timeline Navigation and Editing Gestures

The following table describes the gestures used for Timeline navigation and editing.

Gesture
Description
Modifier keys
Figure. Diagram showing an upside-down L shape, beginning with a right-to-left movement, then a movement straight downward.
Go to the start of the play range.
Figure. Diagram showing an upside-down L shape, beginning with a left-to-right movement, then a right-angle downward.
Go to the end of the play range.
Figure. Diagram showing a curved gesture moving from 3 o'clock to 9 o'clock in a counterclockwise motion, then moving straight upwards.
Go to the start of the project.
Figure. Diagram showing a curved gesture moving from 9 o'clock to 3 o'clock in a clockwise motion, then moving straight upwards.
Go to the end of the project.
Figure. Diagram showing an L shape, beginning at the lower-right corner and moving up towards the top of the stem.
Go to the start of the selected object.
Figure. Diagram showing a backwards  L shape, beginning with a left-to-right movement, then making a right-angle turn upward.
Go to the end of the selected object.
Figure. Diagram showing a left-to-right movement with a large counterclockwise loop in the middle.
Group.
Figure. Diagram showing a right-to-left movement with a large clockwise loop in the middle.
Ungroup.
Figure. Diagram showing a lowercase d-shaped gesture beginning at the top of the stem and making sharp diagonal angles rather than the curved loop at the bottom of the "d" shape.
Set a local In point for the selected object.
To move the In point to the playhead position, press Shift.
Figure. Diagram showing a b-shaped gesture beginning at the top of the stem and making sharp diagonal angles rather than the curved loop at the bottom of the "b" shape.
Set a local Out point for the selected object.
To move the Out point to the playhead position, press Shift.
Figure. Diagram showing a gesture moving from bottom left towards upper right, then a right-angle movement downward toward the lower right, forming the top half of a diamond shape.
Bring the selected object forward in the stack.
To bring an object to the front of the stack, press Shift.
Figure. Diagram showing a gesture moving from upper left towards bottom right, then a right-angle movement upward towards the upper right, forming the bottom half of a diamond shape.
Send the selected object backward in the stack.
To send an object to the back of the stack, press Shift.
Figure. Diagram showing a left-to-right movement, beginning with a sharp, upward diamond top.
Add a project marker.
  • To edit a project marker, press Shift.

  • To clear a project marker, press Option.

Figure. Diagram showing a left-to-right movement, beginning with a sharp, downward diamond bottom.
Add an object marker.
  • To edit an object marker, press Shift.

  • To clear an object marker, press Option.

Figure. Diagram showing a square bracket-shaped gesture beginning at the upper right and ending at the lower right.
Set the start of the play range.
To clear the play range, press Option.
Figure. Diagram showing a square bracket-shaped gesture beginning at the upper left and ending at the lower left.
Set the end of the play range.
To clear the end of the play range, press Option.