Expose Commands
Motion’s expose key commands provide a way of viewing multiple layers at once, exploding and rescaling them.
The expose commands allow you to access all layers in a project in the Canvas without having to drill down into the Layers list or Timeline. Expose commands also let you select inactive layers at the playhead’s current position or jump to a selected layer’s In point.
There are two expose commands: One displays all layers in a project, and the other displays only those layers active at the current position of the playhead in the Timeline.
Exposing Active Layers
The Expose Active Layers command lets you view the layers that are active at the position of the playhead in the Timeline.
Click anywhere in the Canvas.
Press X.
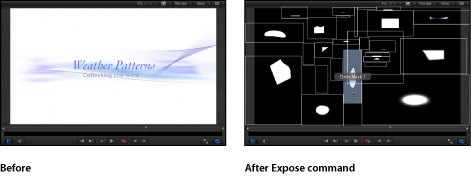
Layers active at the current position of the playhead temporarily scale down and spread out over the Canvas. Each active layer is represented by a white frame in the Canvas. Moving the pointer over a frame reveals the layer’s name.
Select the layer to work on.
The elements move and rescale back to their original positions; the element is selected in the Canvas; and the playhead moves to the first frame of the selected layer.
Exposing All Layers
Using the Expose All Layers key command, you can get a visual sense of all elements in your project and select an element to manipulate.
Click anywhere in the Canvas.
Press Shift-X.
Layers in the project temporarily scale down and spread out over the Canvas. Each layer in the project is represented by a white frame in the Canvas. Moving the pointer over a frame shows the layer’s name.
Select the layer to work on.
The layers move and rescale back to their original positions; the element is selected in the Canvas; and the playhead moves to the first frame of the selected layer.