Working with Audio Tracks
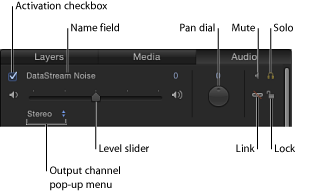
When you add an audio file to your project, Motion creates one or more audio tracks for the file. In the Audio list of the Project pane, you can turn audio tracks on and off, select tracks, mute and solo tracks, and control their volume and pan settings.
Important: Changes you make to an audio track, such as renaming or trimming it, do not affect the source audio file.
The following list summarizes audio controls available to individual audio tracks:
- To select an audio track: Click in the row containing the track’s name and controls in the Audio list or Audio Timeline. Selected tracks are highlighted. You can select multiple tracks by Shift-clicking.
- To turn an audio track on or off: Click the activation checkbox on the left side of the track. (You can also click the activation checkbox to the left of the track’s name in the Audio Timeline). Turning off an audio track removes it from the audio mix.
- To rename a track: Double-click the track’s name, then enter a new name.
- To adjust a track’s audio volume: In the Audio list, the track’s HUD, or the Audio Track Inspector, drag the Level slider to set the level you want. You can also change the parameter numerically using the value field to the right of the Level slider in the Audio Track Inspector.
- To pan a track, changing its position: Adjust the Pan dial left or right. (In the Audio Track Inspector or Audio Track HUD, drag the Pan slider left or right).
- To mute a track, temporarily silencing it during playback: Click the Mute button. When you mute an audio track, it is silent during playback, but is still part of the mix when you export your project. You can also mute tracks in the Audio Timeline by Control-clicking a track and choosing Mute from the shortcut menu.
- To solo a track, temporarily muting all other tracks: Click the Solo button. When you solo an audio track, all other audio tracks are muted, which lets you hear the soloed track more clearly. If you solo multiple audio tracks, all tracks not soloed are muted (silent) during playback.
- To unlink a track: Click the link icon. Unlinked audio can be moved independently of its accompanying video track in the Timeline. Click the link icon again to relink it to the same video track it was originally linked to. If you’ve offset its position in the Timeline, the offset is maintained when the audio track is linked again.
- To lock a track, preventing it from being edited: Click the lock icon on the right side of the track. Click the lock icon again to unlock the track. When a track is locked, you cannot mute or solo the track, change its level or pan, move or trim it, or add keyframes. You can still play the track, and turn it on or off.
Selecting Output Channels
If you’re working with multichannel audio, you can adjust which tracks are assigned to which output channels, or you can create your own multichannel file from mono tracks.
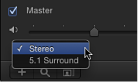
Choose 5.1 Surround or Stereo from the output channel pop-up menu in the Master track area at the bottom of the Audio list.
Choose an output channel for a specific audio track from the output channel pop-up menu in the Audio list).
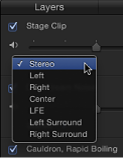
Note: If you do not have surround-sound hardware, the Center, LFE, Left Surround, and Right Surround output channels are italicized. You can still select those channels, and your choices are reflected in an exported project or playback on a system that has the necessary hardware.
Working with the Master Track
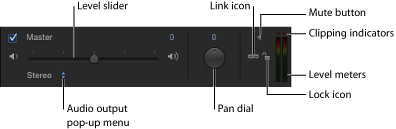
Each project has a Master audio track. The controls for the Master track are located at the bottom of the Audio list, below the individual audio tracks. Using the Master track’s controls, you can make changes that affect the final mixed output of all audio tracks. For example, you can lower the volume of all tracks at once, or pan all tracks to the left or right. In addition, you can turn the Master track on or off, or mute it.
You select the Master track by clicking its area at the bottom of the Audio list. When selected, the Master track area appears highlighted.
Turning the Master Track On or Off
The Master track is turned on by default. When its activation checkbox is deselected, no sound is audible when you play the project, and no audio is included when you export your project. When the checkbox is selected, all audio tracks that are active are included in your export.
Click the checkbox at the left side of the Master track, then click the checkbox again to return the Master track to its previous state.
Setting Master Level
You can use the master Level slider to set the overall volume level for the audio in your project.
Drag the master Level slider to set the level you want.
The master level works with the level setting for each track. For example, if you set a track’s level to 0.5 and you set the master level to 0.5, the combined level is 0.25 (one-fourth) of the original.
Note: If you raise an individual track’s level and the master level so the combined increase is greater than 2, you may cause audio distortion, or clipping.
Viewing the Master Level
At the right of the Master track controls is a pair of stereo level meters that display the combined level of all audible tracks.
If either of the two red dots above the level meters (called clipping indicators) lights up during playback, this indicates that your master levels are too high, causing audio distortion or clipping.
Preventing Clipping
Typically, when working with digital audio, audio engineers set the overall volume level as high as possible without causing clipping. If the clipping indicators light up above the master level meters, you need to find where clipping is occurring and lower the level to eliminate the cause of the clipping.
If clipping occurs, play the project and observe where the clipping indicators light up. You can solo each audio track to determine which track is causing the clipping.
After you determine which track is causing the clipping, you can lower the track’s overall level, or use keyframes to lower the track’s level at the specific point where clipping occurs.
The clipping indicators are “sticky,” meaning that when they light up, they stay lit until you reset them or close the project. This helps remind you to find and eliminate the cause of the clipping before you export your project. As you work to eliminate clipping, reset the clipping indicators and play the project again to make sure clipping no longer occurs.
Click the lit clipping indicator.
Setting Master Pan
You can use the Pan dial in the Master track to set the left-right pan position for the audio.
Adjust the Pan dial to place the sound where you want it in the stereo field.
The Pan dial in the Master track works with the pan setting for each track. For example, if you pan a track to –100 (hard left) and you pan the master to 100 (hard right), the track is inaudible.
Playing Audio
When you click the Play button in the transport controls underneath the Canvas, you hear the audio tracks in your project play in time with your visuals. You can also play an audio track separately from the project Timeline.
Click the Play button in the transport controls.
When you click the Play button, you hear all audio tracks in the project that are turned on and are not muted.
Slipping and Sliding Audio Tracks
When you import an audio file, its start point is placed at the start of the project or at the current playhead position (depending on the setting of the Create Layers At parameter in Motion preferences). You can slide an audio track in the Audio Timeline or mini-Timeline so the track starts playing at a different point in time. And you can slip a trimmed audio track in the Audio Timeline or mini-Timeline so a different range of media plays at the same location.
Select a track in the Audio list, then drag the track’s green bar to the left or right in the mini-Timeline.
Click the Show/Hide Audio Timeline button in the lower-right corner of the Motion project window, then drag the track’s bar to the left or right in the Audio Timeline.
In the Audio list, select the track.
The track’s timebar appears in the mini-Timeline.
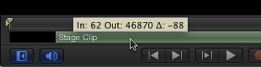
With the pointer over the bar in the mini-Timeline, hold down the Option key so the slip pointer appears, then drag left or right to slip the In and Out points.
As you drag, a dimmed bar representing the full range of the audio clip appears over the green bar, and a tooltip appears, showing the In and Out points for the track.
Note: You can only slip media that has had its In or Out points trimmed.
Click the Show/Hide Audio Timeline button in the lower right-corner of the Motion project window.
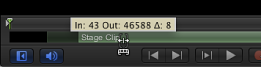
With the pointer over the green bar in the Audio Timeline, hold down the Option key so the slip pointer appears, then drag left or right to slip the In and Out points.
As you drag, a dimmed bar representing the full range of the audio clip appears over the green bar, and a tooltip appears, showing the In and Out points for the track.
Note: You can only slip media that has had its In or Out points trimmed.
Trimming Audio Tracks
You can edit the start and end points of an audio track to cut down the length of the audio in the track, or to start or it end at a specific point in time. This is called trimming the track. Trimming an audio track is nondestructive and does not affect the original audio file.
In the Audio list, select the track to trim.
The track’s green timebar appears in the mini-Timeline.
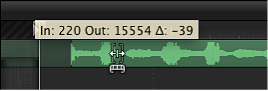
Hold the pointer over the beginning or end of the timebar in the mini-Timeline until the trim pointer appears, then drag left or right to trim the In or Out point for the track.
As you drag, a tooltip shows you the new In or Out point and the duration of the modified track.
Click the Show/Hide Audio Timeline button in the lower-right corner of the Motion project window.
The Audio Timeline appears.
Position the pointer over the beginning or end of the timebar in the Audio Timeline until the trim pointer appears, then drag left or right to trim the In or Out point for the track.
As you drag, a tooltip shows you the new In or Out point and the duration of the modified track.
In the Audio list, select the audio file to trim.
Open the Properties Inspector and show the Timing parameters.
Alter the In, Out, or Duration parameters to change the duration of the audio in your project.
Scrubbing an Audio Track
You can scrub an audio track to hear the audio in your project as you move the playhead.
Hold the Option key down while dragging the playhead right or left in the mini-Timeline or Audio Timeline.
Pausing the pointer in the middle of a drag while holding the Option key down loops the five frames adjacent to the current frame.
Note: Audio looping while scrubbing is turned on by default. You can turn off looping by choosing Motion > Preferences, clicking the Time icon, then deselecting the “Loop audio while scrubbing” checkbox.