Using the Luma Keyer Filter
The Luma Keyer filter pulls a key from an image or clip based on a selected range of image lightness. Although typically used to key out a white background behind a foreground subject, the Luma Keyer filter can also be used to generate creative effects by turning a narrow range of image brightness transparent. The Luma Keyer filter can also isolate rasterized logo and text graphics from a black or white background.
Luma keys are most effective when you’re keying a subject with a range of lightness different from the area you’re turning transparent. For example, if you’re keying a black background, the foreground subject should not have have deep shadows or dark areas that might get keyed with the background. Generally speaking, shadows and highlights in the image usually make this a difficult filter for pulling a perfect key.
Luma Keyer
The Luma Keyer filter appears to have similar controls to the Keyer filter. However, because the Luma Keyer generates keys based on a simple range of lightness in an image, rather than a range of color and lightness, its controls are simpler.
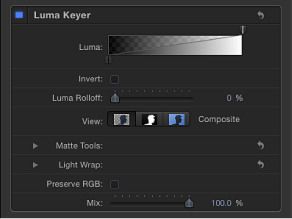
- Luma: Drag the handles of this grayscale gradient to adjust tolerance and softness in the matte. When you first apply the Luma Keyer filter to an image layer in Motion, the Luma control displays two handles: a Tolerance handle in the upper right, and a Softness handle in the lower left.
Dragging the top handle to the left reveals a second tolerance handle. Together, these handles define the range of image lightness used to define the core transparency of the resulting matte. The range of lightness turned transparent is indicated by a checkerboard pattern behind the gradient.
Two handles under the gradient define the softness, or edge transparency, of the key. (The second softness handle may not be visible until you drag the two tolerance handles left.) Dragging either of the lower softness handles further out and away from the upper tolerance handles results in a key with softer edges. You can also drag the slope in the graph to adjust the softness handles.
- Luma Rolloff: Use this slider to adjust the linearity of the falloff between the Luma control’s tolerance and softness handles. Modifying this parameter changes the softness of the matte around the edges in regions that are affected most by the Luma control. Decreasing the Luma Rolloff value makes the slope between the two handles of the Luma control more linear, which visibly increases edge softness. Increasing this value makes the slope between the handles of the Luma control steeper, sharpening the edges of the matte and making them more abrupt.
- View: Use these buttons to switch among three keying preview modes in the Canvas, useful for refining your key.
- Matte: When selected, the middle button displays the grayscale matte, or alpha channel, generated by the keying operation. Viewing the alpha channel lets you evaluate the parts of the generated matte. Areas in the matte that appear white are visible in the final composite; areas that appear black are transparent; and areas with shades of gray are semitransparent (lighter grays being more solid, and darker grays being more translucent). Viewing the alpha channel makes it easier to spot unwanted holes in the key, or areas of the key that aren’t transparent enough.
- Matte Tools: Click the disclosure triangle in the Matte Tools row to reveal controls for post-processing the transparency matte generated by the previous sets of parameters. These parameters do not alter the range of values sampled to create the keyed matte. Instead, they alter the matte generated by the Luma and Luma Rolloff controls, letting you shrink, expand, soften, or invert the matte to achieve a better composite.
- Fill Holes: Use this slider to adjust solidity in regions of marginal transparency throughout a key. This parameter is useful when you’re satisfied with the edges of your keyed matte but have unwanted holes in the interior of the foreground subject that you can’t eliminate using the Strength parameter without ruining edges. Higher slider values fill more holes in the solid areas of the keyed subject.
- Edge Distance: Use this slider to adjust how close to the edge of your keyed subject the effect of the Fill Holes parameter gets. Reducing this parameter brings the solid, nontransparent area of the matte closer to the edge of the subject being keyed, sacrificing translucence at the edges in favor of filling unwanted holes at the edge of the keyed subject, or retrieving areas of semitransparent detail, such as hair, smoke, or reflections. Raising this parameter pushes the filled area of the matte further to the interior of the subject, away from the edges, adding translucence to regions of the image that aren’t being keyed aggressively enough. Raising this parameter too much can introduce regions of unwanted translucence in parts of the subject that should be solid.
- Levels: Use this grayscale gradient to alter the contrast of the keyed matte, by dragging three handles that set the black point, white point, and bias (distribution of gray values between the black point and white point). Adjusting the contrast of a matte can be useful for manipulating translucent areas of the key to make them more solid (by lowering the white point) or more translucent (by raising the black point). Dragging the Bias handle right erodes translucent regions of the key, while dragging the Bias handle left makes translucent regions of the key more solid.
- Black, White, Bias: Click the disclosure triangle in the Levels row to reveal sliders for the Black, White, and Bias parameters. These sliders, which mirror the settings of the Levels handles described above, allow you to keyframe and apply Parameter behaviors to the three Levels parameters (via the Add Keyframe button to the right of each slider). Keyframing the Black, White, and Bias parameters may yield a better key, one that adapts to changing blue screen or green screen conditions.
- Shrink/Expand: Use this slider to manipulate the contrast of the matte to affect matte translucence and matte size simultaneously. Drag the slider left to make translucent regions more translucent while simultaneously shrinking the matte. Drag the slider right to make translucent regions more solid while simultaneously expanding the matte.
- Light Wrap: Click the disclosure triangle in the Light Wrap row to reveal controls for blending color and lightness values from the background layer of your composite with the keyed foreground layer. Using these controls, you can simulate the interaction of environmental lighting with the keyed subject, making it appear as if background light wraps around the edges of a subject.
In Motion, the Light Wrap operation blends light and dark values from the background with the edges of the keyed foreground subject, and can be used to create color mixing effects around the edges of the solid part of a key to better marry the background and foreground layers of your keyed composite.
Light Wrap is the last operation in the image-processing pipeline. In other words, the light-wrap effect is added after every other image operation is processed, including filters, lights and shading, and other composited effects. As a result, Light Wrap accounts for any visual effect that might alter the look of the object it is applied to, yielding the most desirable result.
Important: A separate Light Wrap option appears in the Blend Mode pop-up menu of the Properties Inspector for a selected layer or group in Motion. The Light Wrap blend mode in the Properties Inspector for a layer is ignored when you add a Keyer filter to that layer and set the Light Wrap Amount parameter to a value greater then 0. (The Light Wrap parameters of the Keyer filter take precedence.) However, if you set the Amount parameter of the Light Wrap group to 0, the Light Wrap blend mode becomes active again. Further, the Light Wrap blend mode in the Properties Inspector for a group overrides the Light Wrap parameters of any Keyer filters in that group.
- Mode: Use this pop-up menu to choose the compositing method to blend the sampled background values with the edges of the keyed subject. There are five modes:
- Normal: Evenly blends light and dark values from the background layer with the edges of the keyed foreground layer.
- Lighten: Compares overlapping pixels from the foreground and background layers, then preserves the lighter of the two. Good for creating a selective light wrap effect.
- Screen: Superimposes lighter portions of the background layer over wrapped areas of the keyed foreground layer. Good for creating an aggressive light wrap effect.
- Overlay: Combines the background layer with the wrapped areas of the keyed foreground layer so overlapping dark portions become darker, light portions become lighter, and colors become intensified.
- Hard Light: Acts like the Overlay composite mode, except that colors become muted.
- Preserve RGB: Select this checkbox to preserve smooth graphics and text. Some images may be rendered as if they have an alpha channel, even though they don’t. A good example is white text on a black background. Rasterized text in most images is antialiased properly, and further modification to the RGB channels by the Luma Keyer can degrade the quality of the edges. Selecting the Preserve RGB checkbox adds transparency to the image without modifying the RGB channels, leaving smoothly aliased text or graphics visually intact.
The HUD contains the following controls: Luma and Luma Rolloff.