Adding a Playback Plug-in
The Playback plug-in is an Instrument plug-in and is available only for software instrument channel strips. To use the Playback plug-in, you add it to a software instrument channel strip, then select an audio file to play. You can add a Playback plug-in to a channel strip in a patch or at the set or concert level.
Where you add an instance of the Playback plug-in depends on how you want to use it. If you want to play back an audio file while you play a single patch, you can add it to the patch. If you add a Playback plug-in at the set level, you can select different patches in the set and have the audio file continue playing. This can be useful, for example, if the set includes all the patches you’ll use in a song, and the Playback plug-in plays an audio file with a backing track for the song. If you add a Playback plug-in at the concert level, you can select different patches in the concert and have the audio file continue playing. The ability to use the plug-in at any level gives you a great deal of creative freedom in how you use it.
Each instance of the plug-in can play one audio file. You can use audio files in a variety of file formats including AIFF, WAVE, and CAF. You can play audio files containing marker information, including files exported (bounced) from Logic Pro and Apple Loops, and shift playback to markers located at different time positions in the audio file.
There are two ways to add a Playback plug-in: by dragging an audio file to the Channel Strips area or from the Instrument slot on a channel strip.
In the Patch List, select the patch to which you want to add a Playback plug-in. You can also select a set or the concert icon.
Drag an audio file from the Finder to the space between channel strips in the Channel Strips area.
A black line appears between the channel strips, and the pointer becomes an Add File pointer as a new channel strip is created. The new channel strip contains a Playback plug-in with the audio file you dragged to the Channel Strips area.
Click the Add Channel Strip button to add a new channel strip to the patch, set, or concert.
In the new Channel Strip dialog, select Software Instrument as the type. Leave other settings at their default values, or change them to suit your setup.
A new software instrument channel strip appears in the Channel Strips area.
In the I/O section of the channel strip, click the Instrument slot, choose Playback from the menu, then choose either Mono or Stereo from the submenu.
The Playback plug-in is added to the channel strip, and the plug-in window appears over the MainStage window.
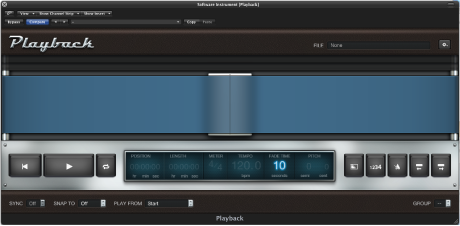
You can add an audio file to a Playback plug-in in one of several ways: by dragging an audio file, by clicking in the File field, or by using the Action menu in the plug-in window.
Adding an Audio File to the Playback Plug-in
After you add an instance of the Playback plug-in, you select and add the audio file you want to play using the plug-in.
Drag the audio file to the Instrument slot with the Playback plug-in.
Drag the audio file to the “tape” area of the plug-in window.
Click the File field in the plug-in window, select an audio file in the Open dialog, then click Open.
Choose Open File from the Action menu at the upper right of the Playback plug-in window, select an audio file in the Open dialog, then click Open.
The name of the audio file appears in the File field, and the waveform of the audio file appears in the Waveform display.
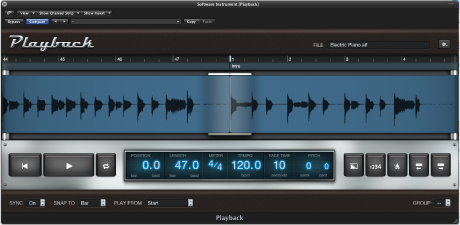
You can preview an audio file in the Open dialog by selecting the file and clicking Play. To hear the file after adding it to the Playback plug-in, click the Play button in the plug-in window.
Setting the Sync Mode for the Playback Plug-in
When you add an audio file to the Playback plug-in, MainStage looks for tempo information in the file. For audio files containing tempo information (including Apple Loops and files exported from Logic Pro), the file is scanned for transients (short bursts of audio energy that usually occur on rhythmic beats). Transient information is stored in the audio file and used to play the file with the best audio quality, even when the file is played at a different tempo or pitch. For these audio files, you can use the Sync feature to set whether the audio file plays at its recorded tempo or uses the current tempo of the concert. When Sync is set to Off, the audio file plays at its recorded tempo, regardless of the current tempo of the concert. This can be desirable, for example, when the audio file contains non-pitched sounds or a sound effect. When Sync is set to On, the audio file plays at the current tempo (set by the patch, set, or concert, by tapping the tempo, or by listening to MIDI beat clock). This makes it easy to keep backing tracks, for example, in time with each other and with your performance. Setting Sync to On can affect audio quality.
You set the Sync mode for an instance of the Playback plug-in from the Sync pop-up menu, located in the lower-left corner of the plug-in window.
To have the audio file play back at its original tempo, choose Off from the Sync pop-up menu.
To have the audio file play back at the current tempo of the concert, choose On from the Sync pop-up menu.
Note: For audio files that do not contain tempo information, Sync is set to Off and the Sync pop-up menu is unavailable.
Choosing the Flex Mode for the Playback Plug-in
For audio files containing tempo information, you can choose between different flex modes for playing back audio. Each flex mode is optimized for playback of a certain type of audio file, and you can choose which flex mode an instance of the Playback plug-in uses to play back the audio file you added. The flex modes available are:
- Slicing: Slices the audio material at transient markers and plays each slice at its original speed. Slicing is a good choice for general use, particularly for rhythmic material.
- Rhythmic: Based on the time-stretching algorithm used for Apple Loops, Rhythmic is best suited for playing non-monophonic material, such as rhythmic guitars, rhythmic keyboard parts, and Apple Loops.
- Speed: Time-stretches material by playing the source material faster or slower, including changing the pitch. Speed is recommended for percussive material.
- Polyphonic: Based on a phase vocoder, Polyphonic time-stretches material, delivering high sonic quality with suitable polyphonic material. It is recommended for complex polyphonic material and is good for all kinds of chords—such as guitar, piano, and choir—and for complex mixes.
Because each flex mode can produce different results depending on the audio material, it is recommended that you try out different flex modes for each instance of the Playback plug-in to determine which provides the best playback for your audio files.
Choose Flex Mode from the Action menu at the upper right of the plug-in window, then choose the flex mode from the submenu.
Note: For audio files that do not contain tempo information, the Flex Mode menu item is unavailable.
Adding Screen Controls for the Playback Plug-in
You can use screen controls to control the parameters of the Playback plug-in, display parameter values and the name of the audio file, and display the audio waveform of the audio file. The Screen Controls palette includes a waveform screen control that you can use with the Playback plug-in to view the waveform of the audio file. If the audio file contains markers, you can also view the markers in the waveform screen control.
Click the Layout button (in the upper-left corner of the MainStage window) to switch to layout mode.
Drag a waveform screen control to the workspace, and position it as needed.
Note: If there is no Playback plug-in in the patch, an alert appears when you try to add a waveform screen control.
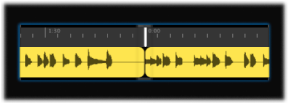
When you map the waveform screen control to the Playback plug-in, the waveform for the audio file loaded in the Playback plug-in appears in the waveform screen control. When you press the button you mapped to the Play/Stop parameter, the audio file starts playing, and you see the waveform move across the waveform screen control.
You can add screen controls for other parameters, including Fade Out, Cycle, Tempo, and so on, and map them to the corresponding parameters in the Mapping browser or in the Playback plug-in window. You can also map a parameter text screen control to the File field and have it display the name of the audio file being played.