Editing Screen Control Parameters in Edit Mode
In Layout mode, you edit basic screen control parameters that are constant throughout the entire concert. In Edit mode, you can edit screen control parameters for a specific patch or set. You can also override concert- and set-level mappings for an individual patch or set.
Overriding Concert- and Set-Level Mappings
By default, mappings you make at the concert level (to parameters and actions) take precedence over mappings to individual patches or sets in the concert. If you map a screen control to a parameter at the concert level (for example, to Master Volume), that screen control cannot be mapped to a parameter or action in a patch or set, unless you override the concert-level mapping.
Similarly, mappings you make at the set level take precedence over mappings for any patches in the set. If you map a screen control to a parameter at the set level (for example, to an effect on a set-level channel strip), that screen control cannot be mapped to a parameter or action in a patch in the set, unless you override the set-level mapping.
If you try to map a screen control that is mapped at the concert or set level, text appears in the Screen Control Inspector informing you that the screen control is mapped at another level, and the parameters in the Screen Control Inspector are dimmed. You can override the concert- and set-level mappings for an individual patch, and then map the screen control at the patch level.
In the Screen Control Inspector, select the Override Concert Mapping checkbox.
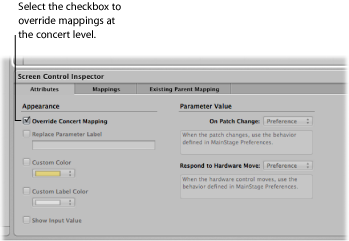
The parameters in the Screen Control Inspector become active.
In the Screen Control Inspector, select the Override Set Mapping checkbox.
The Parameter Mapping section becomes active so that you can map the parameter.
Mapping tabs for concert-level mappings are available only at the concert level, and mapping tabs for set-level mappings are available only at the set level. When you override a concert- or set-level mapping, the mapping tabs become available at the level of the override.
Replacing the Parameter Label
You can replace the parameter label for a screen control (for an individual patch or set), to make the label easier to identify.
Select the screen control in the workspace.
In the Screen Control Inspector, select the Attributes tab.
Select the Replace Parameter Label checkbox.
Enter the new label text in the field.
Choosing a Custom Color for a Screen Control
You can change the color of the active area of a screen control (for an individual patch or set).
Select the screen control in the workspace.
In the Screen Control Inspector, select the Attributes tab.
Select the Custom Color checkbox.
Choose a new color from the Custom Color pop-up menu.
Changing the Appearance of a Background or Grouped Screen Control
You can change the appearance of a background screen control or grouped set of screen controls by choosing a different panel, or adding a custom image.
In Edit mode, Option-click the screen control in the workspace.
Panel and Image controls appear in the Screen Control Inspector.
In the Screen Control Inspector, make sure that the Custom Background checkbox is selected.
Select the Panel button.
Click the Panel well and choose a new panel from the pop-up menu.
In Edit mode, Option-click the screen control in the workspace.
Panel and Image controls appear in the Screen Control Inspector.
In the Screen Control Inspector, make sure that the Custom Background checkbox is selected.
Select the Image button, then click Select.
An Open dialog appears.
Browse to the image you want to use, select the image, then click Choose Image.
Choosing Custom Text Color for a Screen Control
You can change the color of the text for a screen control (for an individual patch or set).
Select the screen control in the workspace.
In the Screen Control Inspector, select the Attributes tab.
Select the Custom Label Color checkbox.
Choose a new color from the Custom Label Color menu.
Setting a Screen Control to Show the Hardware Value
By default, screen controls show the value of the parameter the control is mapped to. In some cases, for example, when the screen control is assigned to a foot pedal, or when the screen control is mapped to multiple parameters, it may be better to show the value of the hardware control assigned to the screen control.
Select the screen control in the workspace.
In the Screen Control Inspector, select the Attributes tab.
Select the Show Input Value checkbox.
Setting Parameter Change Behavior for Screen Controls
You can set the behavior for saving parameter values for screen controls in individual patches. This is useful, for example, when the default for saving parameter values is set to Reset, but you want certain screen controls (for example, concert- and set-level screen controls) to keep their current value when switching patches.
Select the patch.
Select the screen control for which you want to set the parameter change behavior.
In the Attributes tab of the Screen Control Inspector, choose the parameter change behavior for the screen control from the “When a patch is changed and screen value differs from saved patch” pop-up menu:
To have the screen control use the default behavior set in MainStage preferences, choose Preference.
To preserve changes to parameter values when you change patches, choose Keep.
To return values to the last saved value, choose Reset. When this value is chosen, you should save the concert after making any changes you wish to keep to the patch, before selecting another patch.
To have the screen control use the last received value from the physical control assigned to it, choose Match.
When you choose an item from the pop-up menu, a brief description of its function appears below the menu.
Important: If you set the behavior for saving parameter values in a patch to Reset, parameter values are also reset when you switch to Layout mode.
Setting Hardware Matching Behavior for Screen Controls
Some hardware synthesizers and music workstations let users control what happens when you move a physical control that is set to a different value than the parameter it modifies. The parameter value can instantly change to the position of the physical control (sometimes called jump), it can change by the same amount (called relative), or it can not change at all until the physical control matches its current value (called snap).
You can set the behavior for screen controls in MainStage to any of these behaviors when you move the physical control assigned to the screen control.
Select the patch.
Select the screen control for which you want to set the hardware matching behavior.
In the Attributes tab of the Screen Control Inspector, choose the parameter change behavior for the screen control from the “When hardware value differs from screen value” pop-up menu:
To have the screen control use the default behavior set in MainStage preferences, choose Preference.
To have the screen control instantly change to match the hardware value, choose Jump.
To have the screen control change when the hardware control matches its current value, choose Pickup.
To have the screen control move relative to the hardware control, choose Relative.
Note: When you choose an item from the menu, a brief description of its function appears below the menu.
Resetting and Comparing Changes to a Patch
You can reset changes to all parameters in a patch that are mapped to screen controls to their last saved value, letting you hear the patch in its last saved (original) state, and toggle between the original and modified states of the patch. There are two ways to reset and compare changes to a patch: by using the Reset/Compare Patch button in the toolbar or by using the Reset/Compare Patch action mapped to a screen control at the concert level.
With the patch selected, click the Reset/Compare Patch button.
The patch is reset to its previously saved state.
To hear the patch in its modified state, click the Reset/Compare Patch button.
In Layout mode, add a button screen control to your layout.
Assign a button on your hardware controller to the new button screen control.
In Edit mode, click the concert icon in the Patch List.
Select the new button screen control in the workspace.
In the Parameter Mapping browser, select the Actions folder, and then select the Reset/ Compare Patch action in the second column.
For more information about mapping a screen control at the concert level, see Controlling the Overall Volume of a Concert.