Ultrabeat Tutorial: Creating Hi-Hats and Cymbals
Electronic hi-hat sounds are easy to create in Ultrabeat.
Load the Standard Tutorial sound.
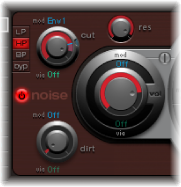
Switch off Oscillator 1 and turn on the noise generator.
In the noise generator, make sure the Cutoff parameter is modulated by Env 1, the modulation is negative, and the position of the Mod slider is below that of the base parameter value.
Use rather short decay values for Env 1 and Env 4.
Set the attack time of Env 4 to a value of 0. The attack time of Env 1 should also be rather short, but not equal to 0.
Note: You’ll find a similarly constructed sound listed as “hihat 1” at a pitch of F2 in the Tutorial Kit. Also analyze the hi-hat sound “hihat 2” at pitch F#2.
It’s not far from the hi-hat to the crash cymbal. The main difference between a hi-hat and crash cymbal sound is the length of the decay time. Correct assignment of the envelopes is the key to producing different cymbal sounds.
Select the Cym 1 and Cym 2 sounds in the Tutorial Kit and try different envelope assignments and settings for Cutoff and Volume in the noise generator, Cutoff and Volume in the main filter, and so on.