Sculpture Tutorial: Getting Started with Sound Creation
This section contains information to assist you when starting to explore sound creation in Sculpture. The creation of particular types of basic instrument sounds is discussed in several sections. See Sculpture Tutorial: Creating Basic Sounds. For a more detailed look at programming particular types of sounds, see Advanced Sculpture Tutorial: Programming Electric Basses and Advanced Sculpture Tutorial: Programming Synthesized Sounds.
Given the flexibility of Sculpture’s synthesis core, you can take a number of different approaches to sound design.
If you’re the type who prefers to sculpt a sound from scratch—parameter by parameter—you can.
If you prefer to make use of Sculpture’s morphing capabilities to create new sounds, you can also do this. See Randomizing Morph Points in Sculpture’s Morph Pad.
If you’re a tweaker of existing settings, then it may be more your style to work with the parameters that affect the entire instrument. See the Body EQ and Filter sections, plus the Modulators, for example.
Whatever camp you fall into, you’ll be able to achieve new and hopefully interesting results. Experiment and familiarize yourself with each approach. You will find that each has its strengths and weaknesses, and that a combination of methods may strike the best balance for your needs.
Starting with Default Settings in Sculpture
When you are programming a sound from scratch in Sculpture, the best approach is to work on each component of the sound in isolation.
Obviously, if you’re just starting out with Sculpture, you won’t be familiar with the impact of each parameter on your end results. Don’t worry about it; this and the other tutorial sections provide pointers for creating particular types of sounds.
First, you’ll need a plain vanilla setting. When you first launch Sculpture, this is exactly what you get—a default set of neutral parameters. Sonically this won’t set your heart racing, but it will provide a starting point for all the examples in this chapter. This setting is saved as the “#default” settings file. It is best to save a copy of this setting right away.
Open the Settings menu and choose Save Setting As, then enter the name you want—maybe “neutral,” or “vanilla”—and click Save.
This setting can be reloaded as you work through the examples.
Exploring the String in Sculpture
The string is the central synthesis element of Sculpture and is responsible for the basic tone. It offers parameters that allow you to adjust its material—what it’s made of, in other words—and to define the environment that it’s being played in—water or air, for example.
Tip: Before starting, Control-click the string (the green horizontal line in the Pickup display), and then click “enable string animation.” When active, the string vibrates when you play a note, making it easier to visualize the impact of the objects and pickups.
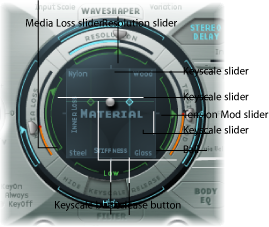
Click the Keyscale button at the bottom of the Material Pad ring.
Strike and hold or repeatedly strike middle C on your keyboard. Middle C is the default pitch of the string.
While striking middle C, drag the ball around the Material Pad. Listen to the sonic changes as you move between the Nylon, Wood, Steel, and Glass materials. Keep an eye on the string (the green horizontal line in the Pickup display, to the left) as you’re doing so.
Release the mouse button when you find a basic tone that you like.
Now experiment with the values of each of the sliders that surround the Material Pad—the Media Loss, Tension Mod, and Resolution parameters—while continuing to strike middle C. Note the changes that each makes to the sound, and also to the string animation in the Pickup display. Play a few notes above and below middle C, again keeping your eye on the string.
You probably noticed that moving the Media Loss, Tension Mod, and Resolution sliders also had an effect on the green and blue Keyscale sliders inside and outside the ring. Drag each of these Keyscale slider arrowheads to different positions—one by one—while you play a few notes either side of middle C. Notice the changes that happen up or down the keyboard range.
When you’re done, click the Release button at the bottom of the Material Pad ring, and adjust the blue Media Loss Release slider while you strike notes.
Exploring the Objects in Sculpture
Up to three objects of different types are used to excite or disturb the vibration of the string.
Before starting, Control-click the string (the green horizontal line in the Pickup display), and then click “enable string animation.” When active, the string vibrates when you play a note, making it easier to visualize the impact of the objects and pickups.
Reload the #default (or your vanilla) setting file by choosing Reset Setting from the Settings menu.
Click the Object 1 button to deselect it while you are repeatedly striking a key. The sound will stop after Object 1 is deselected. The string itself doesn’t make a sound unless it is stimulated by at least one object. Click the button again to reactivate it.
Open Object 1’s Type pop-up menu, and choose each menu item. Strike a note repeatedly while you choose each item to hear the impact of each object type on the string. Keep an eye on the string animation. Note that Object 1 can make use of excite types only. Object 2 can make use of either excite or damping types. Object 3 can make use of damping types only.
Adjust the Strength knob by dragging vertically for large changes or horizontally for fine adjustments. Strike a note repeatedly while doing so.
Drag the Timbre and VeloSens arrowheads to different positions while striking a key to audition the changes that they bring.
The impact of the Variation parameter is different for each type of object. Feel free to experiment with this as well.
Try out each of the Gate settings.
Exploring the Pickup Section in Sculpture
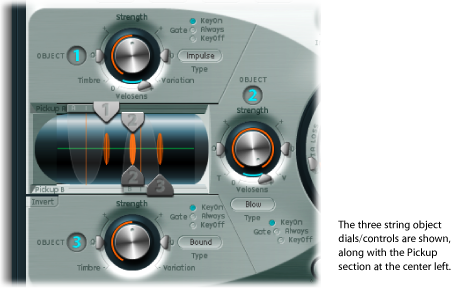
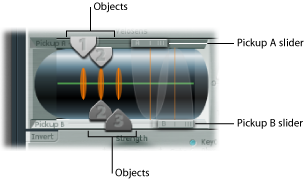
The vibration of the string is captured by two movable pickups. The Pickup section also houses three object sliders—used to set the position of each object along the string.
Reload the #default (or your vanilla) setting file.
Drag the Object 1 pickup left or right while striking a key. Note that adjustment of the object pickup position alters the tonal characteristics of the string.
Adjust Object 1’s Strength control to hear things better, or adjust the tone as desired. You can also use Object 1’s Timbre and Variation parameters to alter the tone.
Feel free to adjust the positions and parameters of the other objects, if they are active.
Drag the Pickup A and Pickup B sliders. Note that changes to the pickup positions result in quite different string vibrations and tonal qualities. If you want to increase the overall volume, adjust the Level knob on the right side of Sculpture’s interface, directly opposite the Pickup section.
Understanding String and Object Interactions in Sculpture
As you’re probably discovering, each parameter has an impact on the overall tone of the string and—more often than not—an impact on the string interaction of other parameters.
Each parameter you introduce or make changes to will affect the modeled string. This will, in turn, affect the interaction of each parameter with the modeled string. Therefore, parameter settings that you already made for Object 1, for example, may need to be adjusted when Object 2 is activated.
Generally, such adjustments won’t need to be radical, and may involve only a small tweak to the Strength parameters, or perhaps to the pickup positions of each object, for example. These parameters have the greatest impact on the tone and level of the objects and should be the first things you look at if enabling Object 2 results in an unwanted change to the color of your sound.
You may want to fine-tune the objects further through use of the Timbre and Variation controls.
Small changes—rather than radical ones—will retain the general tonal character of the string and Object 1, while introducing the new flavor of Object 2.
Exploring Other Processing Parameters in Sculpture
From the pickups, the signal is sent to the processing section, which consists of the ADSR-equipped amplitude stage (just to the right of the circular Material Pad in the center), a Waveshaper with selectable types of waveshaping curves (above the circular Material Pad), and a multimode filter (below the Material Pad). All elements covered thus far exist on a per-voice basis.
All voice signals coming from the pickups are summed, and then they are processed by an integrated Delay effect (to the upper right of the circular Material Pad).
From there, the signal is sent to an EQ-like module (Body EQ, to the lower right of the Material Pad), which globally simulates the spectral shape or body response of your instrument. There are several body types to choose from.
The resulting signal is then fed to a Level/Limiter section (at the far right).
Tip: Feel free to experiment with all these parameters—using the #default (or your vanilla) setting file each time. This will give you a general feel for each parameter and its impact on the sounds you hear.
All other parameters on the lower portions of the Sculpture interface (Modulation, Morph, Envelope, and Controller Assignments) are not part of the core synthesis engine, although they can obviously affect it.