Working with Space Designer’s Impulse Response Parameters
Space Designer can use either recorded impulse response files or its own synthesized impulse responses. The circular area to the left of the main display contains the impulse response parameters. These are used to determine the Impulse Response mode (IR Sample mode or Synthesized IR mode), load or create impulse responses, and set the sample rate and length.

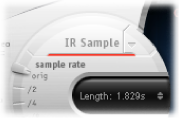
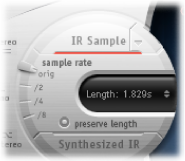
- IR Sample button and IR Sample menu: Click the IR Sample button to switch to IR Sample mode. In IR Sample mode, an impulse response sample is used to generate reverberation. Click the down arrow next to the IR Sample button to open the IR Sample pop-up menu, in which you can load and manipulate impulse response samples, and record and edit impulse responses with Impulse Response Utility. See Working in Space Designer’s IR Sample Mode.
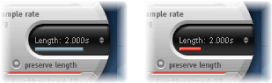
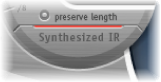
- “sample rate” slider and “preserve length” button: The “sample rate” slider determines the sample rate of the loaded impulse response. Activate the “preserve length” button to preserve the length of the impulse response when changing the sample rate. See Setting Space Designer’s IR Sample Rate.
- Length field: Adjusts the length of the impulse response. See Setting Impulse Response Lengths in Space Designer.
- Synthesized IR button: Click to activate Synthesized IR mode. A new synthesized impulse response is generated. This is derived from the values of the Length, envelope, Filter, EQ, and Spread parameters. See Working in Space Designer’s Synthesized IR Mode.
Note: You may freely switch between a loaded impulse response sample and a synthesized impulse response without losing the settings of the other. For more information, see Working in Space Designer’s Synthesized IR Mode.
Important: To convolve audio in real time, Space Designer must first calculate any parameter adjustments to the impulse response. This requires a moment or two, following parameter edits, and is indicated by a blue progress bar. During this parameter edit processing time you can continue to adjust the parameter. When calculation starts, the blue bar is replaced by a red bar, advising you that calculation is taking place.
Working in Space Designer’s IR Sample Mode
In IR Sample mode, Space Designer loads and uses an impulse response recording of an acoustic environment. This is convolved with the incoming audio signal to place it in the acoustic space provided by the IR.
Click the IR Sample button in the circular area to the left of the main display, and then select the desired impulse response file from any folder.
Note: If you have already loaded an impulse response file, clicking the IR Sample button switches the mode from Synthesized IR to IR Sample mode.
Click the down arrow next to the IR Sample button to open a pop-up menu with the following commands:
- Load IR: Loads an impulse response sample without changing the envelopes.
- Load IR & Init: Loads an impulse response sample and initializes the envelopes.
- Show in Finder: Opens a Finder window that shows the location of the currently loaded IR file.
- Open IR Utility: Opens Impulse Response Utility, where you can record and edit impulse responses. See the Impulse Response Utility Manual for details on use.
All impulse responses that ship with MainStage are installed in the /Library/Audio/Impulse Responses/Apple folder. Deconvolution files have an .sdir file extension.
Any mono, stereo, AIFF, SDII, or WAV file can be used as an IR. In addition, surround formats up to 7.1, discreet audio files, and B-format audio files that comprise a single surround IR can also be used.
Working in Space Designer’s Synthesized IR Mode
In Synthesized IR mode, Space Designer generates a synthesized impulse response based on the values of the Length, envelope, Filter, EQ, and Spread parameters. To switch to this mode, click the Synthesized IR button in the Impulse Response Parameters section.
Repeated clicks of the activated Synthesized IR button will randomly generate new impulse responses with slightly different reflection patterns. The current impulse response state (including parameter and other values that represent the reflection patterns and characteristics of the synthetic IR) is saved with the setting file.
Note: Clicking the Synthesized IR button while you are in IR Sample mode will switch you back to the synthesized IR stored with the setting.
Setting Space Designer’s IR Sample Rate
The “sample rate” slider determines the sample rate of an impulse response.
- Orig: Space Designer uses the current project sample rate. When loading an impulse response, Space Designer automatically converts the sample rate of the impulse response to match the current project sample rate, if necessary. For example, this allows you to load a 44.1 kHz impulse response into a project running at 96 kHz, and vice versa.
- /2, /4, /8: These settings are half-divisions of the preceding value—one-half, one-quarter, one-eighth. For example:
If the project sample rate is 96 kHz, the options will be 48 kHz, 24 kHz, and 12 kHz.
If the project sample rate is 44.1 kHz, the options will be 22.05 kHz, 11.025 kHz, and 5512.5 Hz.
Changing the sample rate upward increases—or changing it downward decreases—the frequency response (and length) of the impulse response, and to a degree the overall sound quality of the reverb. Upward sample rate changes are of benefit only if the original IR sample actually contains higher frequencies. When you are reducing the sample rate, use your ears to decide if the sonic quality meets your needs.
Note: Natural room surfaces—except concrete and tiles—tend to have minimal reflections in the higher frequency ranges, making the half-rate and full-rate IRs sound almost identical.
When you select half the sample rate, the impulse response becomes twice as long. The highest frequency that can be reverberated will be halved. This results in a behavior that is much like doubling every dimension of a virtual room—multiplying a room’s volume by eight.
Another benefit of reducing the sample rate is that processing requirements drop significantly, making half–sample rate settings useful for large, open spaces.
Activating the “preserve length” button preserves the length of the impulse response when the sample rate is changed. Manipulating these two parameters as you see fit can lead to interesting results.
The lower sample rates can also be used for interesting tempo, pitch, and retro-digital sounding effects.
If you are running Space Designer in a project that uses a higher sample rate than the impulse response, you may also want to reduce the impulse response sample rate. Make sure the “preserve length” function is enabled. This cuts CPU power consumption without compromising reverb quality. There is no loss in reverb quality, because the impulse response does not benefit from the higher project sample rate.
You can make similar adjustments while running in Synthesized IR mode. Most typical reverb sounds don’t feature an excessive amount of high frequency content. If you were running at 96 kHz, for example, you would need to make use of some deep lowpass filtering to obtain the mellow frequency response characteristics of many reverb sounds. A better approach would be to first reduce the high frequencies by 1/2 or even 1/4 using the “sample rate” slider, and then apply the lowpass filter. This conserves a considerable amount of CPU power.
Setting Impulse Response Lengths in Space Designer
You can use the Length parameter to set the length of the impulse response—sampled or synthesized.
All envelopes are automatically calculated as a percentage of the overall length, which means that if this parameter is altered, your envelope curves will stretch or shrink to fit, saving you time and effort.
When you are using an impulse response file, the Length parameter value cannot exceed the length of the actual impulse response sample. Longer impulse responses (sampled or synthesized) place a higher strain on the CPU.