Configuring Your Control Surface Setup
The left side of the Setup window contains two or three parameter areas: Device parameters, Special parameters (if your connected device supports them), and Control Surface Group parameters. You can configure your control surface setup to meet your needs by editing the parameters in these boxes.
Important: Any changes to settings (in the Setup window or from the device) are saved in a preferences file, named “com.apple.logic.pro.cs,” located in ~/Library/Preferences. This file is saved independently of the Logic Pro Preferences file.
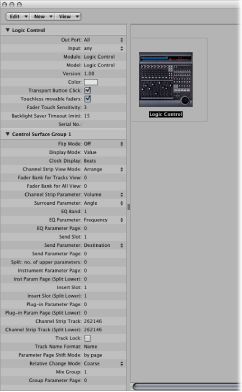
Device Parameters
The Device Parameters area contains the following items:
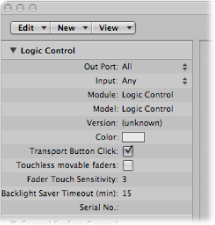
- Out Port: Choose the MIDI output port from the pop-up menu.
- Input: Choose the MIDI input port from the pop-up menu.
- Module: Shows the name of the control surface.
- Model: Shows the model name of the control surface.
- Version: Shows the firmware version for some control surfaces.
- Color: Click to choose the color that indicates which tracks are being controlled by this control surface. In the Arrange window, the tracks controlled by this device are colored along the left edge of the track list (if the track control bars are displayed).
Each control surface must be connected to an independent MIDI In and Out port (or corresponding USB/FireWire port, designated as a MIDI port by the device driver). When the device is added, the automatic setup or scan procedure sets the appropriate MIDI input and output port settings for the device. If the MIDI port settings are incorrect, you can manually choose them from the Input and Out Port pop-up menus.
Special Parameters
Some control surfaces (such as the Mackie Control) allow you to define “special” parameters such as fader touch sensitivity. When a device that offers special parameters is connected, the Special Parameters area appears on the left side of the Setup window. For more information about supported special parameters, refer to the documentation for the specific device.
Control Surface Group Parameters
If you have created one or more control surface groups, you can configure group parameters in the Control Surface Group Parameters area. These parameters apply to the group associated with the selected device, and allow you to set up each group to meet your needs. This is especially helpful when you have multiple control surface groups. Many (if not all) control surface group parameters can also be changed directly from the control surface, as well as from the Setup window.
If you have created multiple control surface groups, the Control Surface Group Parameters area shows the settings for the group that is currently selected in the Setup window.
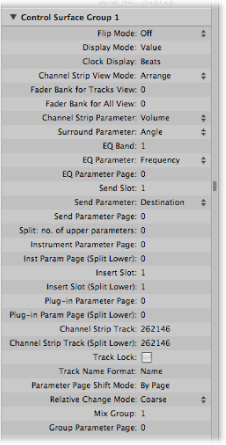
Control Surface Group Display Parameters
The parameters at the top of the Control Surface Group Parameters area give you control over aspects of the device displays.
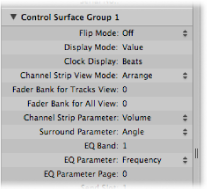
- Flip Mode: Choose the functions for the faders and rotary encoders of the channel strips on the device. For control surfaces that contain a fader and a rotary encoder for each channel strip, Flip mode allows you to assign both controls to the same parameter, or swap their assignments. The choices are:
- Off: Standard mode, with the fader acting as a volume control.
- Duplicate: Assigns both the fader and encoder to the currently selected encoder parameter.
- Swap: Switches the fader and encoder assignments, making the fader a pan control and the encoder a channel volume control, for example.
- Mute: Disables the fader. This is useful when recording in the same room as the control surface, and you want to avoid the mechanical noise of the faders. Any existing automation still functions normally.
- Display Mode: Click to limit the device display to only the name or only the value of the current parameter. This is helpful if there is insufficient space for the display of both the parameter name and value.
- Clock Display: If your control surface features a position display, this parameter allows you to determine how the playhead position is represented. Click to switch between Beats (musical values) or SMPTE (absolute time values).
Note: The exact elements displayed, and thus their positions, depend on the selected SMPTE or bar/beat display option defined in the Logic Pro Preferences.
- Channel Strip View Mode: Choose one of the following view modes:
- Arrange: The channel strips on the device correspond to Logic Pro channel strips as they appear in the Mixer window. The layout of channel strips matches the way tracks are laid out in the Arrange window. Channel strip 1 in the Mixer window is equivalent to channel 1 on the control surface, channel strip 2 in the Mixer is equivalent to channel 2, and so on. Instruments and channels used by multiple tracks are merged into one channel. This is the default mode of most devices, including the Mackie Control.
- All: The channel strips on the device correspond to Logic Pro channel strips of certain types, such as MIDI or aux channels, independent of their use in tracks. Control surfaces that support this view mode generally allow you to define which channel types you want to display. The contents of Logic Pro’s Mixer window automatically follow the state of the control surface, provided that the View > Link Control Surfaces option is turned on.
- Tracks: This view mode is similar to Arrange view mode, but individual channel strips are shown when multiple arrange tracks address the same channel. Typically, this will be an instrument channel, with several tracks routed to it.
- Single: This mode shows a single channel (and its routing to auxes and so on). You can determine which parameters the channel strip controllers (on the control surface) will edit.
Note: Keep in mind that the View mode is a property of the control surface group, not a global setting. One group can display busses, while the other shows tracks, for example.
- Fader Bank for Tracks View: Drag vertically, or enter an integer value to offset which tracks are controlled by the channel strips of the device in Tracks view. For example, if your device has eight channel strips, these might normally be assigned to audio channel strips 1–8 in Logic Pro. If you set this parameter to 2, the device channel strips would control Logic Pro Mixer channel strips 3–10 (1 + 2 = 3).
- Fader Bank for All View: Drag vertically, or enter an integer value to offset which Logic Pro channel strips are controlled by the device in All view. This parameter is only available when multiple channel strip types are displayed in the Mixer. When single channel strip types are displayed, there are separate fader bank parameters. (These aren’t displayed in the parameter list.)
- Channel Strip Parameter: Choose which function is controlled by the channel strip encoders on the device. The choices are:
- Volume: Encoders adjust channel volume.
- Pan: Encoders adjust channel panorama position.
- Format: Encoders adjust/select channel format.
- Input: Encoders adjust/select channel input source.
- Output: Encoders adjust/select channel output (main outs/auxes/surround).
- Automation: Encoders adjust/select channel automation mode.
- Group: Encoders adjust group membership of the track. Editing the parameter allows you to set either “no group” or a single group. Enabling membership of multiple groups is not possible. (This can only be done directly in the Logic Pro Mixer.)
- Displayed Par.: Encoders adjust the automation parameter selected in the Arrange window. This is especially useful if you set the control surface to Arrange View mode, and your Arrange window shows multiple subtracks with various parameters.
- Surround Parameter: Choose the surround parameter that the rotary encoders will control. The choices are:
- Angle: Encoders adjust surround angle.
- Diversity: Encoders adjust surround diversity (direction).
- LFE: Encoders adjust LFE level.
- Spread: Encoders adjust the Spread parameter of Stereo to Surround channel strips.
- X: Encoders adjust surround X position.
- Y: Encoders adjust surround Y position.
- Center: Encoders adjust the Center channel level.
Note: The X and Y parameters are a different representation of the Angle and Diversity parameters, and thus are independent of them. The X and Y parameters support the use of surround joysticks.
- EQ Band: Sets the current EQ band, so that you can edit a particular Channel EQ or Linear Phase EQ parameter for all tracks in the EQ Multi Channel View.
- EQ Parameter: Choose which parameter of the selected EQ band is controlled by the encoders in EQ Multi Channel View. The choices are:
- Frequency: Encoders adjust the frequency of the selected band.
- Gain: Encoders adjust the gain of the selected band. For the Low Cut (band 1) and High Cut (band 8) bands of the Channel and Linear Phase EQ, this parameter controls the slope.
- Q: Encoders adjust the Q factor of the selected band.
- On/Off: Encoders bypass the selected EQ band.
- EQ Parameter Page: Sets the EQ parameter displayed in EQ Channel Strip view.
The Channel and Linear Phase EQs feature eight bands per audio channel, with each band offering four parameters. All of these parameters can be accessed with your control surface.
If your control surface does not display all EQ parameters at once, you view them by stepping through the parameter pages in sequence. For example, if your control surface has eight channel strips, you can directly control parameters 1 to 8 with knobs or sliders 1 to 8 when you switch to EQ Channel Strip Edit view. You then need to switch by a page to access parameters 9 to 16.
Control Surface Group Send and Plug-in Parameters
The parameters in the middle of the Control Surface Group Parameters area let you control different operational aspects when working with Send and Plug-in parameters.
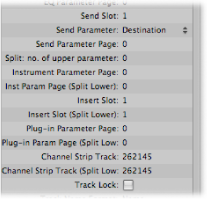
- Send Slot: Sets the currently selected Send slot. The default is 1, which sets the first (top) Send on each channel as the Send slot. A value of 2 sets the second send as the Send slot, a value of 3, the third Send slot, and so on.
- Send Parameter: Choose the Send parameter controlled by the encoders when in the Send Multi Channel view. The choices are:
- Destination: Encoder is used to determine the bus channel number for the Send slot.
- Level: Encoder is used to adjust the Send level.
- Position: Encoders set Pre, Post, or Post Pan fader modes.
- Mute: Encoders mute/unmute the selected Send slot.
- Send Parameter Page: Sets the current page for the Send parameters. Up to 32 parameters are available in Send Channel Strip view for a given channel (eight Send slots multiplied by the four parameters listed above).
- Split: no. of upper parameters: Sets the number of encoders that belong to Split Upper, for control surfaces that support Split mode. The remaining encoders belong to Split Lower. A value of 0 means that Split mode is off—all encoders are assigned to the Split Upper area.
Control surfaces that support Split mode allow the display of two separate parameter sections within one plug-in (or even different plug-ins). They are called Split Upper and Split Lower.
- Instrument Parameter Page: Determines which parameter is assigned to the leftmost encoder when editing a software instrument. The next instrument parameter is assigned to encoder 2, and so on. This applies to Split Upper when Split mode is turned on.
- Inst Parameter Page (Split Lower): Sets the parameter that is assigned to the leftmost encoder of Split Lower when editing a software instrument (when Split mode is turned on). The next instrument parameter is assigned to encoder 2, and so on.
- Insert Slot: Sets the current Insert slot number, both for selecting a plug-in (in Plug-in Channel Strip view) and for editing its parameters. The default is 1, which sets the first (top) plug-in slot on each channel as the Insert slot. A value of 2 sets the second plug-in slot as the Insert slot, and so on. With Split mode turned on, this applies to Split Upper.
- Insert Slot (Split Lower): Sets the current Insert slot number for Split Lower when selecting or editing a plug-in when Split mode is turned on.
- Plug-in Parameter Page: Defines which parameter is assigned to the leftmost encoder when editing a plug-in. The next plug-in parameter is assigned to encoder 2, and so on. This applies to Split Upper when Split mode is turned on.
Note: The plug-in and instrument page parameters are kept separate, as this allows you to quickly switch between editing an instrument and an effect plug-in on a channel, without having to adjust the parameter page every time.
- Plug-in Param Page (Split Lower): Defines which parameter is assigned to the leftmost encoder of Split Lower when editing a plug-in (with Split mode turned on). The next plug-in parameter is assigned to encoder 2, and so on.
- Track: Defines which track is displayed for Channel Strip views. When Split mode is turned on, this applies to Split Upper.
- Track (Split Lower): Sets which track is displayed (in the Split Lower section of the control surface) for Channel Strip views, when Split mode is turned on.
- Track Lock: Determines how the control surface responds when a track is selected in Logic Pro—in essence, this remotely affects the Track and Track (Split Lower) parameters. When set to “on,” the control surface group continues to display the same track, independent of the currently selected track in Logic Pro. When set to Off, the control surface group automatically switches to the selected track, whenever a track is selected in Logic Pro.
Control Surface Group Other Parameters
The parameters at the bottom of the Control Surface Group Parameters area let you set the Track Name Format, Parameter Page Shift Mode, Relative Change Mode, Mix Group, and Group Parameter Page parameters.
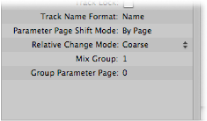
- Track Name Format: Determines whether the track name display shows only the track name, or the track name and number.
- Parameter Page Shift Mode: Determines whether the parameter is shifted by one page or by one parameter.
- Relative Change Mode: Choose the mode for controller assignments that support a Relative Value Change mode (rotary encoders, for example). The choices are:
- Coarse: The parameter is adjusted in coarse steps.
- Full: Turning the encoder to the right sets the maximum value. Turning it to the left sets the minimum value. The encoder also stops at its default value. For example, when the Pan knob is left of center, turning the encoder to the right initially sets the Pan parameter to center (its default value). A further turn to the right sets the Pan to full right (its maximum value).
- Fine: The parameter is incremented or decremented in fine steps—by one tick or other unit. In this mode, the highest possible resolution is used. For example, when editing the Sample Delay plug-in’s Delay parameter, every encoder tick increases or decreases the value by 1 sample, regardless of the resolution value.
- Mix Group: Determines which group is edited when in Group Edit mode.
- Group Parameter Page: Defines which parameter of the edited group is assigned to the leftmost encoder.