Customizing the Arrange Toolbar
You can customize the Arrange toolbar by adding buttons for the commands you use most often. You can also configure the display to show only the button icons, or only their labels.
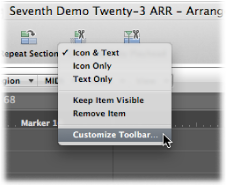
Control-click (or right-click) the Arrange toolbar, then choose Customize Toolbar from the shortcut menu.
Drag the buttons you want to add from the Customize Toolbar dialog to any empty area along the top of the window.
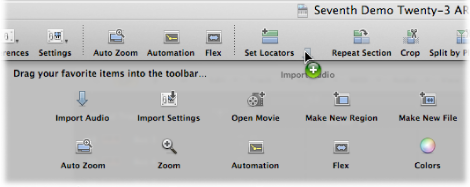
If you drag a button to a location between two existing buttons, they move to make space for the new button.
Note: You can also drag the entire default set from the bottom of the Customize Toolbar dialog, if your customizations don’t work out as well as you’d hoped.
Click Done when finished.
Control-click (or right-click) the button you want to remove, then choose Remove Item from the shortcut menu.
The shortcut menu and Show menu in the Customize Toolbar dialog also allow you to view toolbar items as Icon & Text, Icon Only, or Text Only. Simply choose your preferred viewing option.
When you resize the Arrange window, the toolbar may not offer enough space to keep all buttons visible.
Control-click (or right-click) the button, then choose Keep Item Visible from the shortcut menu.