Audio Preferences in Logic Pro
Audio preferences consist of the following tabs: Devices, General, I/O Assignments, Sample Editor, MP3, and Reset.

Choose Logic Pro > Preferences > Audio (or use the Open Audio Preferences key command).
Click the Preferences button in the Arrange toolbar, then choose Audio from the pop-up menu.
Core Audio Device Preferences
Logic Pro automatically recognizes any installed Core Audio hardware, and uses the default settings as defined in the Audio MIDI Setup utility (Applications/Utilities/Audio MIDI Setup). However, it can be advantageous to optimize the settings for your individual hardware setup, particularly if you use several audio interfaces or a multiple input/output device.
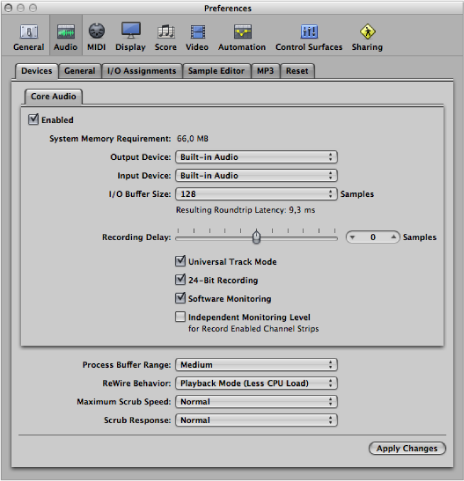
- Output Device pop-up menu: Allows you to choose between any installed Core Audio device, including the internal sound hardware. This also includes aggregate audio devices, consisting of several audio interfaces. See the Audio MIDI Setup Help for information on aggregate devices.
Note: When setting an output device which also provides inputs, the Input Device setting changes accordingly. If choosing a different input device, you will be recommended to use a common Word Clock for both audio devices, in order to ensure the best sound quality.
- I/O Buffer Size pop-up menu: This parameter determines the size of the buffer used by the audio hardware for both input and output. The smaller the buffer size, the less latency you will encounter when monitoring while recording, or using software instruments.
Some points to note:
As this parameter value is reduced, it places a higher strain on your system’s processor or processors.
There may be a point where the selected I/O buffer size is too small for your system, and begins to affect playback. This usually takes the form of clicks, pops, and crackles in your audio.
You should aim for the lowest possible I/O buffer size value that doesn’t introduce clicks, pops, and crackles in your audio.
Tip: If you find that a higher I/O buffer size setting provides suitably low latency during record monitoring and software instrument playback, you should use it. This will minimize the impact on your system’s processor or processors.
- 24 Bit Recording checkbox: When this setting is turned on, Logic Pro can record 24-bit files. 20- or 24-bit recordings offer a significant improvement in the available dynamic range, but require high-quality peripheral components such as microphones and pre-amps, not to mention high-quality analog-to-digital/digital-to-analog converters.
20- and 24-bit files use one-and-a-half times the disk space of comparable 16-bit files.
Note: Turning on this parameter only makes sense if you are using a 20- or 24-bit interface.
- Software Monitoring checkbox: This option allows you to turn Software Monitoring (listening to the actual input signal) on or off. In most situations, you should leave it on.
Note: When Software Monitoring is on, the audio signal is processed via software, and a certain amount of audible delay (commonly referred to as latency) is inevitable.
If you are listening to the recorded signal through your mixing console, or your audio interface supports hardware monitoring, you should turn this option off.
- Independent Monitoring Level (for Record Enabled Channel Strips) checkbox: Select this checkbox to allow the use of an independent monitoring level for record-enabled audio channel strips. After record-enabling a track, you can adjust the fader to the level you want. The original level will be restored when you turn off the record-enable button.
Note: Adjustments to the fader do not affect the recording level; they only affect the monitoring level.
- Process Buffer Range pop-up menu: This parameter determines the size of the buffer used to compute mixes and effects. You can choose between Small, Medium, and Large buffer sizes.
Note: Larger buffer sizes increase latency. Depending on the speed of the processor, buffer sizes that are too small might compromise real-time audio processing.
- ReWire Behavior pop-up menu: Use this pop-up menu to configure the ReWire behavior when sending MIDI data to a ReWire-compatible software instrument:
- Playback mode: Use when playing back MIDI tracks via ReWire. This setting requires less processing power.
- Live mode: Use when playing a ReWire instrument live. This setting uses more processing resources, but has lower latency.
Audio General Preferences
The General pane contains the following preferences:
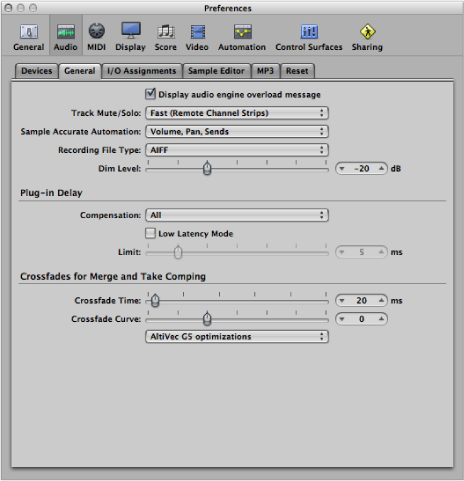
- Track Mute/Solo pop-up menu: Lets you determine the linking relationship of the Track Mute and Solo buttons with the corresponding channel strip buttons.
- Fast (Remote Channel Strips): Clicking a channel strip’s Mute or Solo button switches the state of the associated track button, and vice versa.
- CPU-saving (Slow Response): Choose to save processing resources, and to make the Track Mute and Solo buttons independent of the corresponding channel strip buttons.
- Sample Accurate Automation pop-up menu: As the name implies, sample-accurate automation is the most precise type of automation. It places higher overheads on system resources, which may affect performance (depending on the nature of your projects, and available computing power). This is most likely to happen during heavy project sections where a lot of software instruments and effects are in use. Logic Pro offers three settings:
- Off: Minimal overhead on system performance for automation playback. Automation is less precise when this setting is active.
- Volume, Pan, Sends: Only these parameters are automated with sample accuracy.
- Volume, Pan, Sends, Plug-in Parameters: All of these parameters are automated with sample accuracy. Not all Audio Units plug-ins can be automated in this way.
- Recording File Type pop-up menu: Lets you determine the file type for recorded audio. The settings are:
- AIFF: The AIFF file format cannot handle audio file recordings larger than 2 GB.
- WAVE (BWF): The most common audio format on Windows PC computers. Files are stored as Broadcast Wave files, which contain timestamp information in the file header. The WAV file format cannot handle audio file recordings larger than 4 GB.
- CAF: Choose this setting if you are going to record files larger than 4 GB in size. For more information, see Choosing the Recording File Type.
- Plug-in Latency Compensation pop-up menu: Plug-in latency compensation (also called plug-in delay compensation) is useful for software effect plug-ins, and is particularly important for DSP (digital signal processing) accelerator hardware (for example, TC PowerCore and Universal Audio UAD1). It compensates for audio delays that can be introduced when using plug-ins.
The pop-up menu allows you to activate plug-in latency compensation for either:
Audio and software instrument tracks
All (Audio, instrument, auxiliary, and output channels)
You can also turn off compensation entirely. For details, see Working with Plug-in Latency Compensation.
- Low Latency Mode checkbox and Limit slider: You need to select the Low Latency Mode checkbox in order to activate Low Latency mode and use the Limit slider. The Limit slider lets you determine a maximum amount of allowable delay that can be caused by plug-ins when Low Latency mode is enabled (by clicking the Low Latency Mode button on the Transport bar). In Low Latency mode, plug-ins are bypassed to ensure that all delays (across the entire signal flow of the current track) remain under the Limit slider value. This is useful when you want to play a software instrument with several latency-inducing plug-ins inserted in the channel. For more information, see Working in Low Latency Mode.
Audio I/O Assignment Preferences
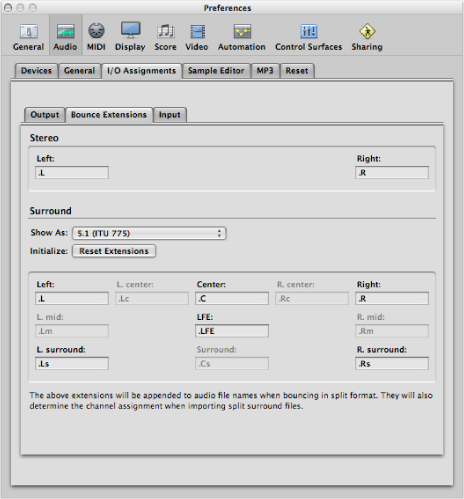
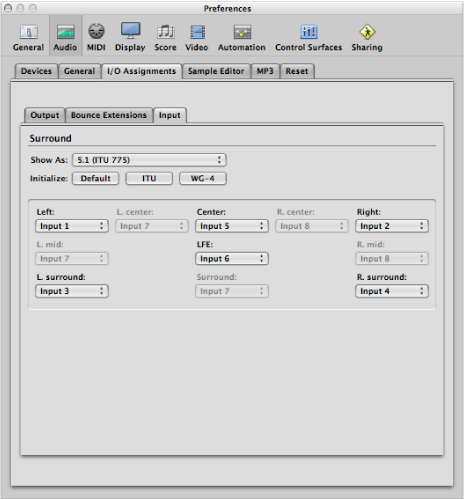
The I/O Assignments pane offers three further tabs: Output, Bounce Extensions, and Input.
Output Pane
The Output pane consists of the following preferences:
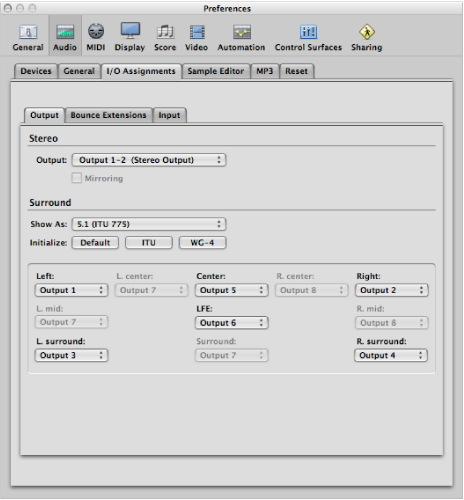
- Mirroring checkbox: Becomes available for all chosen output pairs, with the exception of Output 1–2. Deselect to have the output signal routed to the chosen output pair (Output 3–4, for example). Select the checkbox to have the output signal routed to the chosen output pair (Output 3–4, for example), as well as to the physical outputs (Output 1–2).
Audio MP3 Preferences
The MP3 pane contains the following preferences:

- Bit Rate (Mono/Stereo) pop-up menus: You can choose bit rates between 32 kbps and 320 kbps, but the defaults are 80 kbps mono and 160 kbps stereo. These rates offer acceptable quality and good file compression. If you can afford the increased file size, you should choose 96 kbps for mono and 192 kbps for stereo streams. These settings will deliver better audio quality. You can, of course, choose even higher rates, but the quality improvement in bit rates above 96/192 kbps is minimal.
- Use Variable Bit Rate Encoding (VBR) checkbox: Variable Bit Rate (VBR) encoding compresses simpler passages more heavily than harmonically rich passages, generally resulting in better-quality MP3s. Unfortunately, not all MP3 players can accurately decode VBR-encoded MP3s, which is why this option is off by default. If you know that the audience for your MP3 files can decode VBR-encoded MP3s, you can turn this option on.
- Filter Frequencies Below 10 Hz checkbox: When this option is selected, frequencies below 10 Hz (which are usually not reproduced by speakers, and are not audible to human ears at any rate) are removed, leaving slightly more data bandwidth for the frequencies that humans can hear, resulting in an improvement in perceived quality. Only deselect this option if you’re experimenting with subsonic test tones, or exporting MP3s for whales.
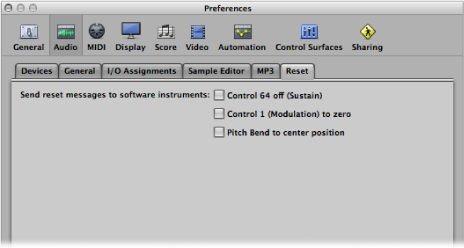
Audio Reset Preferences
The Reset pane enables you to send reset messages of a specified type to all active instrument channels. This can be useful if you are encountering hung notes, or are finding that controller settings are incorrect when in Cycle mode (or when returning to the beginning of a section or the project start point).