Using External Synchronization
When you first open Logic Pro, manual synchronization mode is automatically turned off, and Logic Pro is in Internal Sync (master) mode. Activating the Transport bar’s Sync button synchronizes Logic Pro to the chosen synchronization source.

If Logic Pro is running by itself (no devices or applications capable of synchronization are in use), or is acting as the synchronization source, it is the synchronization master device. In this situation, the Transport bar’s Sync button should not be activated.
The Transport bar Sync button is not displayed by default.
Control-click the Transport bar, then choose Customize Transport Bar from the shortcut menu.
Select the Sync checkbox toward the bottom of the Modes and Functions column (right column), and click OK.
Using the Sync Button
You can use the Sync button to turn external synchronization on or off at any time, without changing the selected synchronization source. This allows you to temporarily disengage Logic Pro (running as a slave) from an external synchronization master device. This could prove useful if you need to quickly edit a MIDI region while the external synchronization source (tape machine, VTR, and so on) is still running, for example.
When Logic Pro Is Running as a Slave
The Transport bar Sync button is lit/depressed, when active.
Click the upper (MIDI In) section of the MIDI Activity display—while receiving an external synchronization signal—to view the frame rate of incoming MIDI time code.
Note: When you click the Record button during external synchronization, Logic Pro enters record mode, but does not actually start recording until it detects an external time code signal.
Accessing Synchronization Settings with the Sync Button
Control-click the Transport bar Sync button to open a shortcut menu, where the following options are available:
Setting the type of external synchronization.
Determining whether or not MMC commands (see MIDI Machine Control) should be transmitted by the Transport buttons of Logic Pro, allowing remote control of MIDI-controlled tape machines.
Direct access to the Synchronization settings.
Direct access to the tempo editors (see Advanced Tempo Operations).
MTC Interpretation
As the MIDI standard only supports four of the six commonly used time code formats (the 30 fps and 29.97 fps formats are not differentiated in the MIDI specification), Logic Pro needs to decide which format is intended, when it encounters incoming time code.
Incoming MTC (MIDI Time Code) is interpreted as follows:
24 fps is interpreted as 24 fps.
25 fps is interpreted as 25 fps.
30 fps drop frame is interpreted as 29.97 drop fps.
30 fps is interpreted as 29.97 fps.
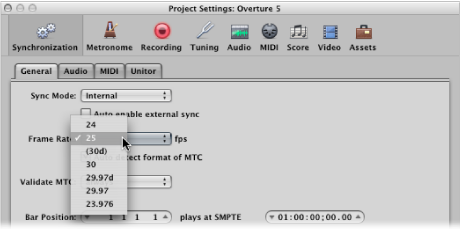
You can, however, manually set the format in the File > Project Settings > Synchronization > General > Frame Rate pop-up menu.
Note: MIDI Time Code (MTC) is the MIDI equivalent of the audio-based SMPTE (Society of Motion Picture and Television Engineers) time code format.