Using the Tempo Operations Window
The Tempo Operations window is used to edit existing tempo changes, and to create new ones. The window automatically displays the area you’ve selected for editing, and changes are displayed graphically, in real time, as the tempo curve is processed, so you can see what’s happening.
Choose Options > Tempo > Tempo Operations from the main menu bar (or use the Open Tempo Operations key command.
Control-click the Sync button in the Transport bar (if visible), and choose Open Tempo Operations from the shortcut menu.
Creating Tempo Curves in the Tempo Operations Window
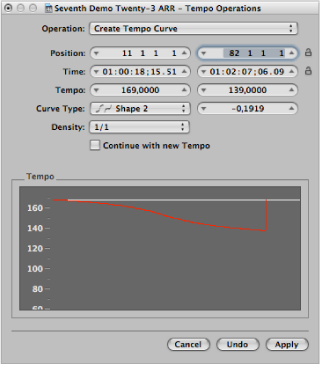
The Create Tempo Curve operation lets you create numerous tempo change events with just a few parameters, and provides a smooth overall change in tempo.
Use the Position or Time field to define the area that the tempo change should take place across: the left field sets the curve start point and the right field, the curve end point.
Enter start and end tempos in the Tempo line.
Select a curve type.
Three kinds of tempo curves are available from the Curve Type pop-up menu. Each of these offers a Curvature parameter (the field to the right of the Curve Type pop-up menu), which determines if the tempo should speed up or slow down, depending on whether positive or negative curvature values are entered.
Adjust the Curvature parameter.
Alter the concentration of graphical tempo events with the Density parameter.
Values of 1/8 and finer should only be used if really necessary (with very slow or fast tempo changes, for example). Don’t select a resolution higher than 1/8 or finer, just to make the curve look smoother. This results in an unnecessary amount of processing, and the creation of more tempo events than are needed.
As you change the values, the displayed tempo curve (which is calculated from the tempo settings you’ve made) is shown in red.
Note: The “Continue with new Tempo” checkbox determines whether the original tempo resumes after the tempo curve ends (unselected), or the new tempo (the last tempo change event in the curve) is maintained (selected).
Click Apply when you are done.
Creating Constant Tempo in the Tempo Operations Window
The Create Constant Tempo operation creates a constant tempo in any selected area. The default setting assigns an average tempo for the selected project section (based on existing tempo change events).
If you want to remove all tempo variations between two points, without changing the SMPTE time for the rightmost position, click the Apply button.
Don’t forget the “Continue with new Tempo” checkbox, which retains the new tempo or returns to the initial tempo.
Scaling Tempo Changes in the Tempo Operations Window
The Scale Existing Tempo operation alters existing tempo changes proportionally (scales them). This allows you to speed up an entire project section, without losing the relationships between any subsequent tempo changes within the area. Scaling is done by percentage. Positive percentage values speed up sections, and negative ones slow them down.
Stretching Tempo Curves in the Tempo Operations Window
The Stretch Existing Tempo Curve operation stretches or compresses an existing tempo curve. The Position or Time parameter is used to define the start point of the area that you want to change. You can then enter either the new end point of the tempo curve as a bar position or SMPTE value, or set a Stretch value for the curve (as a percentage).
Reducing Tempo Changes in the Tempo Operations Window
The Position or Time field defines the start and end points of the area to be processed. Density determines the number of tempo events that remain per bar after processing. You can select values between one tempo change event per bar (1/1) and 32 per bar (1/32).
Randomizing Tempo in the Tempo Operations Window
Use the Position or Time parameter to define the start and end points of the area to be processed. Use Randomize to determine the amount of deviation from the current tempo, in beats per minute (bpm).
Density defines how often the new tempo events occur. You can select values between one per bar (1/1), and 32 times per bar (1/32).