Using Note Attributes to Change Individual Notes
You can use note attributes to set individual display parameters for each note, regardless of the settings in other windows and boxes.
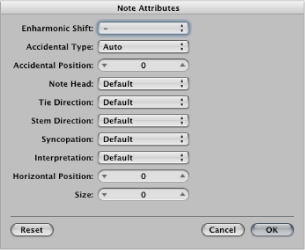
You can set the following note attributes:
Form of the note head, and note size
Horizontal position
Change of accidental distance
Enharmonic changes
Settings for interpretation and syncopation, independent of the settings in the Display Parameter box
Stem direction, tie direction, and beaming, independent of the settings in the staff style being used
Display as an independent note, which excludes the note from the measure’s overall rhythmic calculation
You can change note attributes in the Note Attributes window, via the Attributes menu, or with the respective key commands.
Note: Make sure that the Note Attributes setting is chosen in the “Double-click note to open” menu of the Logic Pro > Preferences > Score window. It is on by default.
Double-click note head to open the Note Attributes window.
Only one note can be changed at a time in the Note Attributes window.
Select one or more notes, then choose the appropriate command from the Attributes menu.
The Attributes menu (and corresponding key commands) allows a group of selected notes to be assigned new attributes.
You can also change specific note attributes via the Part box, and with tools.
Changing Note Heads
The default setting for note heads is normal (round and black).
Drag a note head from the Part box to the respective note.
Choose a note head from the Note Head pop-up menu in the Note Attributes window.
Changing Note Sizes
The default note size is set with the Size parameter in the Staff Style window.
Drag the note upward (increase) or downward (decrease) with the Resize tool.
Choose a size from the Size pop-up menu in the Note Attributes window.
Changing the Horizontal Position of Notes
You can set the horizontal position of each note, individually.
Drag the note horizontally with the Layout tool.
Choose a value from the Horizontal Position pop-up menu in the Note Attributes window.
Changing the Position of Accidentals
This note attribute defines the deviation from the Acc./Note Distance value, chosen in the Layout pane of the Score project settings.
Choose a value from the Accidental Position pop-up menu in the Note Attributes window.
Changing the Display of Accidentals
By default, the display of accidentals depends on the chosen key signature.
Choose a value from the Enharmonic Shift or Accidental Type pop-up menu (see list of settings below) in the Note Attributes window.
Choose a value from the Attributes > Accidentals menu.
You can choose between the following display options:
- Default Accidental: The display of accidentals depends on the chosen key signature.
- Enharmonic Shift#: Converts G flat to F sharp, or F to E sharp, for example.
- Enharmonic Shiftb: Converts D sharp to E flat, or B to C flat, for example.
- Flats To Sharps: Similar to Enharmonic Shift #, but leaves notes without flats unaltered (useful for multiple selection).
- Sharps To Flats: Similar to Enharmonic Shift b, but leaves notes without sharps unaltered (useful for multiple selection).
- Force Accidental: Forces the display of accidentals (and naturals).
- Hide Accidental: Displays the note without accidentals. (MIDI playback is not affected.)
- Guide Accidental: Forces the display of the accidentals (and naturals) in parentheses.
Use one of the following key commands:
Default Accidentals
Enharmonic Shift: #
Enharmonic Shift: b
Flats To Sharps
Sharps To Flats
Force Accidental
Hide Accidental
Guide Accidental
Changing the Stem Direction and Length
By default, a note’s stem direction and length depends on the respective setting in the Staff Style window.
Choose a value from the Stem Direction pop-up menu in the Note Attributes window.
Note: The stem length cannot be changed in the Note Attributes window.
Choose the respective item in the Attributes > Stems menu.
- Default: The stem direction is set in accordance with the default (staff style) setting.
- Up: The note’s stem is forced upward.
- Down: The note’s stem is forced downward.
- Hide: Hides a note’s stem, and the corresponding beam or flag.
- Stem Position: Default: Default setting.
- Stem Position: Center: Moves the stem to the center.
- Stem Position: Side: Moves the stem to the side.
- Stem Position: Automatic: Moves the stem to the side.
- Stem End: Default Length: Default setting.
- Stem End: Move Up: Moves the stem end upward. Depending on the direction, this shortens or lengthens the stem.
- Stem End: Move Down: As above, but moves the stem end downward.
Use one of the following key commands:
Stems: default
Stems: up
Stems: down
Stems: hide
Stem End: Default Length
Stem End: Move Up
Stem End: Move Down
Changing the Beaming of Notes
By default, the beaming of notes depends on the chosen time signature, the Beat Grouping setting in the Time Signature dialog, and the staff style’s Beam parameter.
Choose one of the following items in the Attributes > Beaming menu:
- Beam Selected Notes: Forces a beam to the following note.
- Unbeam Selected Notes: Interrupts the beam to the following note.
- Default Beams: Uses the default setting.
Use one of the following key commands:
Beam Selected Notes
Unbeam Selected Notes
Default Beams
Changing the Voice or Staff Assignment
You can change the voice or staff assignment for cross staff beaming in the Attributes > Ties menu. (See Cross Staff Beaming.)
You can choose between the following options (requires a polyphonic multi staff style):
- Default Staff: According to voice assignment.
- Staff Above Voice: Moves the selected notes to the staff above the assigned voice.
- Staff Below Voice: Moves the selected notes to the staff below the assigned voice.
Changing the Tie Direction
By default, the tie direction is set in accordance with the setting in the Staff Style window.
Choose a setting from the Attributes > Ties menu.
Choose a tie direction from the Tie Direction pop-up menu in the Note Attributes window.
Use one of the following key commands:
Ties: default
Ties: up
Ties: down
Changing the Syncopation of Notes
By default, note syncopation is set in accordance with the setting in the Display Parameter box.
Choose a setting from the Attributes > Syncopation menu.
Choose a setting from the Syncopation pop-up menu in the Note Attributes window.
Use one of the following key commands:
Default Syncopation
Force Syncopation
Defeat Syncopation
Changing the Interpretation of Notes
By default, note interpretation matches the setting chosen in the Display Parameter box.
Choose a setting from the Attributes > Interpretation menu.
Choose a setting from the Interpretation pop-up menu in the Note Attributes window.
Use one of the following key commands:
Default Interpretation
Force Interpretation
Defeat Interpretation
Changing the Independent Status of a Note
Notes are not displayed as independent notes by default.
Choose a setting from the Attributes > Independent menu:
- Independent Grace: The note is displayed as a single (independent) grace note.
- Independent: The note is displayed independent of the rhythmic context.
- Not Independent: The note is displayed in the regular rhythmic context.
Use one of the following key commands:
Not Independent
Independent
Independent Grace
Changing the Color of a Note
You can assign different colors to individual notes, in accordance with the three color palettes.
Select the note.
Choose one of the 16 colors in the Attributes > Colors menu.
You can also enable the Velocity or Pitch Color mode in this menu. Pitch colors can be diatonically or chromatically mapped. Note velocity colors match particular MIDI velocity ranges.
You can edit the 16 color options of the Attributes menu, the velocity colors, and the pitch colors in the Color pane of the Score project settings. For more information, see Color Settings.
Note: As note attributes, these settings have priority over the staff style settings, but they only apply if the color mode is set to Normal in the Score Editor’s View > Colors menu.
Resetting Note Attributes
You can reset all note attributes to their default settings by choosing Attributes > Reset All Attributes (or using the Reset Note Attributes key command).
Warning: Take care when doing this: all symbols directly attached to notes (accents, fermatas, jazz symbols, and so on) are deleted when you reset note attributes.