Working with Time and Key Signatures
Signatures are global events and affect all tracks in your project. You can view and edit time and key signatures in the Signature track, in the Signature List, and in the Score Editor.
Note: The Signature track must be visible—and must not be protected—in order to select and copy signatures.
Choose View > Global Tracks.
By default, the global Marker, Signature, and Tempo tracks are visible when you turn on the display of global tracks. If the Signature track is not visible, Control-click (or right-click) anywhere in the global tracks header area, then choose Signature from the shortcut menu.
Choose Options > Open Signature List.
Shift-double-click in the Signature track.
The Signature List displays time and key signatures in a list style editor, along with other global score symbols such as repeat signs, double bar lines, and so on.
A time signature determines the number of beats in a bar (shown in the Bar ruler), thus defining the editing grid in the Arrange area and MIDI editors. A time signature does not affect the playback of audio or MIDI regions.
Time signatures do, however, affect the score display. All functions that rely on the chosen time signature and bar positions (such as MIDI metronome click or Transform window functions) are affected if bar positions are used to restrict a function to a certain part of the project.
Key signature changes only affect the display of MIDI notes in the Score Editor—they do not have an effect on MIDI playback. The first key signature, however, affects the playback of audio Apple Loops. For more information, see Using Global Tracks with Apple Loops.
You can create as many key signatures as you like. If your project already contains other key signature changes, any newly inserted key signature changes the key from the insertion point forward, until the next key signature change is reached.
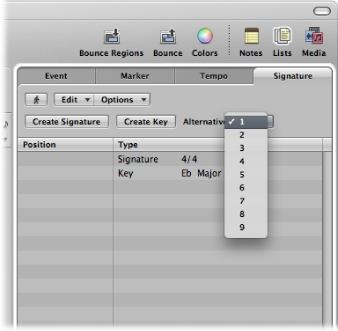
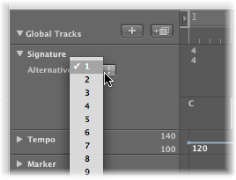
You can store up to nine signature alternatives, which are reflected in the Signature track, Signature List, and Signature window.
Creating Time Signatures
You can create as many time signatures as needed in a project.
Move the playhead to the target bar, and set the new time signature in the Transport bar.
In the Score Editor, drag the time signature from the Part box to the target bar position.
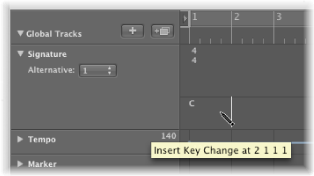
Set the Signature track to a sufficient height, so that it displays both the key and time signature areas. Click the target bar in the Signature track’s time signature area with the Pencil tool, then choose your settings in the Time Signature dialog.
Note: If you perform this procedure when the track height is reduced, a time signature change is created.
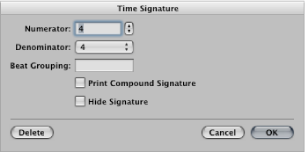
The Beat Grouping text field allows you to determine the grouping of beats in compound time signatures. It is sufficient to enter the numbers—223, for example. This becomes “2+2+3” automatically. The total number of beats in the bar is calculated automatically by the sum in this field. The Print Compound Signature checkbox needs to be selected in order to display the defined grouping as the nominator. If not selected, only the total sum is displayed as the numerator. Beat Grouping, however, affects the way the notes are beamed together (in both cases). You can also change the automatic beaming in normal time signatures. In 4/4-time “1+1+1+1” produces four beamed groups (one for every beat), instead of the two groups displayed as a default.
Select the Hide Signature checkbox to hide the corresponding time signature change in the printout. The signature is still displayed onscreen, but is crossed out, and won’t be included in the calculation of spacing between notes and symbols. As a result, signatures may overlap notes on the screen, but not in the printout. This function can be used for notating cadenza-like passages, which contain more notes than would normally fit the time signature.
Click the Create Time Signature button in the Signature List.
Creating Key Signatures
You can create as many key signatures as needed in your project.
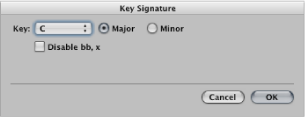
Click a position in the Signature track’s key signature area with the Pencil tool, then choose a key in the Key Signature window.
Note: You can disable the use of double flats and sharps by deselecting the “Disable bb, x” checkbox.
In the Score Editor, double-click a staff between the clef and time signature, then choose a key in the Key Signature window. You can also drag the key signature from the Part box to the appropriate bar position.
Click the Create Key Signature button in the Signature List.
Selecting Signatures
You can select signatures in the Signature List and Signature track by clicking them. Multiple selections are possible by Shift-clicking.
In the Signature track, you can even select multiple signatures in conjunction with regions, a technique that is very useful when you want to copy or move complete parts of a song (along with signature changes). The Edit > Select Inside Locators command can be helpful in this situation.
Note: When a marquee selection is active, using this key command sets the marquee selection to match the locators.
Copying Signatures
You can copy time signatures and key signatures in the Signature List or Signature track. You can also copy all time and key signatures from one project to another.
Subsequent signatures are inserted at bar positions that correspond to their original distance from the first copied signature.
Press Option, then drag the signature (in the Signature track) to the target bar position.
Select the time and key signatures in the Signature List or Signature track by clicking them. (Shift-click for multiple selections.)
Choose Edit > Copy (or press Command-C) to copy them to the Clipboard.
Do one of the following:
In the Signature track: Move the playhead to the insert position, then choose Edit > Paste (or press Command-V).
In the Signature List: Choose Edit > Paste (or press Command-V), type a bar value in the Position text input field, then press Return.
Select signatures in the Signature track or Signature List.
Choose Edit > Copy (or press Control-C).
All signature changes of the source project are copied to the Clipboard.
Switch to the target project.
Activate the Signature track or Signature List, then choose Edit > Paste (or press Control-V).
The copied meter changes are pasted into the target project.
Note: Because any copied time and key signature changes are mixed with those of the destination project when pasted, this procedure should only be used to copy such changes to a blank project (one that contains no time and key signature changes, except the initial settings).
Editing Signatures
You can edit existing signatures in the Score Editor and Signature track by double-clicking them. The Time or Key Signature window appears, allowing you to make changes. Moves are achieved by selecting, and dragging, signatures.
You can use the Scissors tool in the Signature track to cut bars. For example, to divide one 5/4 measure into a 3/4 and a 2/4 measure, cut it at the fourth beat of the 5/4 bar.
If you make a cut in the middle of a bar—in a section where the time signature doesn’t change—two corresponding shorter measures are inserted, with the original time signature resuming after the cut.
Likewise, it is also possible to merge two subsequent measures into one longer measure, by using the Glue tool in the Signature track.
Deleting Signatures
You can delete all signatures in a project, except the initial time and key signature.
Select the signature in the Score Editor, Signature List, or Signature track, then choose Edit > Delete (or press Delete).
Tip: To erase all time signature events, choose Edit > Select Similar Objects after selecting a signature, then press Delete.
Click the signature with the Eraser tool in the Score Editor, Signature List, or Signature track.
Creating and Choosing Signature Alternatives
Signature alternatives are just that: alternative versions of all signatures in the Signature List or Signature track.
Choose Options > Signature Alternatives in the Signature List, then choose a Signature List.
Choose a number from the Alternative pop-up menu in the Signature List.
Choose a number from the Alternative pop-up menu in the Signature track.
For full details about inserting signatures, see Creating Time Signatures and Creating Key Signatures.
Choose the appropriate number from the Alternative pop-up menu in the Signature track or Signature List.
All MIDI regions are affected, resulting in the appropriate changes to your score.