Getting to Know the Piano Roll Editor
MIDI note events are represented by horizontal rectangles, aligned on a grid of horizontal and vertical lines.
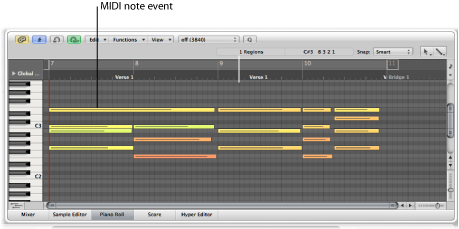
The horizontal placement of note events indicates their temporal (bar, beat, and sub-beat) positioning within the region, and project.
The vertical position of note events indicates their pitch, with those nearer the top of the Piano Roll grid being higher in pitch. Chords are displayed as a vertical stack of note rectangles. The alignment of notes in chords is not always identical, as not all notes in a chord may be struck, or end, at the same time.
The length of MIDI note events is directly related to the length of the rectangles, so notes such as hemidemisemiquavers (1/64th note), quavers (1/8th note), crotchets (1/4 note), minims (1/2 note), whole notes, and so on can be easily recognized.
Using the Grid in the Piano Roll Editor
The grid provides a valuable reference for note lengths. You can see both the start and end positions of note events, aligned with the time values shown in the Bar ruler. This simplifies note length editing.
The default grid lines shown are:
A black line at every bar and beat.
A light gray line at every division value (you can alter the division value in the Transport bar).
You can alter the appearance of this grid and other aspects of the Piano Roll Editor (see Customizing the Piano Roll Editor).
The vertical keyboard on the left side of the Piano Roll Editor indicates note pitches. Horizontal black lines run across the screen between notes B and C, and notes E and F. These lines are very helpful when transposing notes by dragging them up or down.
Using the Info Display in the Piano Roll Editor
The Piano Roll Editor’s info display indicates the current position and pitch of the mouse pointer within the region.
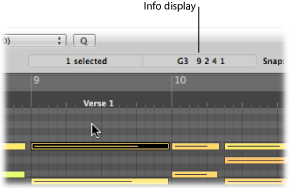
You should refer to this real-time display whenever making a selection.
Tip: Activate the MIDI Out button next to the Piano Roll Editor’s local menu bar to hear your edits as you make them.
Understanding Note Velocities
Each note event features a horizontal line that runs through the rectangle. The length of the line—in relation to the total length of the note—corresponds to the velocity value of the note (up to the maximum value of 127). Velocity denotes how hard the MIDI keyboard was struck when the note was recorded. This also usually indicates how loud the note is, within the range of 127 possible values, with 127 being the “loudest.”
The Piano Roll Editor also indicates note velocities with different colors.

This makes it very easy to see the overall range of (and individual note) velocities in a MIDI region. As you change the velocity of MIDI notes, the color of selected notes changes in real time.
For further details about color assignments in the Piano Roll Editor, see Changing Note Color in the Piano Roll Editor.
Displaying Multiple MIDI Regions in the Piano Roll Editor
The Piano Roll Editor’s Link button can be used to simultaneously display the contents of all MIDI regions in a folder, all regions in a project, or several selected MIDI regions.
You can freely select note events that belong to different MIDI regions, and process, move, or resize them as required. A help tag indicates the number of selected events and parent MIDI regions. For example, 8/2 means that eight notes are selected from two MIDI regions.
Each time you select another region in the composition area, the Piano Roll Editor updates to reflect the contents of this region.
Selecting several regions simultaneously updates the Piano Roll Editor to display the contents of all selected regions.
The start point of each MIDI region is indicated by a vertical line of the same color as the MIDI region itself.
Double-click a note event to revert to a display of the contents of a single parent MIDI region (the region that contains the note).
Using the Shortcut Menu in the Piano Roll Editor
Many selection, editing, and other commands can be accessed by Control-clicking (or right-clicking) anywhere in the Piano Roll Editor background area or directly on a MIDI note event. Make use of this to accelerate your workflow.
These shortcut menus can only be accessed if one of the following options is chosen in the Logic Pro > Preferences > General > Editing pane.
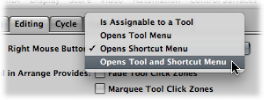
Right Mouse Button: Opens Shortcut Menu
Right Mouse Button: Opens Tool and Shortcut Menu