Using the Sample Editor’s “Time and Pitch Machine”
You can use the “Time and Pitch Machine” to radically alter the time structure of audio files, including time compression or expansion, and pitch transposition. When changing the pitch, you can also correct any alteration of the formants—the vocal characteristics of the pitch-shifted audio. Pitch shifting without formant correction causes a phenomenon commonly known as the Mickey Mouse effect.
In the “Time and Pitch Machine,” time and pitch functions can be carried out together, or can be performed independently of one another.
Opening the Sample Editor’s “Time and Pitch Machine”
You need to select an area within an audio file before you can open the “Time and Pitch Machine.”
Select the area of the audio region in the Sample Editor that you want to process through the “Time and Pitch Machine.”
Choose Factory > “Time and Pitch Machine” (or use the corresponding key command, default assignment: Control-P).
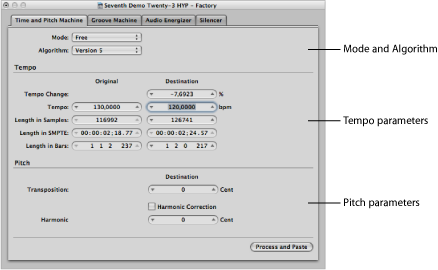
The “Time and Pitch Machine” contains Mode and Algorithm, Tempo, and Pitch parameters.
You don’t need to enter, or adjust, all of the “Time and Pitch Machine” parameters. Most are linked, so an adjustment to the Tempo parameter will result in changes to the Length values, and vice versa.
Setting Mode and Algorithm in the “Time and Pitch Machine”
The “Time and Pitch Machine’s” Mode and Algorithm menus define the operating mode and algorithm used when performing the time stretch or pitch shift.
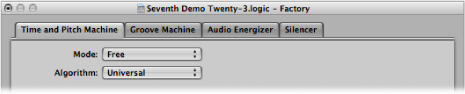
- Mode menu: You can choose between Free and Classic in the Mode menu.
- Free: In Free mode (the more common mode setting), you can make all pitch and tempo adjustments independently of one another.
- Classic: In Classic mode, pitch and tempo are linked, so transposing a selected region also affects its tempo. The resulting effect simulates the sound of changing tape speed. The pitch increases as the tape speeds up, and it decreases as the tape slows down.
- Algorithm menu: You can choose the algorithm that is best suited to the audio material you want to process:
- Version 5: Inherited from Logic 5, this algorithm can be used on most types of audio material. It imparts a particular color on processed audio, which may be a useful creative option.
- Any Material: Is able to handle most types of audio material.
- Monophonic: A specialized algorithm for monophonic material—an individual voice, or brass or woodwind instrument, for example.
- Pads: Use on polyphonic material with harmonic content—choirs or string sections are good examples.
- Rhythmic Material: Use on rhythmic material—can be drums and percussion, but less obviously rhythm guitar, clavinet, and piano comp parts.
- Beats Only: Perfectly maintains the timing of percussive material. This algorithm should be your first choice for all kinds of dry drum loops.
- Universal (default): This high-quality algorithm is able to handle any kind of audio material and is generally recommended for most time-stretching tasks. The following two algorithms can, however, deliver better results in cases where the audio material exactly matches the outlined specifications.
- Complex: Choose this algorithm to obtain natural-sounding results when time-stretching complex musical material—orchestral music or final mixes.
- Percussive: Perfectly maintains the timing of rhythmic material, making it a good choice for drum loops and percussive, nonharmonic signals. In comparison to the Beats Only algorithm, the Percussive algorithm is better suited for percussive material that has been processed through a reverb (or contains a long tail). This may also apply to percussive playing styles, such as staccato electric piano or clavinet parts. Beats Only may be the better alternative for dry drum recordings.
Setting Tempo Parameters in the “Time and Pitch Machine”
The Tempo section is divided into two columns: The Original column displays the current values of the selected area in the audio file, and the Destination column is where you set the desired tempo parameters.
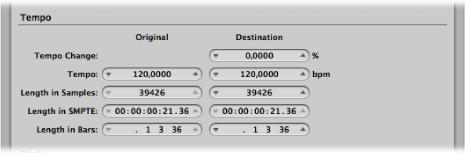
- Tempo Change: Determines the tempo alteration, displayed as a percentage (no original value is shown).
- Tempo: Displays the tempo in bpm (beats per minute). Make sure to set the right length in bars, or the correct original tempo will not be shown on the left.
- Length in Samples: Displays the length of the selected area in samples.
- Length in SMPTE: Displays the length of the selected area in SMPTE time format.
- Length in Bars: Displays the length of the selected area in musical values (bars, beats, divisions, and ticks). If you have already adjusted the project tempo to match the region that you’re about to edit, the original value will automatically be set correctly. If not, you need to manually enter the original length here.
Setting Pitch Parameters in the “Time and Pitch Machine”
The pitch parameters determine the amount of transposition in cents, and also the strength of harmonic correction, if used.
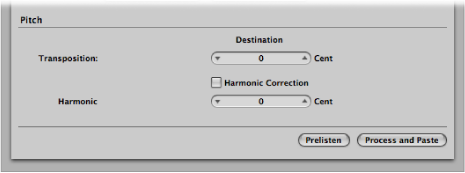
- Harmonic Correction: When audio is transposed, not only is the fundamental pitch transposed, but all of the formants are shifted as well—as though the whole instrument or singer is being reduced or enlarged. This, of course, is not natural. Voices transposed up will sound like Mickey Mouse, or like Darth Vader if transposed down. These artifacts can be circumvented by using Harmonic Correction.
Select the Harmonic Correction checkbox to leave the formants in the transposed material unchanged. This means that the original timbre (or the physical size of the resonance body) is maintained, resulting in a more natural-sounding transposition. The only trade-off is that calculation takes more time.
Note: The quality of Harmonic Correction is heavily dependent on the source material, because the algorithm has to make intelligent decisions between tonal and atonal components of the recording, and handle them separately. This is not an exact science and is more accurate on monophonic material than on complex stereo material, but you can certainly use it on a complete mix. The phase correlation of stereo recordings is maintained.
You can also use Harmonic Correction to shift the formants without transposition. In this way, you alter the physical size of the sound source’s resonance body—to give female voices a male character and vice versa, for example—while keeping the pitch in tune.
This effect (sometimes known as gender-bending) allows you to change sounds so that they appear to have been made by unusually small or large instruments. It is useful for beefing up thin or brittle sounding parts, such as guitars, or instruments and vocals that were recorded through a microphone with a limited frequency response.
As a usage example on a vocal part: If you set Harmonic Shift to −300, and the Transposition value to 0, the sonic character of the singer will be changed as though transposed three semitones down—but without an actual transposition in pitch. This means that a musical C remains a C, but the timbre of the vocal becomes darker.
- Harmonic: If Harmonic Correction is turned on, you can also use the Harmonic (Shift) parameter to independently alter timbre. The units are shown in 1/100 semitone units (cents).
If you select the same value in both the Harmonic and Transposition fields, no correction occurs, and the result is as if Harmonic Correction is turned off.
If you set Harmonic to 0, the formants don’t change. This prevents the unwanted side effects of traditional pitch shift algorithms.
Tip: If you need to find the exact transpose value by trial and error, turn off Harmonic Correction. As soon as you’ve found the right transposition value, do an independent Harmonic Correction, with the same value, in a second step.