Adding and Removing Audio Files
You can add audio directly to the Arrange area, or to the Audio Bin, using any of the methods covered in this section.
The Audio Bin acts as a central repository for all audio files added to the project, whether or not they are used in the Arrange area. This is useful for keeping all takes associated with the project in one location, even if not all are actually used in the final production.
When you add audio files to the Arrange area, they are automatically added to the Audio Bin—and they appear as audio regions in your arrangement. These regions have a default length that encompasses the entire audio file. You can resize, cut, and move these regions in the Arrange area.
All methods outlined in this section can be used to import WAV, AIFF, CAF, MP3, SDII, AAC, Apple Lossless, and Apple Loops files.
Apple Loops offer a few special features when added to your arrangement. For details see Understanding Green and Blue Apple Loops.
ReCycle files are handled differently. See Adding ReCycle Files to Your Project.
Adding Audio Files to Your Arrangement
You can use any of the following methods to add audio files directly to your arrangement:
Shift-click at any position on an arrange audio track with the Pencil tool.
Use the Import Audio File command.
Simply locate (browse to or search for) the specific filenames in the Browser, Audio Bin, or Loop Browser—or the Mac OS X Finder—and drag them into the Arrange area. Double-clicking a filename in the Browser adds the file at the current playhead position on the selected arrange track.
Select the Pencil tool in the Arrange area.
Shift-click an audio track at the appropriate Arrange area position.
Browse to and select the file that you want to insert in the Open File dialog.
Click the Play button to preview the selected audio file.
The Play button is renamed Stop. Click it to halt playback.
Click the Open button to add the file to the selected track, at the clicked position, in the Arrange area.
Select an audio track in the Arrange area.
Choose File > Import Audio File (or use the corresponding key command).
Browse to and select the file that you want to insert in the Open File dialog.
Click the Play button to preview the selected audio file.
The Play button is renamed Stop. Click it to halt playback.
Click the Open button to add the file to the selected track, at the playhead position, in the Arrange.
Drag the file directly onto an audio track in the Arrange area from either the Browser, Loop Browser, or the Finder.
You can drag audio files onto all track types, but playback is only possible on audio tracks.
Note: You can drag audio files directly into a blank Arrange window (with no tracks), or to a blank area below existing tracks. An audio track and corresponding channel strip are automatically created, and an audio region (that is the full length of the file) is placed on the track. In addition, the file is added to the Audio Bin, and the corresponding region is automatically created.
Shift-click contiguous files, or Command-click noncontiguous audio files in the Audio Bin, Finder, or Browser.
Drag them to the Arrange area position, and release the mouse button.
Note: If adding files from the Audio Bin, you can also use the Audio File > Add File to Arrange menu item. The playhead position determines where the first audio region is created.
Select any of the following options shown in the Add Selected Files to Arrange dialog:

- Create new tracks: Creates new tracks (and audio channel strips) for each dragged file.
- Use existing tracks: Sequentially places the dragged files (as regions) onto existing tracks, starting with the currently selected track. For example, if three audio files are dragged into the Arrange area (where track 4 is selected), the first file is placed on track 4, and the following two files are placed on tracks 5 and 6.
- Place all files on one track: All files are placed sequentially (one after the other) on the track they are dragged to.
- Copy audio file names to track names: Uses the filenames to rename tracks. This option is only available when used in conjunction with the “Create new tracks” and “Use existing tracks” functions.
- Create new audio regions: Adds the files to the Arrange area, and creates a new audio region for each. A numeric value is appended to each audio region in the Arrange area, and a new region is created for each file in the Audio Bin. For example, a region called folk-04 will become a new region called folk-04.1. The original region will be retained in the Audio Bin (and Arrange area, if used).
Adding and Removing Project Audio Files
The Audio Bin acts as a central repository for all audio files added to the project, whether or not they are used in the Arrange area. This is useful for keeping all takes associated with the project in one location, even if not all are actually used in the final production.
All audio file addition methods covered above will automatically place the files in the Audio Bin. For methods that add files directly to the Arrange area, a region associated with the file is automatically created in the Audio Bin.
The Audio Bin also provides functions that allow you to add files to your project (into the Audio Bin), and from the Audio Bin into the Arrange area.
Shift-click contiguous files, or Command-click non-contiguous audio files in the Finder or Browser.
Drag them into the Audio Bin, and release the mouse button.
Note: If adding files from the Browser, you can also choose Add Selected Audio File to Bin in the action menu.
Choose Audio File > Add Audio File (or use the corresponding key command, default assignment: Control-F).
The dialog below opens.

Browse to and select an audio file.
You can audition it by clicking the Play button.
Click the Add button.
The file is shown in the file view area below.
Browse to, and select, another audio file, and click the Add button.
Repeat the process until all desired files are in the file view area.
If you accidentally add a file, select it in the file view area, and click the Remove button.
Note: You can also add all files in a folder by selecting the folder and clicking the Add All button. If you accidentally add all files from the wrong folder, press the Remove All button to remove them from the list. This does not remove them from the hard disk.
Click Done to add the selected files to the Audio Bin.
Note: Files that have already been added to the Audio Bin are dimmed, and cannot be selected. This helps to avoid confusion, and duplication.
Select the filenames in the Audio Bin.
Press Delete.
The file is deleted from the project, but not from the hard disk. The only way that you can totally remove an audio file from a project is in the Audio Bin. Removing an audio region in the Arrange area (Eraser tool, pressing Delete) does not remove it from the project—it merely removes the reference to the audio file.
Warning: Take extreme care when using the Audio File > Delete File(s) command (or key command, default assignment: Control-Delete). This not only deletes the selected file from the project, but also from the hard disk. Deleted audio files are moved to the Trash—where they remain until you empty the Trash.
Importing Compressed Audio Files
Logic Pro allows you to directly play back the following compressed audio file formats:
AAC
Compression format: MPEG-4 AAC
Sample rates: 8 kHz, 11.025 kHz, 12 kHz, 16 kHz, 22.05 kHz, 24 kHz, 32 kHz, 44.1 kHz, 48 kHz, 64 kHz, 88.2 kHz, or 96 kHz
MP3
44.1 kHz files
Stereo files encoded at 48 or higher kbps, mono files encoded at 32 or more kbps
iTunes/Logic encoded files
Apple Lossless files
These files are not automatically converted when imported into Logic Pro. The compressed audio file is added to the Arrange area, and a region that encompasses the complete audio file is created. You can edit this region in the same fashion as a normal audio region in the Arrange area. You can cut it, loop it, rename it, and so on.
Note: It is not possible to assign fades to compressed audio files, nor can you destructively edit them.
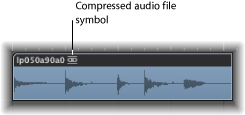
Audio regions that point to compressed audio files are denoted by the following symbol:
Select the audio regions pointing to an audio file in the Arrange area, then choose Audio > Convert Regions to New Audio Files in the local Arrange area menu (or use the Convert Regions to New Audio Files key command, default assignment: Option-Command-F).
The part of the audio file spanned by the audio region is converted to a new audio file.
Select the audio files in the Audio Bin, then choose Audio File > Copy/Convert File(s) in the local Audio Bin menu (which is also available by Control-clicking the Audio Bin or using the corresponding key command).
Important: Compressed audio files protected by the DRM (Digital Rights Management) scheme cannot be opened in Logic Pro. Depending on the type of music you buy from the iTunes Store, you may have the option of buying DRM-free songs. Some songs are only available in a DRM-protected format, while others are available in both formats.
Overview Calculation
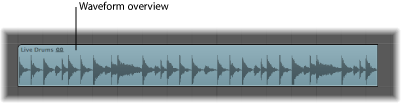
When you add an audio file to your project, Logic Pro automatically creates an overview of the audio file. This is a graphic file that is used to display the waveform.
The calculation of audio file overview data is shown in a window. This calculation occurs in the background, allowing you to continue working in Logic Pro.

Selecting the “Faster overview calculation” option considerably speeds up the calculation, at the cost of slowing down other operations, but not blocking user interaction completely. Logic Pro remembers the state of the “Faster overview calculation” option between projects.
You can manually refresh the overview of selected files with Options > Audio > Refresh Overview(s) in situations where you have replaced file recordings (and used regions), or made edits in an external sample editor.
Adding ReCycle Files to Your Project
ReCycle is the name of a software application from manufacturer Propellerhead, which mainly serves as an editing and production tool for loops (repeatedly cycled audio files). ReCycle uses specific file formats that can be imported, and used directly by Logic Pro, or ReCycle files can be converted to Apple Loops.
Note: You need to install the REX Shared Library © Propellerhead Software when using ReCycle files within Logic Pro. For more information on ReCycle files, see the Propellerhead website.
Logic Pro can import the following ReCycle file formats:
- Old ReCycle file: These files have the suffix .rcy. The abbreviation for this file type is RCSO.
- Old ReCycle export file: These files have the suffix .rex. The abbreviation for this file type is REX.
- ReCycle 2.0 file: These files have the suffix .rx2. The abbreviation for this file type is REX2.
Select the ReCycle file you want to import by doing one of the following:
Choose File > Import Audio File and select a ReCycle file instead of an AIFF, SDII, MP3, or WAV audio file.
Shift-click an audio track with the Pencil tool and select a ReCycle file.
Drag a ReCycle file from the Finder onto an audio track.
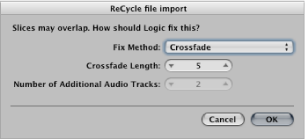
Choose settings in the Import ReCycle file dialog, then click OK.
- Don’t Fix: Imports the file as is. All slices of the file overlap, to match the tempo of Logic Pro.
- Add tracks: Distributes the slices across multiple audio tracks, allowing you to adjust the position or delete slices freely. The Number of Additional Audio Tracks field determines how many tracks are used for the distribution of the slices. These tracks are in addition to the original track that the ReCycle file was added to.
- Crossfade: All slices of the file are imported to the same track, and are automatically crossfaded. The length of the crossfade is determined by the value (shown in milliseconds) displayed in the Crossfade Length field.
- Render into single file: This function writes all ReCycle slices into a single audio file. The current Logic Pro project tempo is used for the rendering process.
- Render to Apple Loop: Imports the ReCycle file as an Apple Loops file.
If you do not import the ReCycle file as an Apple Loops or audio file, Logic Pro creates a ReCycle file folder on a folder track. This folder contains slices (you can view them as miniature regions in the folder) of the ReCycle file at appropriate positions.
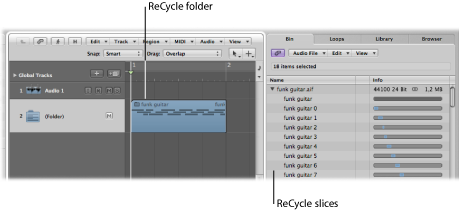
Each of these slices references the same audio file, which can be found in the Audio Bin.
Note: If you move the ReCycle file folder to another audio track, the audio channel strip destination (of the track inside the folder) does not change accordingly. You need to open the folder and change the audio channel strip destination manually, to hear the ReCycle audio data.
Use the Render to Apple Loop option in the ReCycle file import dialog.
Choose the Convert ReCycle Files to Apple Loops command in the Browser’s Tool menu.
Moving Audio Between Logic Pro and ReCycle
You can transfer data from Logic Pro to ReCycle, and back, without using any file selector dialogs.
Select an audio region in the Arrange area.
Choose Audio > Copy as ReCycle Loop in the Arrange menu.
The data of the selected audio region is copied into the Clipboard.
Use the “Paste as new Document” command in ReCycle to create a new ReCycle document (containing the audio data selected in the Arrange area).
Note: The size of the transferred audio region is limited to 10 MB, which should be sufficient for most ReCycle loops (an eight bar stereo loop in 4/4 at 70 bpm uses approximately 5 MB, for example).
Use the Copy Loop command in ReCycle.
This copies the loop currently being edited in ReCycle into the Clipboard.
Choose Audio > Paste ReCycle Loop in the Arrange menu to paste this loop into the Arrange area.
The result is the same as the ReCycle file import options.