Using Screensets
You position windows in a way that suits your working methods. This layout of various windows, including the display size, zoom levels, and position of each window (and other settings), is called a screenset. Once defined, you can save, and freely switch between different screensets, much as you might between different computer displays.
Creating, Recalling, and Switching Screensets
Screensets are numbered from 1 to 99 (using only the 1 to 9 computer keys—the 0 key is assigned to the Stop command by default).
You don’t need to save screensets with an explicit command. It happens automatically, as soon as you switch to another screenset. Thus, without any effort, your current working view is always stored as the current screenset.
Press any numerical key except 0; for example, 7.
For two-digit screensets, hold down the Control key while entering the first digit.
Arrange your windows, including changes to zoom settings, the relationship of the Arrange area and editor areas, open or closed Inspector and Media or Lists areas, and so on.
Note: When you choose a screenset number that has not been saved, a maximized Arrange window opens.
Input the number of the screenset (1 to 9) you want.
For two-digit screensets, hold down the Control key while entering the first digit.
Choose the screenset from the Screenset menu.
Use the Next Screenset or Previous Screenset key commands.
Note: Screensets 1 to 9 can be recalled by freely defined key commands, not only the number keys on your computer keyboard. This allows you to use the number keys for other purposes, such as opening or closing windows. The 1 to 9 key commands are called Recall Screenset 1–9 in the Key Commands window.
Select the MIDI region into which you want to insert the meta event.
Set the playhead to the point where you want the screenset to change.
Click the Create button in the Event List, then click the Meta Events button.
The inserted meta event has a default value of 50 (Project Select).
Alter the number in the Num column from 50 to 49.
This changes the name to screenset.
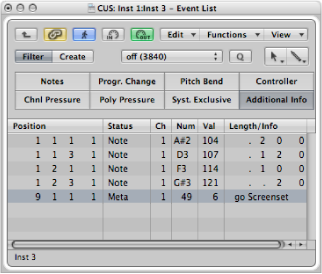
Enter the screenset number in the Val column.
You can stop screenset switching by muting the MIDI region that contains the meta 49 event.
Protecting, Copying, Renaming, and Deleting Screensets
Logic Pro allows you to protect, copy, rename, and delete a screenset, making it easy to manage them.
Choose Screensets > Lock from the main menu bar (or use the Lock/Unlock Current Screenset key command).
A bullet appears in front of the screenset number to indicate that it is locked. Reuse the key or menu command to unlock the screenset.
Important: The File > New command deactivates all screenset locks.
Switch to the screenset you want to copy, and choose Screensets > Duplicate from the main menu bar (or use the Duplicate Screenset key command).
The Duplicate Screenset dialog appears.
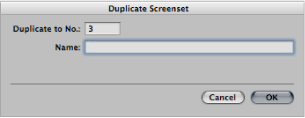
Enter the target screenset number (the screenset number that you want to copy to), and type a name.
Click OK.
Choose Screensets > Rename from the main menu bar (or use the Rename Screenset key command).
The Rename Screenset dialog appears.
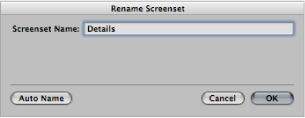
Do one of the following:
Type a new name.
Click the Auto Name button to automatically name the screenset. This defaults to the visible window names (“Arrange/Piano Roll” or “Arrange/Mixer” as examples). The name is automatically updated whenever a window or view is opened or closed.
This names the screenset automatically, defaulting to the visible window names (“Arrange/Piano Roll” or “Arrange/Mixer” as examples). The name is automatically updated whenever a window or view is opened or closed.
Click OK.
Choose Screensets > Delete from the main menu bar (or use the Delete Screenset key command).
Importing Screensets from Another Project
You can import screensets from another project.
Do one of the following:
Choose File > Project Settings > Import Project Settings (or use the corresponding key command, default assignment: Option-Command-I).
Click the Settings button in the Arrange toolbar, then choose Import Settings from the pop-up menu.
Choose the Media > Browser pane.
Navigate to, and select, the project file that you want to import screensets from.
Click the Import button.
Note: If accessing this feature via the Media > Browser pane, you also need to click the Import Settings button, which appears after clicking the Import button.
In the Import Settings dialog, click the Screensets option.
Click the Import button.
The settings are imported into the active project.
Reverting to Saved Screensets
You can easily revert to saved screensets.
Choose Screensets > Revert to Saved from the main menu bar (or use the Revert to Saved Screenset key command).
This resets your screen to its original state—prior to changing any aspect of the current screenset.