Working in the Lists Area
The Lists area can be opened or closed by clicking the Lists button in the Arrange toolbar. It provides four independent tabs that show a listing of the following types of data:
- Event List: Displays regions or MIDI events in the project.
- Marker List: Lists all markers in the project.
- Tempo List: Displays all tempo changes in the project.
- Signature List: Shows all time signature and key change events in the project.
The List tabs are well-suited for a number of precise editing tasks, and when a complete view of all data is required.
Introducing the Event List
The Event List presents a list of all events in your project, such as MIDI note events or region start events. Use it whenever you need to make precise alterations to recorded data, and when the graphic display of the other editors is not as well-suited to the task. You can restrict the types of events that are shown, making it easier to find specific event types.
The Event List can display two types of data: region-related or event-related. The information that is displayed depends on the current hierarchy level—in other words, whether you are viewing information at the Arrange level, or looking inside one or more MIDI regions in the Arrange area. Further information about the display hierarchy can be found in Working at Different Hierarchy Levels.
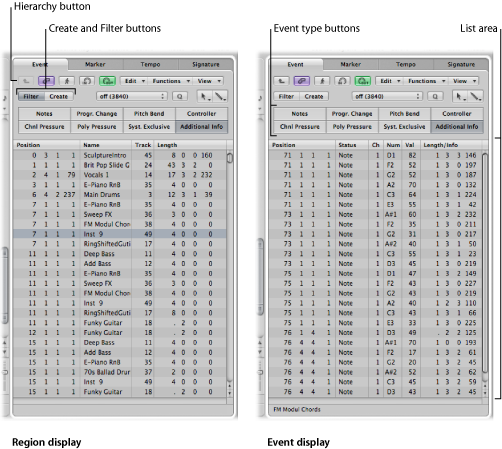
- Hierarchy button: Click to move up one level in the Event List hierarchy. This allows you to see all regions in the current project.
- Create and Filter buttons: Determine the function of the event type buttons. When you activate the Create button, clicking the event type button adds the selected event type. When you activate the Filter button, you can use the event type buttons to filter specific event types from the display. This merely hides the events from the display; it does not affect playback.
- Event type buttons: Click to filter specific event types from the display, or add them (depending on the status of the Create and Filter buttons).
- List area: Shows the actual list of events or regions, separated into columns. For details, see Editing MIDI Events in the Event List.
Introducing the Marker List
The Marker List displays all markers in the project. You can use it to create new markers, edit existing ones, and to select markers for text editing. It also serves as a navigation aid—you can click a marker name to jump to (move the playhead to) that marker position.
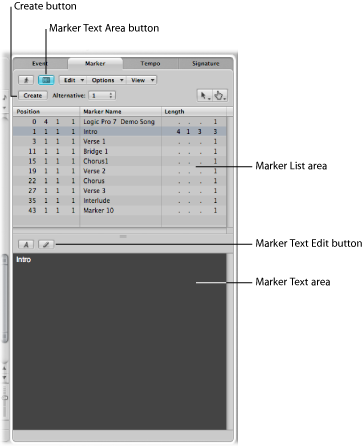
- Create button: Creates a new marker.
- Marker List area: Displays all markers in your project.
- Marker Text Area button: Click to display the optional Marker Text area, allowing you to enter or edit marker text.
- Marker Text area: Enter text for the selected marker here.
- Marker Text Edit button: Activates marker text editing mode.
Introducing the Tempo List
The Tempo List displays all tempo changes in the project. You can also use it to create new tempo events, or to edit existing ones.
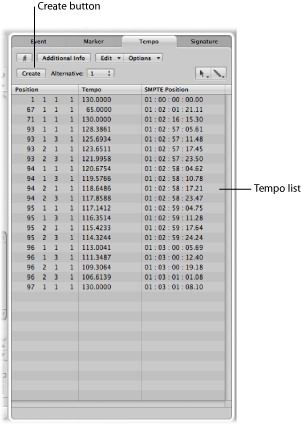
- Create button: Click to create a new tempo event.
- Tempo list: Displays all tempo changes, and their position in a project.
- Additional Info button: Displays all additional tempo changes located on a tempo curve, and their position in a project.
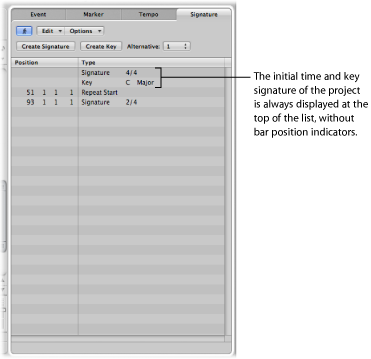
Introducing the Signature List
The Signature List shows all time and key signature events in the project. Score symbols, if present in the score of the project, are also shown. These include repeat signs and double bar lines (including end of score events), half/short bar lines, hidden bar lines, and manually inserted bar lines.
You can use the Signature List to create, copy, move, and delete time and key signature events.