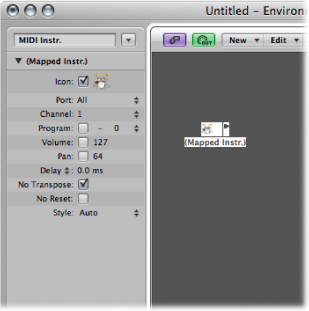
Mapped Instrument Objects
A mapped instrument is particularly useful for drum instruments or any drum-mode MIDI device. A drum-mode device has different sounds assigned to different MIDI notes, but only uses a single MIDI channel; for example, a drum kit loaded into the EXS24 mkII, or MIDI channel 10 of a GM-compliant sound module, or a drum machine.
Choose New > Mapped Instrument (or use the New Mapped Instrument key command).
A mapped instrument is used just like a standard instrument, but each individual input note can be:
Named (snare, hi-hat, and so on)
Mapped to an output note
Given a velocity offset
Assigned its own MIDI channel
Sent to one of up to 16 output cables (This allows you to create a single instrument that addresses multiple sound sources.)
Given its own notation parameters: note head shape, relative vertical position in the staff, and drum group assignment (See Using Drum Notation with Mapped Staff Styles.)
The Mapped Instrument Parameter Box
The mapped instrument’s parameters are a subset of the standard instrument parameters. The missing settings are available on a note-by-note basis in the Mapped Instrument window. For details, see Opening the Object Parameter Box.
The Mapped Instrument Window
Double-clicking a mapped instrument icon opens the Mapped Instrument window. The rows correspond to input notes, and the columns contain the various parameters available for each note. The window opens automatically when a new mapped instrument is created.
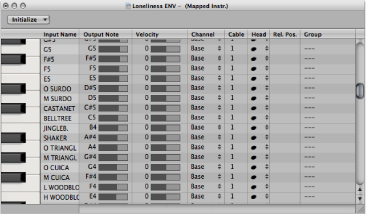
The keyboard on the left represents the input notes. It can be played by clicking it. You can also select individual notes or note ranges by dragging the mouse over the notes you want to use. To select multiple notes, Shift-click them. Any value alterations apply to all selected notes.
In the first column, you can click the input note name (E6, for example), and type in a name of up to 12 characters. Press Return or click outside the text entry field to confirm the new name.
You can initialize the names of the selected notes to:
Pitch descriptions (C#3, for example) by choosing Names as Notes from the Initialize pop-up menu.
The names of GM Standard drum sounds by choosing Initialize > Names as General MIDI.
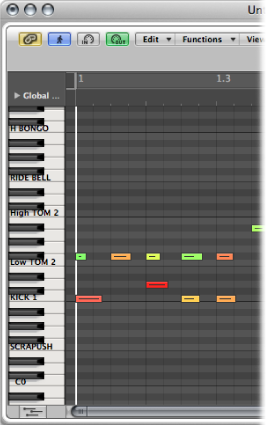
If a MIDI region (on a track routed to a mapped instrument object) is displayed in the Piano Roll Editor, the names of the notes being played appear on the vertical keyboard.
This column is used to set the output note. This is done by either:
Double-clicking the note description and editing the text
Dragging the beam to the right of the output note name
MIDI notes are sent while the value is being changed, allowing you to hear what you’re doing.
Use the Initialize > Output Notes command to match the output notes of the selected pitches to the input note pitches.
Use to set a velocity offset that is added to, or subtracted from, the velocity of the incoming note. Drag the number vertically to create a velocity offset. You can also click the specific point on the beam.
The Initialize > Output Velocities command resets all velocity offsets to 0 (no offset).
Use to set the MIDI channel of individual notes. This allows you to play individual sounds from different drum sets in the same sound generator.
You will normally use the Base setting. This means that the notes are sent on the channel set in the mapped instrument’s Parameter box. If you choose All in the Parameter box, the channel information of the incoming notes is used. This is useful if you want to place the mapped instrument after a multi-instrument or standard instrument in the signal path.
To set all selected notes to Base, choose Initialize > Output Channels.
You can send individual notes from a mapped instrument object to (up to) 16 different output cables, allowing you to play sounds from different sound sources. If you select a cable that doesn’t exist, the note will not be sent out.
The Initialize > Output Cables command resets all cables to #1 (the top outlet of the Mapped Instrument).
The last three columns define the notation parameters of individual notes.
- Head: This pop-up menu allows you to change the note head.
- Rel. Pos.: This field is used to alter the relative position of the note on the staff. This does not alter the pitch, only the vertical positioning of the note head on a staff in the Score Editor. Drag vertically to alter the note position.
- Group: As the mapped instrument object is typically used for percussion instruments, click-holding the Group field opens a menu of grouped drum families: Kick, Snare, and so on. MIDI sound modules can have drum sounds mapped across 127 possible notes, which would result in an interesting staff (to say the least). Assign several related percussion sounds (tom drums, for example) to the Toms group to place all related sounds on a single staff line. As with the relative position, the pitch of grouped notes is not affected by grouping them on a single line.
Choosing Initialize > Score Parameters neutralizes the settings of the Head, Rel. Pos., and Group parameters.
Custom Bank Selects
Logic Pro provides 15 bank numbers (0 to 14) for each standard instrument, multi-instrument (including sub-channels), or mapped instrument object. You can create custom lists, consisting of as many events (of any kind, even SysEx) as you like, for each of these banks.
Whenever you change the bank manually, or send a standard bank change message from Logic Pro, the entire list for that bank is transmitted to your sound module.
Select the instrument you want to define bank select messages for.
Choose Options > Define Custom Bank Messages.
A window similar to the Event List opens, with a single, default bank select message for banks 0 to 15. (The default used is a MIDI controller #0 message, with a value equal to the bank number.)
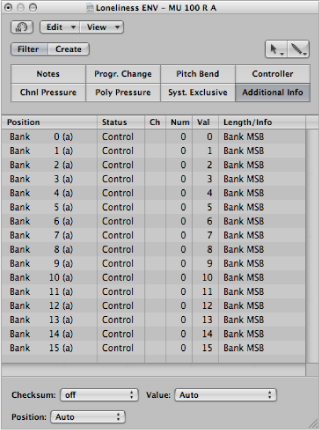
You can create MIDI events here as you would in the Event List, by cutting, copying, inserting, and editing. (See Editing MIDI Events in the Event List.) The only difference is that you enter a bank number, rather than a time position.
The letter in parentheses next to the bank number allows you to control the order of transmission when a bank select requires more than one message.
If there are no events defined for a particular bank, a standard bank select message is sent for that bank.
For bank messages that need a channel (MIDI controller messages, for example), the channel of the instrument is used. This feature is especially useful for multi-instruments, as you only need to create one set of bank messages for all 16 sub-channels. If an instrument’s channel is set to All, channel 1 is used.
Note: The custom bank select information becomes part of the instrument, and is automatically copied with it, if you replicate the instrument object.