Working with Objects
As with all windows, you interact with onscreen elements and data by using different tools. The Environment window Tool menu offer the standard Pointer, Pencil, and Eraser tools found in other windows. These are used to select, create, and delete objects in the Environment. In addition, the following tools are available in the Environment:
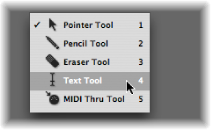
- Text tool: Clicking an object with the Text tool allows you to rename it. Click anywhere outside the text field, or press Return, to complete the naming operation.
- MIDI Thru tool: Clicking an object in the Environment with the MIDI Thru tool assigns the object to the selected track in the Arrange window.
Creating and Deleting Objects
You can create and delete objects.
Choose an object type from the New menu to create an object of this type on the current layer.
Click a layer background with the Pencil tool to create a new instrument object.
Click the object with the Eraser tool.
Select all objects you want to delete, and choose Edit > Delete (or press Delete).
Moving Objects
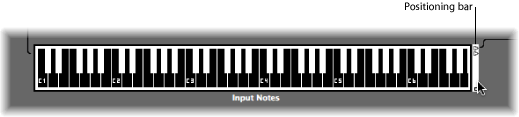
You can move objects by grabbing their icon or name, and dragging them to a new position on the layer. The surface of keyboard and fader objects is used for their operation. You must therefore either grab the name (if available), or the positioning bar to the right of the object in order to move them. If you hold down Shift, you can also grab keyboard or fader objects by their surface.
Note: You can Shift-click any Environment object to select and move it. When doing so, remember to first deselect any other selected objects by clicking the layer background, to avoid moving them as well.
You can use the Layer menu and the Clipboard to move objects between layers. You can also open a second Environment window and drag the objects to a different layer.
Select the objects.
Hold down Option, and select a layer in the Layer menu.
The selected objects are moved to the chosen layer.
Select the objects that you want to move and choose Edit > Cut (or use the corresponding key command, default assignment: Command-X).
Switch to the destination layer.
Make sure that no objects are selected (by clicking the layer background).
Choose Edit > Paste (or use the corresponding key command, default assignment: Command-V).
Note: If any objects are selected when attempting to paste objects to the current layer, a dialog asks if you want to “Replace current selection? No/Replace.” If you press Return or click Replace, the selected objects are replaced by the objects in the Clipboard. The existing cabling remains intact.
Open a second Environment window that displays the target layer.
Select the objects you want to move in the first Environment window, and drag them from one window to the other.
Tip: You can also use this method to copy objects between layers (by holding Option).
Copying Objects
You can copy an object on a layer by Option-dragging it with the Pointer tool.
Select the objects that you want to move and choose Edit > Copy (or use the corresponding key command, default assignment: Command-C).
Switch to the destination layer.
Make sure that no objects are selected (by clicking the layer background).
Choose Edit > Paste (or use the corresponding key command, default assignment: Command-V).
Cabling is preserved, so groups of objects copied in this way are connected in the same way as the originals. (When you copy a single object, only its output cables are preserved.)
Note: If any objects are selected when attempting to paste objects to the current layer, a dialog asks if you want to “Replace current selection? No/Replace.” If you press Return or click Replace, the selected objects are replaced by the objects in the Clipboard. The existing cabling remains intact.
Open a second Environment window that displays the target layer.
Select the objects you want to copy in the first Environment window, press Option, and drag them from one window to the other.
Adjusting the Position of Objects
Objects can be freely placed, which is flexible, but can lead to overlaps or misalignments—particularly when pasting between layers. Fortunately, you can quickly clean up object positions.
Choose View > Snap Positions to align the objects to an invisible grid.
It’s a good idea to leave Snap Positions turned on. You only need to turn it off if you want to manually move an object by a few pixels.
You can also use the following key commands to move all selected objects one pixel in the relevant direction, even when the grid is turned on:
Object move left
Object move right
Object move up
Object move down
Choose Options > Clean up > Align Objects (or use the corresponding key command).
The top-left object stays where it is. The position of the next object determines whether the objects are aligned in a column or a row. If it is to the right of the top-left object, all objects are aligned horizontally (row). If it is below the top-left object, all objects are aligned vertically (column).
Choose Options > Clean up > Positions by Grid.
Adjusting the Size of Objects
You can adjust the size of fader, keyboard, and monitor objects by grabbing and dragging the bottom-right corner (just as with windows).
Changing sizes when multiple objects are selected (by dragging to select or Shift-clicking) alters each object’s size, while preserving their sizes, relative to each other.
Choose Options > Clean up > Size by Default.
You can also use the following key commands to decrease or increase the width or height of all selected objects by 1 pixel:
Object Width −1 Pixel
Object Width +1 Pixel
Object Height −1 Pixel
Object Height +1 Pixel
Using Advanced Selection Commands
You can make moving and copying tasks faster and easier by using the selection commands outlined below.
- Selecting All Used Instruments: The Edit > Select Used Instruments function selects all objects that are assigned to the selected track in the Arrange window (or tracks that contain regions), or are connected to such objects via cables.
- Selecting All Unused Instruments: The Edit > Select Unused Instruments function selects all objects that are neither used in the Arrange window (as tracks which contain regions), nor connected to any such objects via cables.
- Selecting Cable Destination or Origin Objects: The Edit > Select Cable Destination command highlights the destination object of a selected cable connection. This is particularly useful in two cases:
The destination object is on a different layer. You can use the function to select and display the destination object (and layer).
When in the list display (View > By Text), you can locate the destination object of a source object, because selecting the source object also selects its cable connections.
This function allows you to follow the cabling from one (serially cabled) object to the next. If several objects are connected in parallel, or several cable connections are selected, the path of the top cable is followed.
The Edit > Select Cable Origin command essentially performs the reverse task, where the MIDI signal flow is back-tracked to the source (or origin) object. This is particularly useful for troubleshooting, or when you want to make changes to a number of serially cabled objects (by changing the original).
- Toggling Your Selection: Just as in the Arrange window and editors, you can change the status of any selected objects in the current layer by choosing Edit > Toggle Selection.