Working with OMF Files
The OMF (Open Media Framework, also known as OMFI—Open Media Framework Interchange) file format is typically used to exchange data with Digidesign Pro Tools software. The OMF format only supports the exchange of audio data (audio media and the use of this audio media in a project)—MIDI and automation data is ignored when using the export functions.
Exporting OMF Files
To export the current project as an OMF file, choose File > Export > Project as OMF File (or use the Export Project as OMF File key command).
Choose the required options in the dialog that opens:
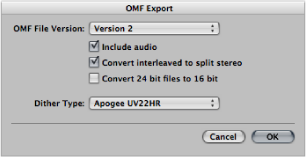
- OMF File Version: You can choose to export the file in OMF Version 1 or Version 2 format. You will usually choose Version 2. Version 1 is only useful for backward compatibility with older software versions.
- Include audio: Turn this on to integrate all exported audio files into the OMF file itself. This can result in a very large file, and can make file export times lengthy. Deselect this checkbox to only write file references to the OMF file.
Note: If the latter option is chosen and you want to copy the OMF file to another hard disk, you need to ensure that all referenced audio files are also copied.
- Convert interleaved to split stereo: As some applications don’t support interleaved stereo files, Logic Pro can convert interleaved stereo files to split stereo (when exporting an OMF file for a Pro Tools session, for example). Select this checkbox if this is the desired behavior.
Note: This only works if the “Include audio” option is turned on.
- Convert 24 bit files to 16 bit: Select this option to convert all 24-bit files to 16 bit, using the chosen dithering type. This might be necessary when using older versions of Pro Tools.
- Dither Type: Choose None or any of the four dither algorithms (see Bouncing and Dithering).
Importing and Opening OMF Files
The following procedure is identical for both importing and opening OMF files. Importing a file copies the OMF data into the current project, whereas opening an OMF file creates a new project.
Do one of the following:
Choose File > Import (or use the corresponding key command, default assignment: Command-I).
Choose File > Open (or use the corresponding key command, default assignment: Command-O).
Locate the OMF file in the Browser, then click the Open button.
Choose an OMF file from the dialog.
Tip: If you choose the OMF files option in the File Type pop-up menu, only files with the “.TL” extension are shown.
After choosing and confirming the file import, another dialog allows you to define the target location for audio data extracted from the OMF file.
Choose an existing folder (this defaults to the open project folder), or create a new one.
The OMF file is imported into the currently open project. New audio tracks are generated for every track contained in the OMF file, and the audio parts are placed appropriately on these tracks (as regions).