Display Parameters
This section outlines all of the display parameters available in the Score Editor. To reiterate the point, these only affect the appearance of events in the score, not the playback of events.
Quantize
This parameter applies visual quantization to notes: it determines the shortest note value that can be displayed in the currently selected MIDI region. (The exception is artificial N-tuplets; see Creating and Editing N-Tuplets in the Score Editor.)
For example, if you insert a short note, such as a 32nd note, it can only be displayed at its original length if Quantize is set to 32 or shorter. If Quantize is set to 8, the 32nd note is displayed as an eighth note (although it will still be played back as a 32nd note).
You choose the Quantize value from a pop-up menu, which contains all available display quantization options.
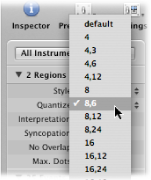
Among the options are binary quantizations (displayed as one binary value—16 or 128), and hybrid quantizations (two values combined, a binary and a ternary value—16,24 or 32,96, for example).
Binary values always correspond to the note value with the same denominator; for example, 32 corresponds to thirty-second notes, and so on. Ternary values refer to triplets. Here is a list of the ternary values, and their corresponding triplet values:
Quantize setting | Corresponding note length |
|---|---|
3 | 1/2-note triplets |
6 | 1/4-note triplets |
12 | 1/8-note triplets |
24 | 1/16-note triplets |
48 | 1/32-note triplets |
96 | 1/64-note triplets |
192 | 1/128-note triplets |
384 | 1/256-note triplets |
When binary display quantizations are used, automatic triplets are not displayed at all (except for triplets inserted with the mouse, using an N-tuplet object).
Important: A hybrid quantization value must be assigned to the Quantize parameter, to enable the automatic display of triplets.
Quantize Default Setting
The Quantize parameter’s Default option can only be set with the Insert Defaults. (See Default Settings for New MIDI Regions.) It cannot be set to its Default value in existing regions. If Default is chosen, the Quantize setting of any new MIDI region is dependent on the current division value in the Transport bar. In this situation, the Quantize value is always a hybrid value. In the case of a binary division value, the Quantize value is the division value currently set in the Transport bar plus the next highest ternary value. In the case of a ternary division value, it is the division value currently set in the Transport bar plus the binary value, which is divisible by that particular ternary value.
For example, a global division value of 1/8 results in an 8,12 Quantize setting for new regions, a global division value of 1/12 becomes a 4,12 Quantize value, a global division value of 1/16 results in a Quantize value of 16,24, 1/24 in 8,24, and so on.
Note: If a particular Quantize value has already been set in the Insert Defaults, all new regions are assigned this value, regardless of the division value in the Transport bar. You may, of course, change any of these values at any time.
Choosing a Quantize Value for Swing Notation
For regular swing notation, 8,12 should be used as the Quantize parameter. This enables the display of eighth-note triplets, and also displays two uneven notes on one beat (dotted eighth and sixteenth), as regular eighth notes.
For double-time passages containing sixteenth notes, you need to either:
Cut the MIDI region in the Arrange area, and assign a higher quantize value to the new MIDI region (that contains the double-time figure).
Use hidden artificial N-tuplets for the sixteenth notes. (See Creating and Editing N-Tuplets in the Score Editor.)
For swinging sixteenth notes (shuffle funk, hip hop, and so on), the same principle applies. In this case, Quantize would be set to 16,24.
Fixing the Score Quantize Value
The Functions > Quantization > Fix Displayed Note Positions and Fix Displayed Note Positions and Durations commands can be used to fix the display quantization of all MIDI events in the project. These commands may be useful for exporting projects (complete with display Quantize settings) to other notation programs that don’t feature display quantization.
Interpretation
If Interpretation is enabled, notes are generally displayed with longer length values than their actual length, in order to avoid short rests. Short notes on a downbeat in 4/4 time, for example, are displayed as quarter notes. The score becomes less precise as a result, but is easier to read.
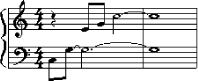
If Interpretation is disabled, note lengths are displayed as closely as possible to their real values, as determined by the Quantize value. In the following example, the same MIDI region is shown twice, the first with Interpretation disabled, the second enabled:


The Interpretation function is intended to produce an easy-to-read score display of real-time recordings. You should usually turn it off when using step or mouse input.
You can use note attributes to turn Interpretation on and off for each individual note, overriding the Display Parameter box setting. (See Using Note Attributes to Change Individual Notes.)
Choose Attributes > Interpretation, then choose the appropriate setting.
Double-click the note, then choose the appropriate setting in the Note Attributes window.
Use one of the following key commands:
Default Interpretation
Force Interpretation
Defeat Interpretation
Syncopation
If Syncopation is enabled, each (MIDI) note is notated as one graphic note (not displayed as several tied notes), regardless of position—if possible. (This also depends on the Max. Dots setting—see Max Dots.) If this isn’t possible, the note is graphically divided into the minimum possible number of notes, connected by ties.
This function is usually used for the display of syncopated notes. The following example shows the same two bars displayed differently, the first with Syncopation disabled, then enabled:


Syncopation can also be enabled and disabled for each note, independent of the Display Parameter box setting. This can be done via note attributes. (See Using Note Attributes to Change Individual Notes.)
If an unwanted display of ties and notes results from the Syncopation function, it is possible to change the graphic display of notes connected with ties.
Insert a user rest from the Part box (preferably a short one, but the length isn’t important) at the bar position where you want the tie subdivided.
Once the rest is inserted, it disappears, but the note display changes. The inserted rest can only be seen and edited in the Event List.
This trick works for all notes, not just syncopated ones. (See Creating and Editing Tied Notes in the Score Editor.) In polyphonic staff styles, the MIDI channel of the rest and the corresponding note must be identical.
No Overlap
No Overlap, when turned on, prevents the overlapped display of notes in melodies that are played with an exaggerated legato. The displayed length of notes is truncated (shortened) to the beginning of the next note (unless a polyphonic staff style is used—see Working with Staff Styles for details). Notes beginning simultaneously (chords, in other words) are displayed with the (note) length of the shortest note in the chord.
When set to off, the score display shows the lengths of the notes fairly precisely. The music is definitely harder to read this way, however.
The effect can be seen in the following example, which shows the same MIDI region, first without, then with, overlap correction:
No Overlap should only be deactivated in rare cases. If, for example, a piano player arpeggiates a chord and holds the notes, the score displays the following result with No Overlap on:
Although you can’t see that all notes continue to sound here, the result looks like this if No Overlap is deactivated:

The solution typically involves turning No Overlap on and using sustain pedal markings. Logic Pro automatically displays pedal markings if notes are recorded in real time with a MIDI keyboard and sustain pedal.
Max Dots
This parameter determines the maximum number of dots that Logic Pro allows for the display of single notes. Unwanted dotted notes or rests can be changed by inserting user rests (which remain invisible, if notes). See Creating and Editing Tied Notes in the Score Editor for information on changing the way notes with ties are displayed).
Score
This parameter is accessed via the Inspector’s Region Parameter box. If Score is turned off here, the MIDI region is not displayed in the score at all. This is mainly used to prevent the score display of particular regions—namely those that only contain MIDI events which can’t be displayed in the score, such as controller or SysEx data.