Setting an Automation Mode
Automation modes determine how automation tracks are handled. Essentially, automation is either off, being read, or being written. You can independently choose the automation mode for every channel strip.
Choose a mode in the track header’s Automation Mode menu.
Choose a mode in the Automation Mode menu on a channel strip in the Mixer or Arrange channel strip.
Press Option, and choose an automation mode in the Automation Mode menu in the Mixer or Arrange channel strip.
Choose channel strips by Shift-clicking their names in the Mixer.
Choose an automation mode in the Automation Mode menu of one of the selected channel strips.
Setting the Automation Mode via Key Commands
You can also set the automation mode with the following key commands:
Toggle Current Track Automation Off/Read
Set Current Track to Automation Read
Toggle Current Track Automation Touch/Read
Toggle Current Track Automation Latch/Read
Toggle Current Track Automation Write/Read
Set All Tracks to Automation Off (default assignment: Shift-Control-Command-O)
Set All Tracks to Automation Read (default assignment: Shift-Control-Command-R)
Set All Tracks to Automation Touch (default assignment: Shift-Control-Command-T)
Set All Tracks to Automation Latch (default assignment: Shift-Control-Command-L)
Set All Tracks to Automation Write
Choosing Automation Modes
You can choose from the following automation modes in any channel strip:
Off
Off disables the current track automation data without deleting it. No automation data is written, read, or played back. If the current automation mode is Off, any edits to track automation data in the Arrange area automatically switch the automation mode to Read. This ensures that the data, as currently edited, will be played.
Given that track automation can be recorded during playback mode, Off is the default setting, as any mix automation recording may prove disconcerting while arranging.
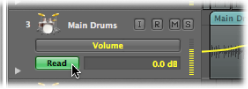
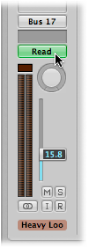
Read
Read mode automates the current track, using the existing automation data.
The data cannot be changed by moving the channel strip controls, or using an external automation controller, when in Read mode.
Touch
Touch mode plays back automation data in the same fashion as Read mode.
If a channel strip or an external (touch-sensitive) automation controller is touched, the existing track automation data of the active parameter is replaced by any controller movements—for as long as the fader or knob is touched. When you release the controller, the automation parameter returns to its original (recorded) value. The time required by a parameter to return to its previously recorded setting is set via Logic Pro > Preferences > Automation > Ramp Time.
Touch is the most useful mode for creating a mix, and is directly comparable to “riding the faders” on a hardware mixing console. It allows you to correct and improve the mix at any time, when automation is active.
Latch
Latch mode basically works like Touch mode, but the current value replaces any existing automation data after releasing the fader or knob, when Logic Pro is in playback (or record) mode.
To finish, or to end parameter editing, stop playback (or recording).
Write
In Write mode, existing track automation data is erased as the playhead passes it.
If you move any of the Mixer’s (or an external unit’s) controls, this movement is recorded; if you don’t, existing data is simply deleted as the playhead passes it.
Warning: Be careful with Write mode (and its settings), to make sure that you don’t erase your pan, bus, and plug-in automation data by mistake, if your intention was only to erase Volume fader information.
Open Automation preferences by doing one of the following:
Choose Logic Pro > Preferences > Automation (or use the Open Automation Preferences key command).
Click the Preferences button in the Arrange toolbar, then choose Automation from the pop-up menu.
Select checkboxes in the “Write Automation for” section.
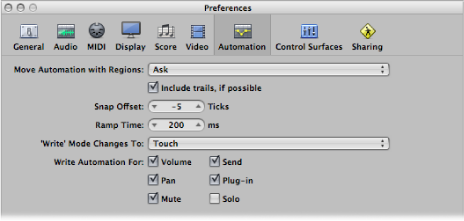
The Write Mode Changes To menu determines the mode that Logic Pro switches to after a Write operation has been executed.
You’ll rarely need the Write mode when working with the track automation features of Logic Pro. It’s mainly there to complete the selection of automation modes. It’s easier to erase automation data by choosing Track > Track Automation > Delete all Automation on Selected Track (or Delete All Automation, respectively).
In earlier analog mix automation systems, Write mode was the only way to erase automation data from tape when beginning a new project. The Track > Track Automation > Write to End and Write to Right Locator commands are self-explanatory. One writes track automation data to the end of the project, and the other to the right locator position.