Displaying Track Automation
Track automation data is displayed on a transparent gray shaded area—an automation track—that runs the length of your project. The audio waveforms of audio regions, and notes in MIDI regions, can be seen at a reduced contrast level in the shaded area.
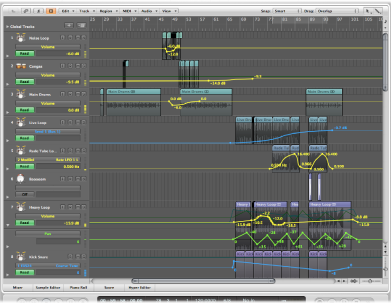
The automation data is represented by colored curves, dots (known as nodes) and lines that are shown in the gray area.
Numerical values are also automatically displayed at each node on automation tracks. Numerical values are context-sensitive, which means the centered pan position is displayed as 0 (not 64), and volume is displayed in dB, for example.
Choose View > Track Automation in the Arrange area (or use the Hide/Show Track Automation key command, default assignment: A).
Click the Automation button in the Arrange toolbar (if visible).
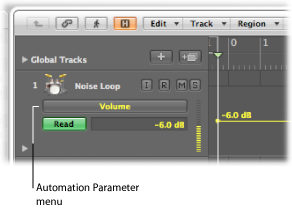
The gray automation area appears on all tracks, and the Automation Parameter menu is displayed in the track header. This allows you to choose the visible automation parameter. It is automatically set to Volume.
Automation can only be displayed when a track is of a sufficient height. Turning on track automation automatically sets a suitable vertical zoom level.
Drag the lower-left corner of a track header (in the track list) to resize it. Alternately, you can use the vertical zoom bars to resize all tracks, if automation is not visible.
This can happen if you have manually resized a track, or changed the zoom level after activating automation.
Displaying Different Automation Parameters
You can choose the parameter that you want to view and edit in the Automation Parameter menu. This appears below track names in the Arrange track list.
This can be the Volume fader, pan pot, or any other parameter of the track’s channel strip. The parameters are represented by the following preset colors when displayed as a curve in the automation track:
Yellow for Volume automation
Green for Pan automation
Yellow for Solo automation
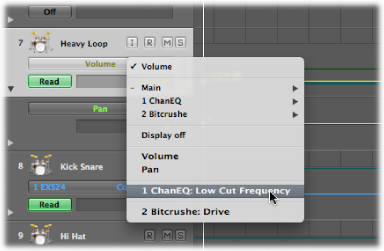
Only parameters that actually control something in the selected track’s channel strip (or its plug-ins) are displayed in the Automation Parameter menu. Parameters that already exist in the track (as automation data) are displayed in bold lettering in the menu.
Click the Automation Parameter menu, and choose a parameter.
A submenu is shown for each plug-in inserted in the channel strip. These are numbered and named after the slot position and plug-in (1 EXS24, for example). Further submenus may be shown inside the Plug-in menus. Volume, Pan, Solo, Mute, and Bypass are shown in the Main submenu.
Click the Automation Parameter menu, and choose Display Off.
Choose View > Track Automation in the Arrange area (or use the Hide/Show Track Automation key command, default assignment: A).
Click the Automation button in the Arrange toolbar (if visible).
Viewing the Automation Data of Multiple Parameters
The automation track shows all automation data (not only the currently active parameter) at a lower contrast level. Volume is a muted yellow, Pan is a muted shade of green, and so on.
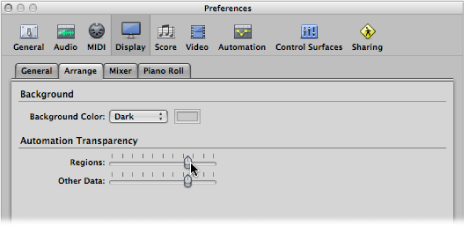
Open Display preferences by doing one of the following:
Choose Logic Pro > Preferences > Display (or use the Open Display Preferences key command).
Click the Preferences button in the Arrange toolbar, then choose Display from the pop-up menu.
Click the Arrange tab, then adjust the Regions and Other Data sliders in the Automation Transparency section.
You also have the option of viewing each automation parameter on its own subtrack, making it easier to see what is being controlled.
Click the disclosure triangle to the lower left of a track name.
This opens a separate automation sub-lane, below the track.

Logic Pro automatically sets the automation parameter type of the new automation lane to a type that’s already recorded, but not currently shown. The active automation parameter remains on the top track. Repeated clicks on the disclosure triangle open further automation subtracks.
Option-click the (closed) triangle to open up to 30 automation subtracks, which will display existing (already recorded) automation data.
Only as many automation subtracks as required will open, so if you have recorded automation data for ten parameters, nine subtracks will open. The active automation parameter remains on the top track.
Option-click the open triangle to collapse all automation subtracks. The automation data remains active, and will play if the automation mode of the main track is not set to Off or Write—even if the track is not visible.