Working with Flex Markers
Flex markers allow you to alter the timing of audio material. You can create them manually (as discussed in this section) or they can be created automatically during the audio quantization process (see Quantizing Audio or MIDI Regions).
You can create single or multiple flex markers in an audio file, which allows you to manipulate whole or partial areas of the material. The following sections describe the various ways to create, move, and delete flex markers.
Tip: You may find it useful to use the Zoom function in Logic Pro when creating, editing, and deleting flex markers.
Creating Flex Markers
You can create flex markers within the body of an audio region, either between or directly on top of existing transient markers.
Note: Make sure that Flex view is turned on and a flex mode is set for the track. For details, see Turning on Flex View and Choosing Flex Modes.
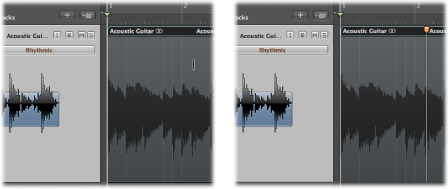
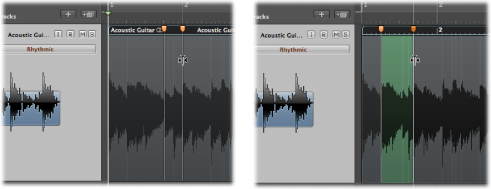
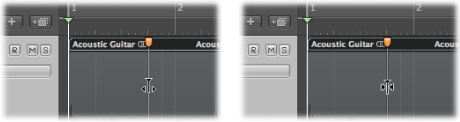
Click the area in the upper half of the waveform body.
If you click in the area on or beside an existing transient marker (note the change of mouse pointer), the flex marker is created directly on top of the transient marker.
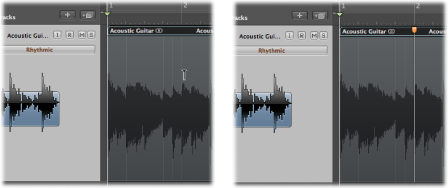
If you click in the area where a transient marker does not exist (note the change of mouse pointer), the flex marker is created at the clicked position.
Note: You can drag a flex marker—and thereby edit the timing of the material—immediately after you create it. This action alters the timing of the audio material between that flex marker and the preceding and following flex markers, or the region start and end positions if there are no preceding and following flex markers.
You can also create multiple flex markers in an audio region.
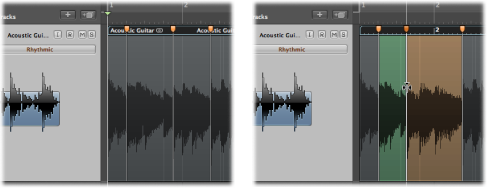
Click the area in the lower half of the waveform body.
Three flex markers are created, according to where you click:
If you click in the area on or beside a transient marker (note the change of mouse pointer), three flex markers are created in these positions:
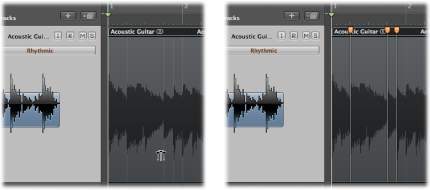
On the transient marker
On the previous transient marker
On the following transient marker
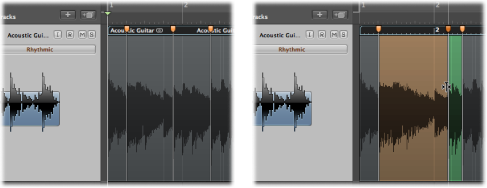
If you click in the area where a transient marker does not exist (note the change of mouse pointer), three flex markers are created in these positions:
At the clicked position
On the previous transient marker
On the following transient marker
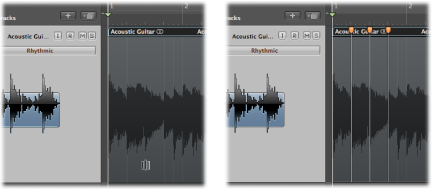
Drag a selection in the region with the Marquee tool, then click it with the Pointer tool.
If you click in the upper half of the selection area, four flex markers are created in these positions:

Two at the marquee borders
Two outside the marquee selection at the previous and next transient positions
If you click in the lower half of the selection area, three flex markers are created in these positions:
One at the clicked position
Two at the marquee borders
Moving Flex Markers and Time Stretching
When you move flex markers, the audio material will be time-stretched, but the results depend on which flex marker you move and where you move it.
Consider the following two examples:
- When you move a flex marker to the left: The audio material is time-compressed up to the preceding flex marker, the preceding tempo marker, or the region start position. The audio material is time-expanded up to the following flex marker or the following tempo marker (which can also be the region end position).
- When you move a flex marker to the right: The audio material is time-expanded up to the preceding flex marker, the preceding tempo marker, or the region start position. The audio material is time-compressed up to the following flex marker or the following tempo marker (which can also be the region end position).
Note: You can reset a flex marker by Control-clicking (or right-clicking) the flex marker, then choosing Set To Neutral Position from the shortcut menu.
If you move a flex marker to the left and the flex marker crosses the previous flex marker, the previous flex marker jumps back to the previous transient marker. This allows you to extend the Flex Time editing range to the left. The same behavior occurs if a flex marker crosses a tempo marker.
If you move a flex marker to the right and the flex marker crosses the following flex marker, the following flex marker jumps forward to the next transient marker. This allows you to extend the Flex Time editing range to the right. The same behavior occurs if a flex marker crosses a tempo marker.
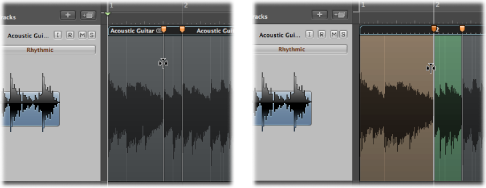
When you move a flex marker, time stretching is highlighted with green, orange, or red. If you click a flex marker, the area of the waveform that will be affected by time stretching is highlighted with the relevant color. These colors are also used to represent areas where the timing has been edited, as follows:
- Green: Time compression is shown in increasing shades of green, the more the audio region section is compressed.
- Orange: Time expansion is shown in increasing shades of orange, the more the audio region section is expanded.
Note: Time compression or expansion may lead to reduced sound quality. However, if Slicing mode is selected, the audio itself is never time-compressed or expanded, so the sound quality is retained.
- Red: High-speed sections, where time compression equals or exceeds factor 8—time-stretching factor 0.125—turn from green to red and come with a warning.
Moving Flex Markers Without Time Stretching
You can change a flex marker’s position in an audio region without changing the timing of the audio material before or after the flex marker.
Hold down the Option key while you drag the flex marker.
When you drag a flex marker, you can press the Option key to turn time stretching off, or release the Option key to turn time stretching on.
Deleting Flex Markers
When you delete a flex marker, any time alteration that took place in the area around it is either removed—with the audio material reset to its original position—or reset according to the time-stretching offset of the previous or following flex marker.
There are a number of methods you can use when deleting one or more flex markers, including quantize markers.
Double-click the flex marker.
Drag across the flex marker with the Eraser tool.
Important: Make sure to use the Eraser tool in the body of the waveform only. Clicking the region header with the Eraser deletes the entire region.
Control-click (or right-click) the flex marker, then choose Delete Flex Marker from the shortcut menu.
Drag across multiple flex markers with the Eraser tool.
Important: Make sure to use the Eraser tool in the body of the waveform only. Clicking the region header with the Eraser deletes the entire region.
Control-click (or right-click) the region background, then choose Delete All Flex Markers from the shortcut menu.
It is also possible to delete only those flex markers that were created manually, leaving quantize markers intact.
Control-click (or right-click) the region background, then choose Delete Manually Created Flex Markers from the shortcut menu.