Audio Punch Recording
Punch recording is a technique that allows you to overwrite a portion of a previously recorded track, during playback, without touching any of the recording before or after that portion. You punch in to interrupt playback and make the recording, then punch out to return to playback mode.
Logic Pro offers two methods of punch recording:
- Punch on the fly: Involves the use of a key command to start recording while in playback mode.
- Autopunch: Involves the use of predefined punch-in and punch-out points to start and stop recording.
Note: Only record-enabled tracks are affected by punch recording.
Audio Punch Recording on the Fly
A useful and common recording practice is to switch in and out of recording while listening to the previously recorded material, sometimes referred to as "punching in on the fly." This facilitates repairing mistakes or creating alternate takes for a particular section. To ensure transition between playing and recording occurs without any audible gaps, you must enable "Punch on the Fly" mode.
It is useful to understand that when Punch on the Fly mode is turned on, recording occurs in the background from the moment you start playback. This requires there be twice the number of available channel strips than the number enabled for recording. There's no need to keep track of this number yourself. Logic Pro will display a dialog if you exceed the number of channel strips needed.
Tip: It is recommended that you leave Punch on the Fly mode turned on. It is only necessary to turn it off if you are recording more than the number of channel strips available (in a new project that's more than 128 tracks), or if your hard disk is unable to accommodate recording a large number of tracks.
Turn on Punch on the Fly mode by doing one of the following:
Control-click (or right-click) the Record button in the Transport bar, and choose Punch on the Fly from the pop-up menu.
Choose Options > Audio > Punch on the Fly in the main menu bar (or use the Toggle Punch on the Fly key command).
Click the Play button in the Transport bar, then use the Record Toggle key command (default assignment: Shift-*) at the point where you want to start recording.
Audio recording starts immediately.
Click the Stop button in the Transport bar, or use the Record Toggle key command a second time to stop recording.
If you use the latter option, recording ends, but playback continues.
Note: You can also use the Record Toggle key command when Logic Pro is not in Punch on the Fly mode. However, this will cause a delay when you switch between playback and record modes, accompanied by a dropout of all audio tracks.
Preprogrammed Audio Punch Recording
Autopunch describes the automatic activation and deactivation of recording at predefined positions. The advantage of the Autopunch feature is that you can concentrate on your playing, rather than on controlling Logic Pro. Another advantage is that starting and stopping recordings can be set far more precisely than would be possible if punching on the fly.
The Autopunch feature can be used for audio, software instrument, or MIDI tracks.
Turn on the Autopunch button in the Transport bar.
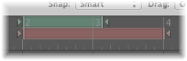
The left and right autopunch locators serve as punch-in and punch-out points. The autopunch recording area is indicated by a red stripe in the middle third of the Bar ruler.
If both Cycle and Autopunch modes are active, you see a pair of locators in the autopunch area. Two stripes are shown in the Bar ruler: the top (green) one represents the cycle area, and the bottom (red) one represents the autopunch area. These can be adjusted independently.
Set the autopunch area by doing one of the following:
Use the autopunch locator fields in the Transport bar to set the autopunch area numerically. Note that the Sample Rate or Punch Locators setting in the Customize Transport Bar dialog must be active before you can see and set the autopunch locators (to the right of the standard locators).

Alter the Autopunch range graphically in the Bar ruler, just as you would with the cycle area.
Place the playhead at any position before the punch-in point.
Click the Record button in the Transport bar (or use the corresponding key command, default assignment: *).
Stop recording by clicking the Stop button in the Transport bar (or press the Space bar).
A region that exactly matches the length of the autopunch stripe will be created. Any audio input received before the punch-in or after the punch-out points streams through Logic Pro as usual, but is not recorded.
Logic Pro will begin recording approximately one bar before the punch-in locator. This allows the start point of the region to be adjusted later, enabling you to hear the lead-in, if desired.
You can also recover the beginning of the recording if the performer slightly anticipates the autopunch area. Any such adjustments to the lead-in portion of the region do not change the position of the recording, relative to the time axis of the project.
Recording automatically begins at the punch-in locator, following the count-in, even if the playhead is positioned after the right locator when recording starts.
If Autopunch is enabled during recording, the Record button will flash while the playhead is outside the area encompassed by the punch-in and punch-out locators. This indicates that no recording is currently taking place.
Combining Cycle and Autopunch Recording
If you want to improve a difficult part of a certain passage, you can use a combination of the Cycle and Autopunch functions. Cycle mode recording allows you to practice as many times as you like before performing the final take. On each cycle pass, only events or audio that falls within the area defined by the autopunch locators is recorded. This allows you to make use of the preceding song section to “get into the groove.”